
In my first post, I talked about a utopic vision of utilizing MongoDB Atlas for an entire stack. Let's start to turn that vision into a reality. I want my data to live in MongoDB, I want my API to be in Realm, and I want to deploy my Vue frontend using Atlas. If none of this makes any sense to you, I recommend clicking the link to my first post.
I really like the idea of visualizing data on a map. While I made a tutorial about doing this in Python, I love creating things for the web. Everyone is always app this, app that. This is kinda dumb IMHO. Please just build it for the web. Billions of people have access to an internet browser. While we are talking about the web right now, we will focus on building the frontend later, first, we gotta focus on our data.
Once we get our data in line, I believe we will be able to code and deploy the frontend in thirty minutes. Just to step back real quick, our goal is to not only to make a great visualization, but also call our MongoDB Collection. Seems pretty simple, but the second you have your site call a database it can go from some fun project to teeth grinding code writing; where you forgot why you were even doing this in the first place. I think keeping the fire alive is what can take a project from some weeknight thing to a passion project you continue to iterate on.
If you are interested in seeing me upload crime data to a MongoDB collection, I am happy to walk through that - just let me know. However, for this project, we will be using the sample data that comes with MongoDB. If you have done a MongoDB tutorial you will be beyond familiar with these sample collections.
The sample Database we are going to use is called sample_geospatial, I will allow y'all to deduce the purpose behind this collection. Beyond the purpose, the specific collection is related to over 11,000 shipwrecks. Real quickly, a MongoDB instance is made up of Databases that contain collections. Unlike SQL, it is document-based rather than relation-based. The document style is really suitable for information related to web applications. You can load everything you need for a page without joining tables. You just have to architect it right.
If you haven't yet, go ahead and create a MongoDB account. Besides AWS, the MongoDB free tier is as generous as they come. After creating a project and a database, click [...] - Load Sample Data:

If you now click Browse Collections you will find our geospatial database + the single shipwrecks collection. If we click through to this and see the list of documents, we can get an understanding of the general shape of the document.
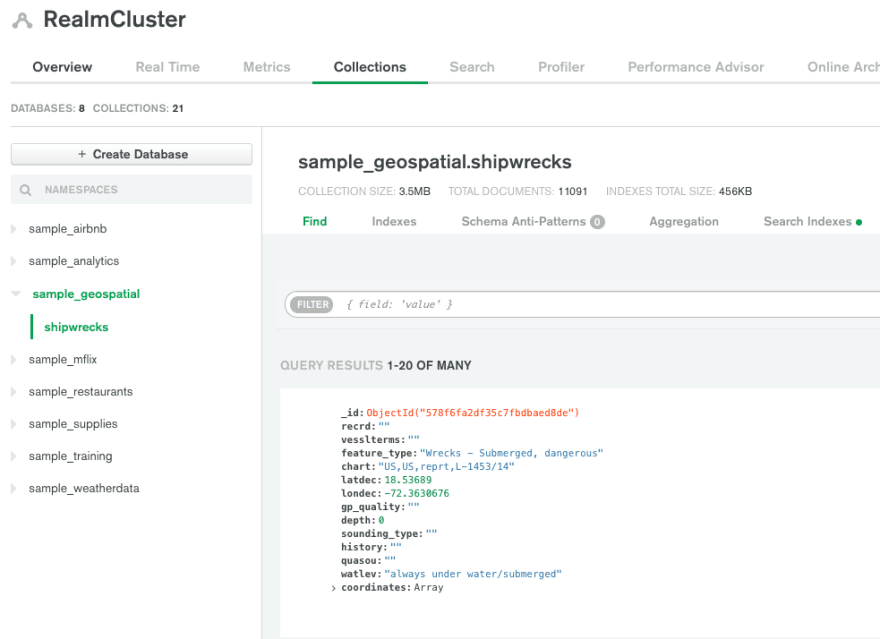
My hunch is we will mainly be focused on longitude and latitude. I recommend clicking through a few pages of documents and get a mental model of what you are seeing. Now that we have looked at our data, let's go ahead and click the Realm Tab at the top of the page. If you haven't created a Realm project before you will see the following dialogue. Name the app whatever your heart desires and navigate to the schema tab.

After clicking this tab, it prompts us to add a Data Source. make sure to chose your cluster, probably named Cluser0. Now name your Realm project, I am going with data-viz. I am going to leave MongoDB Connection string off for now. Finally chose primary for the Read Preference and click Save Draft.
With Realm, deploying changes is a two-step process. We just drafted our changes - which at the end of the day are just a few line changes in a few config.json files - now we need to deploy them. You will see a blue banner with a button about review and deploying. Click through
Before we can create a schema based on our data we have to give Realm permission to our shipwrecks collection. Click "+ Add Collection" on the Rules page it just directed you too. Make sure to select the geospatial database and proper collection. If you don't see any Databases or collections, your cluster might be performing maintenance. If you go back to the Atlas tab, you can see if your cluster is ready or not.
Once the collection shows up click Shipwrecks. Ignore the sections about permissions and templates and click Add Collection in the bottom right.
Now if we go back to the schema page we can generate the GraphQL schema. You'll see a green "Generate Schema" button on the right side of the page. Click it.

Make sure to chose just the shipwrecks collection in the first select. Next, you chose how many documents to sample. With GraphQL, the schema validation matters in totality. It feels like an iron first that forces you to get your data structure down. 500 is fine for this. I've found major diminishing marginal returns after like 750.
Make sure to click save and deploy. Without saving and deploying, your validation wont work. When we navigate to the validate tab, and click run, it will fail and return a list of document IDs that failed. This is because Mongo, for whatever reason, made the depth field irregular. The vast majority of fields are double, but there are some NumberInt() and even strings 😣. This means that we will never be able to return all the shipwreck documents using GraphQL.
Lastly we might need to edit our Schema to reflect our goal of having all depth be a number. Change
"depth": {
      "bsonType": "string"
    },
to
"depth": {
      "bsonType": "number"
    },
We are off to a great start, it might feel like we've done nothing - but understanding what the heck is going on will have you feeling more confident when we really get down to coding.

Check back in part 3 of this Realm Tutorial Series to figure out how we use the Mongo Shell to fix the data issues.
Nicholas Oxford

Top comments (0)