
Interested in learning AWS & Lambda from the ground up using Ruby? This workshop leverages Docker & AWS SAM Cookiecutter templates to provide a fast-paced curriculum with little configuration fuss. Expect to learn the following while making a Lambda that responds to S3 events to resize source images.
- Introductory concepts of AWS Lambda.
- Using AWS SAM CLI to locally develop & deploy Lambda.
- Practicing Infrastructure as Code (IaC) via CloudFormation.
Workshop Steps
Want to move fast and read later? Within each section, find the code boxes with leading ⚡️⏩⚡️symbols, type or apply them and breeze thru the workshop. However, please do take time to followup and read the notes later. Here are the steps for today's workshop.
- New Project with SAM Init
- Setup & Deploy
- Connecting Lambda to S3
- Image Processing & Lambda Layers
- Resizer Code & Permissions
- Next Steps & Resources
Preparation
🚢 Install Docker
AWS SAM uses Docker to simulate the Ruby Lambda Runtime environment. We also use Docker to avoid installing both the AWS CLI & SAM CLI. Both can be problematic to install since each use Python. No worries, Docker can help solve that too. If you do not already, install Docker now. Is it working?
$ docker --version
Docker version 19.03.8, build afacb8b
⛅️ AWS Account
We are after all, in the cloud, from this point on - so you are going to need an AWS Account. Creating one is pretty straightforward. Afterward you will need to configure programatic access using your account's AWS_ACCESS_KEY_ID and AWS_SECRET_ACCESS_KEY. If you do not have these already, you can create them by doing the following within the AWS Management Console.
- Click on "Services" in the toolbar.
- Enter "IAM" into the find services field, select.
- Click on "Users" from the left hand navigation, select your username.
- Click the "Security credentials" tab.
- Click the "Create access key" button.
- Copy your key id and secret to a secure place.
From here you need to configure CLI programatic access. This is easy to do with the AWS CLI Docker container.
$ docker run \
  --interactive \
  --tty \
  --rm \
  --volume "${HOME}/.aws:/root/.aws" \
  "amazon/aws-cli" \
  configure
When prompted, paste in your key id and secret key from the steps above. I recommend using us-east-1 as the default region and json as the output format. To make all aws CLI commands easier, I recommend using the following alias.
alias aws='docker run --rm -it --tty -v "${HOME}/.aws:/root/.aws" -v "${PWD}:/aws" "amazon/aws-cli"'
Alternatively, you can install AWS CLI & SAM via Homebrew.
$ brew install awscli
$ brew tap aws/tap
$ brew install aws-sam-cli
Assuming you have run configure and set the alias. Is it working? This command should list any S3 buckets in your AWS account.
$ aws s3 ls
🚀 CI/CD
This part is optional. But if you have git installed and are using GitHub, committing our work along the way is both fun and makes code exploration safe. If you have neither, that is fine and you can safely skip these steps.
But if you do have a GitHub account, our starter project includes a GitHub Action Workflow to help you practice Continuous Integration & Continuous Delivery (CI/CD) in a fully automated way. More on that later.
Step 1: New Project with SAM Init
Most developers are familiar with the Serverless framework since it was first on the scene. Think of it as the ActiveRecord adapter for every cloud provider's "serverless" offering. It is a higher order abstraction that is powered by community plugins.
To ease the development cycle for their own Lambda offering, AWS developed a tool called 🐿 SAM which is short for the Serverless Application Model. SAM encompasses both the name of the YAML syntax to express your function & the command line tooling to run, build, and deploy it.
❓Why use SAM vs. Serverless? Both tools are open source. However, I recommend SAM if you are new to serverless and using AWS. Learning too many layers of abstraction can be frustrating. So stick with SAM and learn it before move higher up, if ever needed at all.
SAM Init
To start a new SAM project, we are going to use a Docker container to run sam init which leverages this Custom Ink Cookiecutter Project Template to kickstart a new project folder for you.
⚡️⏩⚡️
$ docker run \
  --interactive \
  --volume "${PWD}:/var/task:delegated" \
  lambci/lambda:build-ruby2.7 \
  sam init --location "gh:customink/cookiecutter-ruby"
It will prompt you for a project name and ask if your Lambda needs an HTTP API. Use "image_service" for this name. Also we do NOT want HTTP events for this Lambda, so enter "2" for the second question.
- project_name [my_awesome_lambda]: image_service
- Select http_api 1 - yes 2 - no: 2️⃣
Now change to your newly created project directory. All other commands assume you are in this working directory.
⚡️⏩⚡️
$ cd image_service
🚀 CI/CD
Assuming you are using git and have created a GitHub repo while working on this project, create your first commit and push. Remember, make a new repo in GitHub first.
⚡️⏩⚡️
$ git init && git add .
$ git commit -m "Initial commit"
$ git remote add origin git@github.com:YOURUSERNAME/image_service.git
$ git push -u origin master
❗️Replace YOURUSERNAME with your own GitHub username.
What Happened?
Your new SAM project folder has everything you need for your new Ruby Lambda. Take some time to explore its contents. Specifically the SAM template.yaml file which describes your Lambda function. That file designates a single handler method within lib/image_service.rb that receives events. From a higher level, here is what has been generated in your new project.
- Docker setup using both a
Dockerfileanddocker-compose. - A working Ruby project with a lib directory, bundler, and tests.
- SAM fully integrated into all setup and test scripts.
All of which you will have a chance to become familiar with throughout the workshop.
Step 2: Setup & Deploy
In its current state, the only thing your Lambda does is log whichever event triggers it. Rather than wait for a big release, this is a great time for your first deploy to get familiar with the process. First, we need to setup your project's dependencies and run the tests. These commands are somewhat standard scripts to perform a one-time bootstrap or repeatable setups. For example, if you change dependencies in your Gemfile.
⚡️⏩⚡️
$ ./bin/bootstrap
$ ./bin/setup
$ ./bin/test
If your tests ran fine, you should see output similar to this.
# Running:
.
Finished in 0.000992s, 1008.4712 runs/s, 1008.4712 assertions/s.
1 runs, 1 assertions, 0 failures, 0 errors, 0 skips
Your First Deploy
⚡️⏩⚡️
$ STAGE_ENV=production ./bin/deploy
This will use AWS SAM's build, package and deploy CLI commands. Assuming everything went smoothly, you should see output for SAM's CloudFormation deployment tasks ending with something like this. Take some time to examine the full output too.
CloudFormation outputs from deployed stack
---------------------------------------------------------------------------------------------
Outputs
---------------------------------------------------------------------------------------------
Key                 ImageServiceLambdaArn
Description         Lambda Function Arn
Value               arn:aws:lambda:us-east-1:012345678912:function:image-service-production
---------------------------------------------------------------------------------------------

Successfully created/updated stack - image-service-production in us-east-1
💥Were there problems? Did you make sure to run the bin/bootstrap script? It should have made an S3 bucket to store your packaged artifacts. Check that there is a .bucket-name file and that bucket exists in your AWS account.
Invoking Your Lambda
Even without any event handlers, we can still invoke and test that your Lambda is deployed successfully. Log into the AWS Management Console:
- Click on "Services" in the toolbar.
- Enter "CloudFormation" into the find services field, select.
From this page you will see your newly deployed image service Lambda listed as a "stack". A stack is a collection of AWS Resources for a project.

Click into your stack and click on the "Resources Tab". Your Lambda project only has two resources, the Lambda itself and the IAM Role which it executes under.
- Click the "image-service-productions" Lambda resource under the "Physical ID" column. This will take you to your Lambda within the AWS Console.
- Click on the "Test" button the in the upper right.
- Use the "Hello World" event template.
- Give it a name of "HelloWorld".
- Click the "Create" button.
- Now click the "Test" button to invoke your Lambda
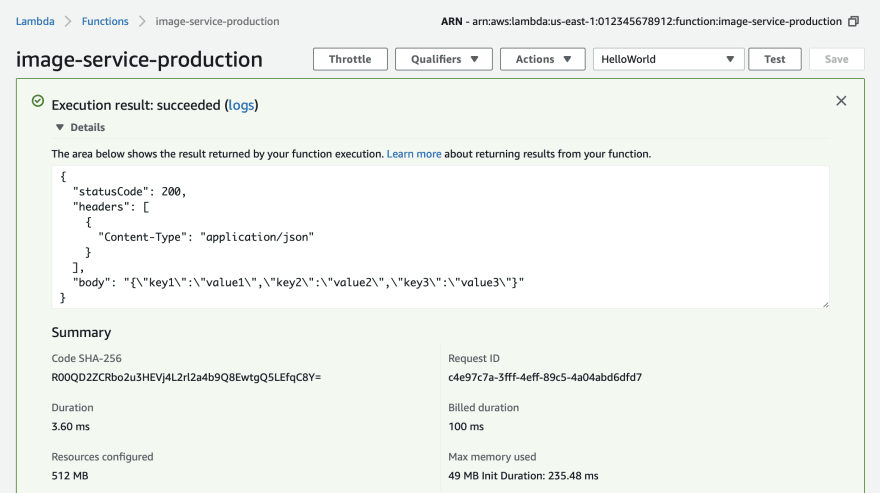
🎉 Congratulations!
Your new Lambda is working. From the test invoke we just performed, you can see the return value, a Ruby hash containing a status code, an array of headers, and a response body. In this case, the Lambda simply returns the same event the it received as a JSON string. This is the handler method in your project.
def handler(event:, context:)
  puts event
  { statusCode: 200,
    headers: [{'Content-Type' => 'application/json'}],
    body: JSON.dump(event) }
end
CloudWatch Logs
So what about that puts call in our Ruby handler? Where is standard out written too? How about logging to files? Other than a limited amount of /tmp space, you can not write to the filesystem in Lambda. All standard out (logging) is capture by CloudWatch and written to log groups for you. The service is 100% managed. To view the log of our test invocation.
- Click on "Services" in the toolbar.
- Enter "CloudWatch" into the find services field, select.
- Click "Log Groups" from the left hand menu.
- Find the log group named "/aws/lambda/image-service-production" and select it.
From here, CloudWatch organizes logs into streams organized by dates. Click one of these to view logs from our test invocation.
START RequestId: 0d6c34b2-42f0-439f-9f65-c35050e8da3e Version: $LATEST
{"key1"=>"value1", "key2"=>"value2", "key3"=>"value3"}
END RequestId: 0d6c34b2-42f0-439f-9f65-c35050e8da3e
REPORT RequestId: 0d6c34b2-42f0-439f-9f65-c35050e8da3e  Duration: 2.93 ms Billed Duration: 100 ms Memory Size: 512 MB Max Memory Used: 49 MB  Init Duration: 255.06 ms
❗️When things go wrong, digging into CloudWatch logs is one of the first places you should go looking to see what happened.
🚀 CI/CD
Because SAM bundled and packaged our Lambda, a newly added Gemfile.lock has appeared in our project ensuring our gems are locked down. We can commit this change before moving on.
⚡️⏩⚡️
$ git add .
$ git commit -m "Add Gemfile.lock"
$ git push
Step 3: Connecting Lambda to S3
Time to get familiar with the files in your AWS SAM project. In general, they are similar to how a Ruby gem is organized. There is a lib directory containing a file & folder each matching the name of your project. The Ruby file is the entry point for everything required in the directory of the same name. Also present is a Gemfile for any additional gem dependencies.
But how did we create our Resources in AWS during the deploy? Also, how does Lambda know where to invoke your Ruby code?
Template.yaml
This is the SAM specification to CloudFormation on how to build everything needed for your project. Think of it as syntactic sugar to make AWS Lambda development easier.
❗️An important thing to remember is that SAM Specification is a subset of CloudFormation. Any valid CloudFormation can also be used in this template.
When the deploy script was run, SAM examined your template file, found your code, packaged it into a compressed file, uploaded that file to an S3 bucket, and then instructed CloudFormation with a new packaged template.yaml file to build the needed AWS Resources for you. Take some time to examine your template.yaml file. Take note of the following:
- The
Resourcessection contains everything you need created in AWS for this project. - Your function's resources has a
Runtimeproperty set to Ruby 2.7. It also has memory and timeout settings. - The
Handlersection of your function is how SAM knows where your code is. It will look for alib/image_service.rbfile with a method calledhandlerinside of it. - CloudFormation is actually a semi-dynamic language. It supports runtime reflection via a concept called Pseudo Parameters as well as behaviors called Intrinsic Functions.
❓What bucket did SAM upload my code too? Great question! During the bin/bootstrap part of the process, we created a random bucket name for you. The name of which is stored in a .bucket-name file.
Adding Your S3 Resource
That was a lot of information above and SAM/CloudFormation certainly has a lot to offer. But lets start slowly and create our Lambda's S3 bucket so it can listen to events and eventually resize our images. Add the following ImageServiceS3Bucket to your template.yaml file under the Resources section. Since indentation is important, we have shown where in relation to the ImageServiceLambda. Order is not important though.
⚡️⏩⚡️
Resources:
  ImageServiceLambda:
    # ...
  ImageServiceS3Bucket:
    Type: AWS::S3::Bucket
    Properties:
      BucketName: !Sub image-service-SOMEUNIQNAME-${StageEnv}
❗️S3 bucket names are global. So replace SOMEUNIQNAME above with your own unique name.
Triggering Lambda Events
Remember how our Lambda had no events connected which required us manually trigger a test? Now that we have a S3 bucket resource declared we can instruct SAM/CloudFormation to trigger our Lambda from any S3 Notification. We are going to choose any ObjectCreated event. SAM allows us to provide an Events property and this is where we are going to add our. See below for an example of where to add this under the ImageServiceLambda Properties section.
⚡️⏩⚡️
ImageServiceLambda:
  Type: AWS::Serverless::Function
  Properties:
    # ...
    Events:
      ImageServiceS3BucketEvent:
        Type: S3
        Properties:
          Bucket: !Ref ImageServiceS3Bucket
          Events: s3:ObjectCreated:*
The ImageServiceS3BucketEvent is called a Logical ID. It is defined by us and can be whatever we want, just like ImageServiceS3Bucket above.
Our S3 event does require two things. The name of the bucket and the events we want to trigger our Lambda. The !Ref syntax is one of those intrinsic functions I mentioned earlier. In this case we give it the Logical ID of the bucket resource in our template from the step above. This works because the return value of Ref for an S3 bucket is its name.
Deploy Updated Stack
Time to deploy again. When doing so, watch the SAM output closely. It shows how CloudFormation detects a change to our stack, notices there are new resources, and which resources have to be modified. It happily sorts all this out and even figures out which order events need to happens to get the desired results. Pure magic! ✨
⚡️⏩⚡️
$ STAGE_ENV=production ./bin/deploy
Test S3 Upload Triggers Lambda
Now that our bucket has been created from our stack's deploy, let's upload an image and see if it triggers our Lambda. Here is a fun file called RubyForGood.png and we can upload it via the AWS Console.

- Click on "Services" in the toolbar.
- Enter "S3" into the find services field, select.
- Click on your S3 bucket named
image-service-SOMEUNIQNAME-production. WhereSOMEUNIQNAMEis the name you chose earlier. - Drag and drop this file into your browser window to start an upload dialog.
- Click "Next" 3 times to use the default values for permissions, etc. Finally click "Upload" to start the upload.
Afterward you should see your file uploaded to your S3 bucket. But did our Lambda get the event? Using the CloudWatch steps from the previous chapter, navigate to your log group to see if your Lambda received the event and hence logged it. You should see something like this.
{
  "Records": [
    {
      "eventVersion": "2.1",
      "eventSource": "aws:s3",
      "awsRegion": "us-east-1",
      "eventTime": "2020-04-26T23:40:00.273Z",
      "eventName": "ObjectCreated:Put",
      "userIdentity": {
        "principalId": "AWS:AIDAJIS4TINW4H5GRI3LG"
      },
      "requestParameters": {
        "sourceIPAddress": "72.228.219.152"
      },
      "responseElements": {
        "x-amz-request-id": "B1C967507AE19561",
        "x-amz-id-2": "CwSljyyyFADdm1Cyf06BsYkfWfoojX5CX7ezcT1Y9uWSF/L4mWGjz01cnPpGg+W+fiWEiCj2oQjTkELtfJFny5DlbB80UXkz"
      },
      "s3": {
        "s3SchemaVersion": "1.0",
        "configurationId": "8fe91e68-1782-47d8-93a1-470f89531673",
        "bucket": {
          "name": "image-service-SOMEUNIQNAME-production",
          "ownerIdentity": {
            "principalId": "A4ILFJ7OF8X06"
          },
          "arn": "arn:aws:s3:::image-service-SOMEUNIQNAME-production"
        },
        "object": {
          "key": "RubyForGood.png",
          "size": 659624,
          "eTag": "a2028b43a11dd778720371ceaf53dde5",
          "sequencer": "005EA59B740BD1E80F"
        }
      }
    }
  ]
}
In fact this event could be useful to our eventual test suite. I recommend adding it to your project in the test/events/s3-put.json file. Later we can use it for some eventual test-driven development.
🚀 CI/CD
This feels like another good time to save our work.
⚡️⏩⚡️
$ git add .
$ git commit -m "Connecting Lambda to S3"
$ git push
Step 4: Image Processing & Lambda Layers
In order to resize images we need to select a Ruby gem to do the work for us. Thankfully Rails ActiveStorage has elected a wonderful gem called ImageProcessing that leverages either ImageMagick or Libvips to resize images.
Add this to your Gemfile.
⚡️⏩⚡️
gem 'image_processing'
Adding Libvips
When talking about Lambda we often refer to it as "serverless" when in fact there are technically... servers involved. Specifically they are Micro VMs that execute your code. You can think of them as managed containers which we refer to as Runtimes. If you look in your project's template.yaml file you would see that our function's resource Runtime property is set to ruby2.7. As the name suggests, these Micro VMs only have the bare minimal software to perform their needed task, for example, having Ruby installed. This ensures they are small and execute our code fast.
Often times Ruby gems with native C extensions will need headers or shared objects to compile or link to. ImageMagick and Libvips both require other shared objects. None of which are pre-installed on AWS Lambda's modern Runtimes. That work is left to you using a technique called Lambda Layers. The most simple explanation of how Layers work is they add code to your runtime's /opt directory. We are going to use a Lambda layer that adds Libvips to our runtime in a way that allows the ImageProcessing gem to use it.
Add this public Libvips layer resource ARN under the functions's Properties section in your template.yaml file.
⚡️⏩⚡️
ImageServiceLambda:
  Type: AWS::Serverless::Function
  Properties:
    # ...
    Layers:
      - arn:aws:lambda:us-east-1:589405201853:layer:rubyvips892-27:13
❓Can I learn more about how this Libvips layer was made? Yes, here is the ruby-vips-lambda project used to make the layer. Also the Yumda project is a great way for other common layer use cases.
Permissions
Remember when we first deployed our Lambda and looked at the CloudFormation stack in the AWS Console? Within the Resources tab was a type of AWS::IAM::Role. SAM made this role for us automatically. When invoked, our Lambda executes with any managed or inline policies attached to this role. If our Lambda is going to read & write to an S3 bucket, it needs permission to do so. Thankfully this is super easy with the AWS SAM framework using the Policies property.
Any valid AWS Identity & Access Management statement can be expressed in this section as a collection. Each one will be attached to your Lambda function's role. Here is a simple one that states this Lambda can perform any operation on the S3 bucket it owns.
⚡️⏩⚡️
ImageServiceLambda:
  Type: AWS::Serverless::Function
  Properties:
    # ...
    Policies:
      - Version: "2012-10-17"
        Statement:
          - Effect: Allow
            Action:
              - s3:*
            Resource:
              - !Sub arn:aws:s3:::image-service-SOMEUNIQNAME-${StageEnv}
              - !Sub arn:aws:s3:::image-service-SOMEUNIQNAME-${StageEnv}/*
❗️S3 bucket names are global. So replace SOMEUNIQNAME above with your own unique name. Make sure it matches from the name you used in the ImageServiceS3Bucket resource.
🚀 CI/CD
We are not yet finished with all the code needed to read and write to our S3 bucket. So no need to commit our work now.
Step 5: Resizer Code & Permissions
In this section we are going to respond to our new S3 events from the Connecting Lambda to S3 section. Here are the steps our code will perform:
- Read the image file from our S3 bucket.
- Resize the image to 200px wide as a new image.
- Upload that image back to the same S3 bucket with a new name.
Resizer Class
I wrote this plain old ruby object (PORO) class to do the work for us. Please take some time to read over it. Here are some high level call outs:
- Require the ImageProcessing gem's Vips implementation.
- Creates an
Aws::S3::Clientclient to use. - Initializes with an S3 key and optional desired size.
- Resizes the image if it is not resized already.
- Leverage S3 metadata to avoid recursive resizing events.
- Does all work in memory using buffers vs writing to disk.
Create a new file in your project within the lib/image_service directory named resizer.rb file using the below code. 💥Please change SOMEUNIQNAME for the BUCKET constant to match your actual bucket name. 💥
⚡️⏩⚡️
require 'aws-sdk-s3'
require 'image_processing/vips'

module ImageService
  class Resizer
    CLIENT = Aws::S3::Client.new region: Env.region
    BUCKET = "image-service-SOMEUNIQNAME-#{Env.stage}"

    attr_reader :key, :size

    def initialize(key, size = 200)
      @key = key
      @size = size
    end

    def resize!
      return if resized?
      resized = ImageProcessing::Vips
        .source(source)
        .resize_to_limit(size, nil)
        .call(save: false)
        .write_to_buffer(File.extname(key))
      put_object resized, new_key
    end

    def source
      if File.extname(key) == '.png'
        Vips::Image.pngload_buffer(get_object)
      else
        Vips::Image.new_from_buffer(get_object, File.extname(key))
      end
    end

    def new_key
      "#{File.basename(key, File.extname(key))}-#{size}#{File.extname(key)}"
    end

    def get_object
      CLIENT.get_object(bucket: BUCKET, key: key).body.read
    end

    def put_object(object, put_key)
      CLIENT.put_object bucket: BUCKET, key: put_key, body: object,
                        metadata: { 'resized' => '1' }
    end

    def resized?
      metadata['resized'] == '1'
    end

    def metadata
      response = CLIENT.head_object bucket: BUCKET, key: key
      response.metadata || {}
    rescue Aws::S3::Errors::NotFound
      {}
    end

  end
end
❓I noticed you did a require for aws-sdk-s3 but it was not added to your Gemfile, how does that work? Each Lambda runtime has preinstalled SDK packages to make common tasks easier. In this case the Aws::S3 SDK is one of them.
❓I noticed you did not pass an AWS_ACCESS_KEY_ID nor a AWS_SECRET_ACCESS_KEY to the client? How does this work? Since our Lambda is invoked with an execution role, added in our previous step, we do not have to manage keys or secrets. All client SDKs will use that role automatically. Welcome to the future!
Handler Changes
Now that we have our little Ruby object to resize S3 objects we need to hook it up in our Lambda's handler function. The code below has been changed to:
- Added a require for our new file.
- Get the S3 key form the event.
- Create a new Resizer instance. Resize the file.
- Return some meaningful response. The S3 key.
Update your image_service.rb file to use this code.
⚡️⏩⚡️
require 'json'
require 'dotenv'
require_relative './image_service/env'
require_relative './image_service/resizer'

def handler(event:, context:)
  key = event['Records'][0].dig('s3','object','key')
  resizer = ImageService::Resizer.new(key, 200)
  resizer.resize!
  { statusCode: 200,
    headers: [{'Content-Type' => 'application/json'}],
    body: JSON.dump({key: key}) }
end
Deploy Updated Stack
That was a lot to change but we are now ready to deploy and see our efforts at work.
⚡️⏩⚡️
$ STAGE_ENV=production ./bin/deploy
See It At Work
Just like in the Connecting Lambda to S3 step we are going to upload our test image, RubyForGood.png as seen to the right.
- Click on "Services" in the toolbar.
- Enter "S3" into the find services field, select.
- Click on your S3 bucket named
image-service-SOMEUNIQNAME-production. Where SOMEUNIQNAME is the name you chose earlier. - Delete the file we uploaded before.
Now drag and drop our RubyForGood.png file into the S3 browser window and lick "Next" 3 times to use the default values for permissions, etc. Finally click "Upload" to start the upload. After it uploads hit the ♻️ button a few times till you see the new file show up.

💥 Did you not see the new file? Go check your CloudWatch logs to see what happened. If you have any issues or get stuck, reach out for help using the GitHub Issues and I would be happy to help.
🚀 CI/CD
If everything worked out, now is a good time to commit your code.
Next Steps & Resources
Here are some things I recommend doing to keep learning or digging into the AWS eco-system.
🚀 Automatic CI/CD - Did you get tired of doing bin/deploy all the time? Want to automate the process with GitHub Actions? This project includes a workflow to get your started. Open your project's README for steps on how to do that.
HTTP Web Service - Use the HTTP option of the cookie cutter and make a small web service. This will help you learn API Gateways HTTP API
Expire CloudWatch Logs - Set your CloudWatch logs to expire. That's right, you pay for them till fore ever. You can set them to expire past whatever makes sense for you.
S3 CloudFormation Bucket - During the bin/bootstrap process we made a dynamic bucket name for you and stored it in the .bucket-name file. It is usually a good idea to use the same S3 bucket across different projects.
Resources
Find your next steps and knowing where to look for help can be hard. Here are some places I reference when writing AWS Lambda code using SAM.
AWS Serverless Application Model (AWS SAM) Specification - This is everything you need to know about template.yaml from property references to intrinsic functions. Remember, the Serverless Application Model (SAM) specification is a tightly focused and more succinct subset of CloudFormation to ease Lambda development.
AWS Resource and Property Types Reference When passing AWS Resources around in your template it is helpful to know the return value of the Ref intrinsic function. Each resource is different. Sometimes it is a name, sometimes an ARN.

Top comments (0)