In this blog, I am going to evolve the architecture of a popular WordPress web application. I did this demo as a part of the AWS certification course by Adrian Cantrill. You can find this video course here. Even the free version of this demo is available here.
Overview
Here our goal is to learn how to design architecture for any given scenario. We are going to see the architectural evolution of the WordPress web application. We will start by manually creating a single instance, running application and database. In the end, We will create highly available, scalable and resilient architecture.
Steps
I will go through all the steps of this demo that I followed.
- Setup WordPress manually
- Automate setup using Launch Template
- Database migration to RDS
- EFS for local storage
- Elasticity using ASG and ALB
- Upgrade RDS to Aurora cluster [OPTIONAL]
- Cleanup
If you skip step 6, you will able to complete this demo almost in the free tier. If you have any doubt, then I have attached a more detailed instruction link with each step.
Step 1 - Setup WordPress manually [GitHub]

For complete isolation from our current VPC in our AWS account, We will set up a new VPC and perform the whole demo in that. So, in the end, We can easily clean our resources and do not incur any unnecessary charges. You can find one-click deployment here.
After this CloudFormation stack moves into CREATE_COMPLETE status, you have to launch the EC2 instance. To store configuration information, We will use SSM parameter store and create various parameters like DBUser, DBName, DBEndpoint, DBPassword, DBRootPassword.
Now, We will connect to EC2 instance and install database and WordPress. For that, We have to install a web server and database server. We will set up a database and download WordPress. After that, We have to configure a wp-config.php file. We will change permission for file system and create a WordPress user. Next, We will create a database user and configure permissions.
At the end of this step, We can test WordPress by creating a post. Till now everything is manual and We have so many limitations.
Step 2 - Automate setup using Launch Template [GitHub]

In step 1, We did all set up manually. To automate this process, We will create a launch template for this. Whatever configuration We did in the first step, We will do this in user data. Therefore when We launch the instance using this template, We will directly get our WordPress web application ready to use.
By doing this, this will remove the overhead of configuring an EC2 instance whenever we launch it. Even doing this using user data is less time-consuming.
Step 3 - Database migration to RDS [GitHub]

We will split out database functionality from EC2 instance by launching the RDS DB instance. To migrate WordPress data, We will take a backup of the database from EC2 instance and restore into RDS. To accommodate this database migration, We have to change one SSM parameter DBEndpoint and update launch template with necessary command.
By doing this, it allows the database to scale independently of the application.
Step 4 - EFS for local storage [GitHub]

Currently, any media for WordPress posts are stored locally. Now, We will move this data to EFS, which will allow all instances access this shared data. After successful creation of EFS, We will add EFS id to SSM parameter store. To access this EFS, We have to modify user data entered in Launch template.
Now, our application media and UI store are not local. It will also not create any problem in scaling.
Step 5 - Elasticity using ASG and ALB [GitHub]
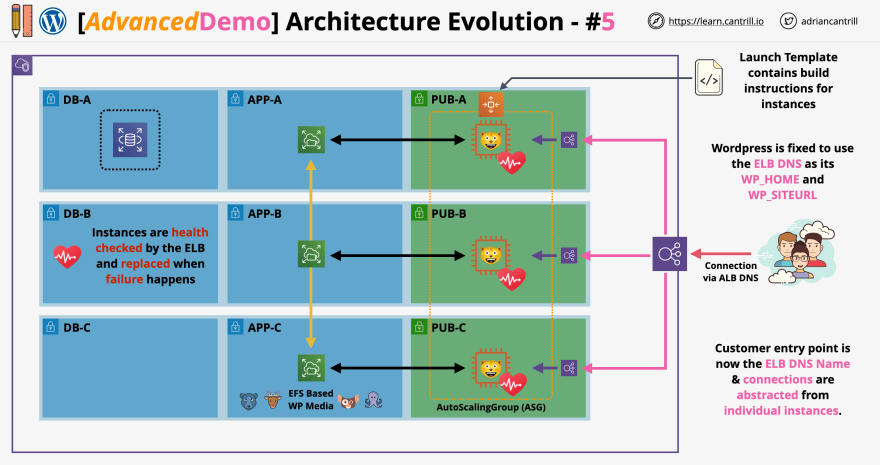
To add elasticity in our WordPress application, We will add ASG and ALB. We need to add the DNS of ALB in SSM parameter store. To adopt changes, We have to change user data of launch template. We can add a scaling policy for ASG to scale in and out dynamically.
After completion of this step, We have removed direct connection of customer and instance. Now, there is no dependency between the database and instance.
Step 6 - Upgrade RDS to Aurora cluster [OPTIONAL] [GitHub]

In this step, We will move RDS to 3AZ aurora cluster to provide high levels of resilience for the WordPress application. You can skip this part if you do not want to incur any charges. To upgrade our database, firstly We will create a snapshot of RDS instance. After that, We will migrate this snapshot Aurora DB cluster. For resilience, We can create additional readers. We will change the DBEndpoint SSM parameter with the Aurora database endpoint. To apply these changes, We have to refresh our instances using ASG.
Finally, We can create a highly available, scalable and resilient architecture of WordPress web application.
Step 7 - Cleanup [GitHub]
To do clean up, We have to delete load balancer, target group, auto-scaling group, EFS, RDS, launch template, RDS snapshot and CloudFormation template. By doing this, you will delete all resources created during this demo.
Conclusion
I learned how to create this kind of architecture by doing step by step evolution. Thank you, Adrian Cantrill, for this demo. I highly recommend his course on learn.cantrill.io.

Top comments (0)