
Introduction
Table Of Contents
- Prerequisites
- Step 1 — Resource Provisioners
- Step 2 — Destroy Provisioners
- Step 3 — Null Resource Provisioners
- Conclusion
Provisioners provide the ability to run additional steps or tasks when a resource is created or destroyed. This is not to be confused as a replacement for configuration management. Tools like Chef, Puppet, and Ansbile are much better suited for configuration management and it's best to leave the heavy lifting to those tools. Provisioners are used to fill the gaps in between.
Before we go into how to use provisioners in Terraform, let's first discuss the differences between configuration management and Terraform. Configuration management is typically used to enforce desired settings on an operating system or cloud resource. The settings are defined in code and that code is re-applied again and again to enforce those settings for the rest of the resource's life. Terraform is more likened to an orchestrator where it deploys the infrastructure components and then relies on the configuration management to deploy the desired settings onto the operating system. Terraform is also not designed for configurations to repeatedly run every 15 minutes to maintain it's state. This could be done with a scheduled task or script, however it's not necessary with Terraform as any changes made should be done through the code anyways.
Unlike configuration management tools, Terraform really shines with immutable infrastructure designs. Building infrastructure that is immutable means building infrastructure that is designed to simply be rebuilt instead of reconfigured or updated. This means that a web server will never be patched or changed, instead it is rebuilt with the new patches or changes and is deployed back into production replacing the old server. Building systems this way reduces the requirement for configuration management since changes are made to the image before deployment, not after the fact. Tools like Packer, which allow for images to be created and defined in code, are used to automate the configuration changes to the image which Terraform is then used to deploy. The idea is that with configuration management, you will never be able to configure an OS 100% to enforce every change on that system, it's much more efficient to rebuild an image to desired state and re-deploy the system.
However, not all environments can fit into this immutable infrastructure design. Sometimes we are already stuck with a solution in place or are working with an application that can't exist with an immutable infrastructure design. For those cases we need to lean on our configuration management tools to ensure that our servers are not drifting away from the desired state. Provisioners can be used in Terraform to assist with bootstrapping or initializing a configuration management tool onto a server. They can also be used to perform additional customization tasks where the Azure provider is missing the capability.
Note that provisioners should be a last resort as they can make our Terraform configurations brittle. However, there are some cases where it is still necessary to create a provisioner in order to accomplish a task. In this exercise we will take a look at how to use provisioners in Terraform. We will start by using a provisioner to add a virtual machine into Azure Desired State Configuration, or Azure DSC. This is a configuration management technology in Azure that uses PowerShell to enforce OS settings on a server.
Prerequisites
Before you begin, you'll need to set up the following:
- Azure subscription.
- Azure Cloud Shell. Be sure to check out the prerequisites on "Getting Started with Terraform on Azure: Deploying Resources" for a guide on how to set this up.
We will also need to set up an Azure Automation account and upload a DSC configuration. We can easily do this in a matter of minutes in Azure Cloud Shell. Open up an Azure Cloud Shell session by going to shell.azure.com. In this example I will be using the PowerShell version since all the syntax in this guide is meant for PowerShell. Start by changing the directory to $home:
cd $home
Next, we will need to setup a resource group for our Azure Automation account. Run the command below:
New-AzResourceGroup -name rg-terraformaa -location westus2
Then we will create an Azure Automation account in that resource group using the New-AzAutomationAccount PowerShell cmdlet:
New-AZAutomationAccount -name aa-terraformdemo -ResourceGroupName rg-terraformaa -location 'westus2'
We are going to be making a DSC configuration for installing the IIS role. Copy the following code below and paste it into the Azure Cloud Shell. This will create a WebserverConfig.ps1 file on our $home directory which we will import into our Azure Automation account:
"
Configuration WebserverConfig {

    # Import the module for dsc
    Import-DscResource -ModuleName PsDesiredStateConfiguration

    Node 'vmterraform' {

        #ensures that the Web-Server (IIS) feature is enabled.
        WindowsFeature WebServer {
            Ensure = 'Present'
            Name   = 'Web-Server'
        }


    }
}
" > WebserverConfig.ps1
Now that we have the DSC configuration file created, we will import it into the Azure Automation account and immediately start a compilation job. This job takes our configuration file and turns it into a MOF file which contains all the configuration information. The compiled configuration can then be assigned to a node:
Import-AzAutomationDscConfiguration -AutomationAccountName "aa-terraformdemo"-ResourceGroupName "rg-terraformaa" -SourcePath ".\WebserverConfig.ps1" -force -published | Start-AzureRmAutomationDscCompilationJob
The compilation job will immediately start. It will take a few minutes to complete, you can check the status with the following command:
Get-AzureRmAutomationDscCompilationJob -AutomationAccountName "aa-terraformdemo" -ResourceGroupName "rg-terraformaa"
The status will change to completed if the compile job is successful:
ResourceGroupName      : rg-terraformaa
AutomationAccountName  : aa-terraformdemo
Id                     : 09743f32-7bfb-4e0b-b18b-db2cc5cb7ead
CreationTime           : 1/25/20 11:29:42 PM +00:00
Status                 : Completed
StatusDetails          :
StartTime              : 1/25/20 11:30:24 PM +00:00
EndTime                : 1/25/20 11:30:32 PM +00:00
Exception              :
LastModifiedTime       : 1/25/20 11:30:32 PM +00:00
LastStatusModifiedTime : 1/1/01 12:00:00 AM +00:00
JobParameters          : {}
ConfigurationName      : WebserverConfig
Once the compile job is complete, we now have our Azure Automation account set up with a DSC configuration for installing IIS. We are ready to deploy a VM and automatically assign the DSC configuration during deployment. If you want to read more on Azure DSC be sure to check out the documentation.
Step 1 — Resource Provisioners
Provisioners can be tied to a resource which causes them to run after that resource has been successfully created. There are several provisioner types that allow for various actions to be taken such as copying a file to a resource, remotely executing a script or command, as well a locally executing a command or script on the endpoint that is running the terraform code. There are also provisioner types that are specifically meant for configuration management tools like Chef, Puppet, and Saltstack. Provisioners are created with a provisioner resource block followed by a provisioner type in the first parameter string. Below is an example of a provisioner block using the file provisioner type to copy a PowerShell script to the deployed resource. Inside the provisioner block is a connection block. This is used to define how to connect to the resource, in the example winrm is used but we could also do SSH as well:
provisioner "file" {
  source      = "./setup.ps1"
  destination = "C:/temp/setup.ps1"

  connection {
    type     = "winrm"
    user     = "Administrator"
    password = "P@ssw0rd"
    host     = "webserver1"
  }
}
Creating connections inside provisioners creates a limitation in our Terraform code. We then have to think about network connectivity between the device running the Terraform code and the resources we are deploying. Therefore it's best to avoid using connection blocks when possible. In our example we are going to make use of the AZ PowerShell module cmdlets to assign our VM a DSC configuration. Because we are using Azure Cloud Shell, we are automatically authenticated with Azure and there is no need for additional authentication steps in the provisioner block. If we were to run this code elsewhere, we would need to plan for that in our design.
We will be running a local-exec provisioner type since we are running our Terraform configuration from Azure Cloud Shell. On the command argument we will be using <<- which allows for us to create a multi-line string. The text EOT stands for end of text. This serves as our marker for when the string ends. We could essentially use any text for this, but EOT is the most commonly used and it's best to stick to standards for readability of code. We are using the Register-AzAutomationDSCNode cmdlet to register our newly deployed VM with Azure DSC and assign the web server configuration. The @params is a Powershell technique called splatting used for formatting and easy readability of the cmdlet parameters. Lastly, the interpreter argument defines the executable or application we want to run. This could be any application on the machine that is running the Terraform code. In our case we are running the configuration from Azure Cloud Shell so we will be using Powershell Core. The strings after pwsh are the arguments used for the application which will be -command in our example:
provisioner "local-exec" {
    command = <<-EOT
        $params = @{
        AutomationAccountName = "aa-terraformdemo"
        AzureVMName = "${azurerm_virtual_machine.vm.name}"
        ResourceGroupName = "rg-terraformaa"
        NodeConfigurationName = "WebserverConfig.localhost"
        azureVMLocation = "${azurerm_resource_group.rg.location}"
        AzureVMResourceGroup = "${azurerm_resource_group.rg.name}"
        }
        Register-AzAutomationDscNode @params
   EOT
   interpreter = ["pwsh", "-Command"]
  }
Below is the entire configuration for deploying our VM. Copy the config below and paste it into a main.tf file in Azure Cloud Shell using the code main.tf command:
provider "azurerm" {
  version = "1.38.0"
}

#create resource group
resource "azurerm_resource_group" "rg" {
    name     = "rg-MyFirstTerraform"
    location = "westus2"
    tags      = {
      Environment = "Terraform Demo"
    }
}

#Create virtual network
resource "azurerm_virtual_network" "vnet" {
    name                = "vnet-dev-westus2-001"
    address_space       = ["10.0.0.0/16"]
    location            = "westus2"
    resource_group_name = azurerm_resource_group.rg.name
}

# Create subnet
resource "azurerm_subnet" "subnet" {
  name                 = "snet-dev-westus2-001"
  resource_group_name  = azurerm_resource_group.rg.name
  virtual_network_name = azurerm_virtual_network.vnet.name
  address_prefix       = "10.0.0.0/24"
}

# Create public IP
resource "azurerm_public_ip" "publicip" {
  name                = "pip-vmterraform-dev-westus2-001"
  location            = "westus2"
  resource_group_name = azurerm_resource_group.rg.name
  allocation_method   = "Static"
}


# Create network security group and rule
resource "azurerm_network_security_group" "nsg" {
  name                = "nsg-sshallow-001 "
  location            = "westus2"
  resource_group_name = azurerm_resource_group.rg.name

  security_rule {
    name                       = "HTTP"
    priority                   = 1001
    direction                  = "Inbound"
    access                     = "Allow"
    protocol                   = "Tcp"
    source_port_range          = "*"
    destination_port_range     = "80"
    source_address_prefix      = "*"
    destination_address_prefix = "*"
  }
}

# Create network interface
resource "azurerm_network_interface" "nic" {
  name                      = "nic-01-vmterraform-dev-001 "
  location                  = "westus2"
  resource_group_name       = azurerm_resource_group.rg.name
  network_security_group_id = azurerm_network_security_group.nsg.id

  ip_configuration {
    name                          = "niccfg-vmterraform"
    subnet_id                     = azurerm_subnet.subnet.id
    private_ip_address_allocation = "dynamic"
    public_ip_address_id          = azurerm_public_ip.publicip.id
  }
}

# Create virtual machine
resource "azurerm_virtual_machine" "vm" {
  name                  = "vmterraform"
  location              = "westus2"
  resource_group_name   = azurerm_resource_group.rg.name
  network_interface_ids = [azurerm_network_interface.nic.id]
  vm_size               = "Standard_B2s"

  storage_os_disk {
    name              = "stvmpmvmterraformos"
    caching           = "ReadWrite"
    create_option     = "FromImage"
    managed_disk_type = "Premium_LRS"
  }

  storage_image_reference {
    publisher = "MicrosoftWindowsServer"
    offer     = "WindowsServer"
    sku       = "2019-Datacenter"
    version   = "latest"
  }

  os_profile {
    computer_name  = "vmterraform"
    admin_username = "terrauser"
    admin_password = "Password1234!"
  }
  os_profile_windows_config{
    provision_vm_agent = true
  }

  #Add Virtual Machine to Azure DSC after deployment.
  provisioner "local-exec" {
    command = <<EOT
        $params = @{
        AutomationAccountName = "aa-terraformdemo"
        AzureVMName = "${azurerm_virtual_machine.vm.name}"
        ResourceGroupName = "rg-terraformaa"
        NodeConfigurationName = "WebserverConfig.vmterraform"
        azureVMLocation = "${azurerm_resource_group.rg.location}"
        AzureVMResourceGroup = "${azurerm_resource_group.rg.name}"
        }
        Register-AzAutomationDscNode @params
   EOT
   interpreter = ["pwsh", "-Command"]
  }


}
We will run terraform init and then terraform apply to deploy our server. The following output will be displayed:
azurerm_resource_group.rg: Creating...
azurerm_resource_group.rg: Creation complete after 1s [id=/subscriptions/5c80ecff-4dfe-4fa0-abd4-3c15c2e3be31/resourceGroups/rg-MyFirstTerraform]
azurerm_public_ip.publicip: Creating...
azurerm_virtual_network.vnet: Creating...
azurerm_network_security_group.nsg: Creating...
azurerm_network_security_group.nsg: Creation complete after 3s [id=/subscriptions/5c80ecff-4dfe-4fa0-abd4-3c15c2e3be31/resourceGroups/rg-MyFirstTerraform/providers/Microsoft.Network/networkSecurityGroups/nsg-sshallow-001]
azurerm_public_ip.publicip: Creation complete after 4s [id=/subscriptions/5c80ecff-4dfe-4fa0-abd4-3c15c2e3be31/resourceGroups/rg-MyFirstTerraform/providers/Microsoft.Network/publicIPAddresses/pip-vmterraform-dev-westus2-001]
During the deployment, after our VM is created, we can see the provisioner block runs and our PowerShell command is executed:
azurerm_virtual_machine.vm: Still creating... [2m0s elapsed]
azurerm_virtual_machine.vm: Still creating... [2m10s elapsed]
azurerm_virtual_machine.vm: Provisioning with 'local-exec'...
azurerm_virtual_machine.vm (local-exec): Executing: ["pwsh" "-Command" "        $params = @{\n        AutomationAccountName = \"aa-terraformdemo\"\n        AzureVMName = \"vmterraform\"\n        ResourceGroupName = \"rg-terraformaa\"\n        NodeConfigurationName = \"WebserverConfig.vmterraform\"\n        azureVMLocation = \"westus2\"\n        AzureVMResourceGroup = \"rg-MyFirstTerraform\"\n        }\n        Register-AzAutomationDscNode @params \n"]

azurerm_virtual_machine.vm (local-exec): MOTD: Save files to $home/clouddrive for persistence across sessions

azurerm_virtual_machine.vm (local-exec): VERBOSE: Authenticating to Azure ...
azurerm_virtual_machine.vm (local-exec): VERBOSE: Building your Azure drive ...
azurerm_virtual_machine.vm: Still creating... [2m20s elapsed]
azurerm_virtual_machine.vm: Still creating... [2m30s elapsed]
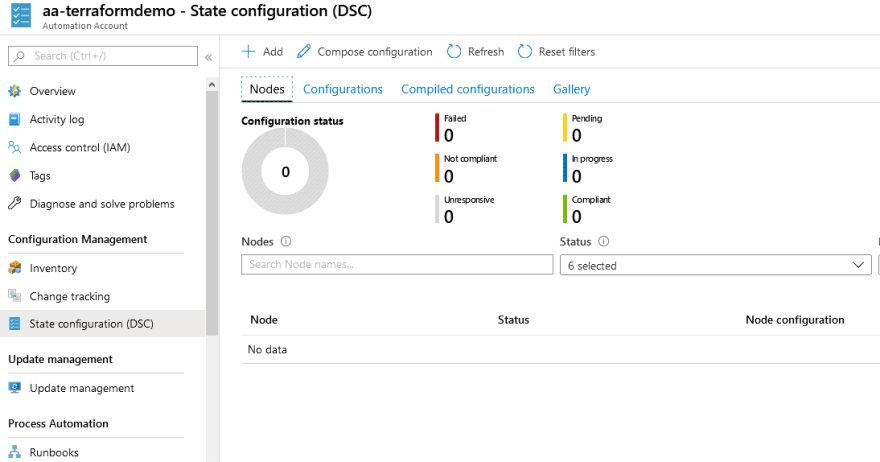
Once the Terraform deployment has finished, we can check in the Azure Portal and search for Automation Accounts. After selecting the Automation Account aa-terraformdemo, we can select State Configuration (DSC) on the left hand side and see our newly provisioned VM with the WebServer configuration assigned:

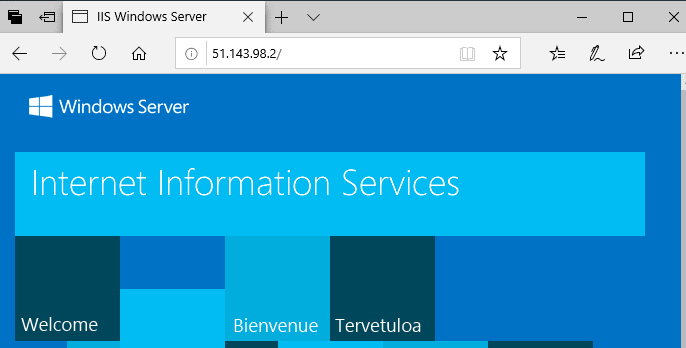
When we go to the assigned Public IP Address in a web browser, we can see that the IIS role is already installed:
We've successfully created a Terraform configuration that deploys a VM and assigns a DSC configuration. But what happens when we destroy this VM? Provisioner blocks like the one we created are only deployed when the VM or resource is first created. If we changed the size of the VM or another attribute, the Provisioner block would not run again. If we ran a terraform destroy on this configuration right now, our VM would not be removed from Azure DSC. In the next section we will look at what we can do to fix this with a destroy provisioner.
Step 2 — Destroy Provisioners
Destroy provisioners are only executed during a terraform destroy. This can be useful in cases where additional cleanup is needed for a resource such as VM decommission tasks. A destroy provisioner block looks the same as a regular provisioner block except that there is an additional when = destroy argument. Below is a snippet of the destroy provisioner that we will be adding :
#Remove Virtual Machine from Azure DSC when destroying.
  provisioner "local-exec" {
    when = destroy
    command = <<EOT
        Get-AzAutomationDscNode -ResourceGroupName "rg-terraformaa" -AutomationAccountName "aa-terraformdemo" -Name "${self.name}" | Unregister-AzAutomationDscNode -force
    EOT
   interpreter = ["pwsh", "-Command"]
  }
The provisioner block uses the Get-AzAutomationDscNode PowerShell cmdlet to find our VM by name and then pipes it to the Unregister-AzAutomationDSCNode cmdlet to unregister the VM from Azure DSC. Also notice that we are using the ${self.name} expression to reference our VM name instead of ${azurerm_virtual_machine.vm.name} like we did in the first provisioner block. Terraform does not like destroy provisioner blocks to have dependencies on external resources. This allows for us to have a more stable provisioner because it is not relying upon other resources to exist before the destroy provisioner can be run. The local named value self references attributes from the resource that the provisioner block resides in. We will add the snippet above to our main.tf Terraform configuration. The complete configuration should look like the following:
provider "azurerm" {
  version = "1.38.0"
}

#create resource group
resource "azurerm_resource_group" "rg" {
    name     = "rg-MyFirstTerraform"
    location = "westus2"
    tags      = {
      Environment = "Terraform Demo"
    }
}

#Create virtual network
resource "azurerm_virtual_network" "vnet" {
    name                = "vnet-dev-westus2-001"
    address_space       = ["10.0.0.0/16"]
    location            = "westus2"
    resource_group_name = azurerm_resource_group.rg.name
}

# Create subnet
resource "azurerm_subnet" "subnet" {
  name                 = "snet-dev-westus2-001 "
  resource_group_name  = azurerm_resource_group.rg.name
  virtual_network_name = azurerm_virtual_network.vnet.name
  address_prefix       = "10.0.0.0/24"
}

# Create public IP
resource "azurerm_public_ip" "publicip" {
  name                = "pip-vmterraform-dev-westus2-001"
  location            = "westus2"
  resource_group_name = azurerm_resource_group.rg.name
  allocation_method   = "Static"
}


# Create network security group and rule
resource "azurerm_network_security_group" "nsg" {
  name                = "nsg-sshallow-001 "
  location            = "westus2"
  resource_group_name = azurerm_resource_group.rg.name

  security_rule {
    name                       = "HTTP"
    priority                   = 1001
    direction                  = "Inbound"
    access                     = "Allow"
    protocol                   = "Tcp"
    source_port_range          = "*"
    destination_port_range     = "80"
    source_address_prefix      = "*"
    destination_address_prefix = "*"
  }
}

# Create network interface
resource "azurerm_network_interface" "nic" {
  name                      = "nic-01-vmterraform-dev-001 "
  location                  = "westus2"
  resource_group_name       = azurerm_resource_group.rg.name
  network_security_group_id = azurerm_network_security_group.nsg.id

  ip_configuration {
    name                          = "niccfg-vmterraform"
    subnet_id                     = azurerm_subnet.subnet.id
    private_ip_address_allocation = "dynamic"
    public_ip_address_id          = azurerm_public_ip.publicip.id
  }
}

# Create virtual machine
resource "azurerm_virtual_machine" "vm" {
  name                  = "vmterraform"
  location              = "westus2"
  resource_group_name   = azurerm_resource_group.rg.name
  network_interface_ids = [azurerm_network_interface.nic.id]
  vm_size               = "Standard_B2s"

  storage_os_disk {
    name              = "stvmpmvmterraformos"
    caching           = "ReadWrite"
    create_option     = "FromImage"
    managed_disk_type = "Premium_LRS"
  }

  storage_image_reference {
    publisher = "MicrosoftWindowsServer"
    offer     = "WindowsServer"
    sku       = "2019-Datacenter"
    version   = "latest"
  }

  os_profile {
    computer_name  = "vmterraform"
    admin_username = "terrauser"
    admin_password = "Password1234!"
  }
  os_profile_windows_config{
    provision_vm_agent = true
  }

  #Add Virtual Machine to Azure DSC after deployment.
  provisioner "local-exec" {
    command = <<EOT
        $params = @{
        AutomationAccountName = "aa-terraformdemo"
        AzureVMName = "${azurerm_virtual_machine.vm.name}"
        ResourceGroupName = "rg-terraformaa"
        NodeConfigurationName = "WebserverConfig.localhost"
        azureVMLocation = "${azurerm_resource_group.rg.location}"
        AzureVMResourceGroup = "${azurerm_resource_group.rg.name}"
        }
        Register-AzAutomationDscNode @params
   EOT
   interpreter = ["pwsh", "-Command"]
  }

  #Remove Virtual Machine from Azure DSC when destroying.
  provisioner "local-exec" {
    when = destroy
    command = <<EOT
        Get-AzAutomationDscNode -ResourceGroupName "rg-terraformaa" -AutomationAccountName "aa-terraformdemo" -Name "${self.name}" | Unregister-AzAutomationDscNode -force
    EOT
   interpreter = ["pwsh", "-Command"]
  }

}
Now let's run Terraform destroy. We will see that before the VM is destroyed, the destroy provisioner block is executed:
azurerm_virtual_machine.vm: Destroying... [id=/subscriptions/5c80ecff-4dfe-4fa0-abd4-3c15c2e3be31/resourceGroups/rg-MyFirstTerraform/providers/Microsoft.Compute/virtualMachines/vmterraform2]
azurerm_virtual_machine.vm: Provisioning with 'local-exec'...
azurerm_virtual_machine.vm (local-exec): Executing: ["pwsh" "-Command" "        Get-AzAutomationDscNode -ResourceGroupName \"rg-terraformaa\" -AutomationAccountName \"aa-terraformdemo\" -Name \"vmterraform\" |Unregister-AzAutomationDscNode -force\n"]

azurerm_virtual_machine.vm (local-exec): MOTD: Connect to a remote Azure VM: Enter-AzVM

azurerm_virtual_machine.vm (local-exec): VERBOSE: Authenticating to Azure ...
azurerm_virtual_machine.vm (local-exec): VERBOSE: Building your Azure drive ...
azurerm_virtual_machine.vm: Still destroying... [id=/subscriptions/5c80ecff-4dfe-4fa0-abd4-...t.Compute/virtualMachines/vmterraform, 10s elapsed]
azurerm_virtual_machine.vm: Still destroying... [id=/subscriptions/5c80ecff-4dfe-4fa0-abd4-...t.Compute/virtualMachines/vmterraform, 20s elapsed]
azurerm_virtual_machine.vm: Still destroying... [id=/subscriptions/5c80ecff-4dfe-4fa0-abd4-...t.Compute/virtualMachines/vmterraform, 30s elapsed]
azurerm_virtual_machine.vm: Still destroying... [id=/subscriptions/5c80ecff-4dfe-4fa0-abd4-...t.Compute/virtualMachines/vmterraform, 40s elapsed]
azurerm_virtual_machine.vm: Still destroying... [id=/subscriptions/5c80ecff-4dfe-4fa0-abd4-...t.Compute/virtualMachines/vmterraform, 50s elapsed]
azurerm_virtual_machine.vm: Still destroying... [id=/subscriptions/5c80ecff-4dfe-4fa0-abd4-...t.Compute/virtualMachines/vmterraform, 1m0s elapsed]
...
Once the destroy process is complete, we will see that the VM is removed from Azure DSC.
Now we have a complete VM configuration automated from deployment to decommission.
Step 3 — Null Resource Provisioners
Not only can we put provisioner blocks inside of resources like we did with our virtual machine resource. But we can also have them run independently of resource blocks. This can be used for scenarios where we need to run a script or process after several resources are created or if we want to design a provisioner that does not depend on a single resource.
We will deploy two Azure Container Registries in this example, one for Production and one for Development. Azure Container Registry is a service in Azure that is used for housing container images. We will use a provisioner to import the hello world image from Docker Hub, a public container registry, to our Azure Container Registries once they have been deployed.
A provisioner block must still technically reside inside a resource so we will create a null_resource resource block. Null_resource resource blocks are used as a "do nothing" type of resource that allow us to run provisioner tasks independently of a resource. Below is a snippet of what our null_resource resource block will look like:
resource "null_resource" "import_image" {

  provisioner "local-exec" {
    command = <<EOT
       az acr import --name ${azurerm_container_registry.acr-prod.name} --source docker.io/library/hello-world:latest --image hello-world:latest
       az acr import --name ${azurerm_container_registry.acr-dev.name} --source docker.io/library/hello-world:latest --image hello-world:latest
   EOT
   interpreter = ["pwsh", "-Command"]
  }
The resource block is declared just like any other resource with the resource type and label. Next, we have our standard provisioner block using local-exec to run our AZ Cli commands locally from our Cloud Shell session since that's where we will be running our Terraform code in this example. The AZ Cli commands are used to import the hello world container image to each Azure Container Registry.
The complete configuration will look like the following. Copy the configuration and paste it into a new main.tf. Make sure that you've either removed the terraform contents created from the previous steps or you are using a new directory for this Terraform code:
#Create Resource Group
resource "azurerm_resource_group" "rg" {
  name     = "rg-acrdemo"
  location = "West US"
}

#Create Azure Container Registry
resource "azurerm_container_registry" "acr-prod" {
  name                     = "acrprodregistrycloudskillslab001"
  resource_group_name      = azurerm_resource_group.rg.name
  location                 = azurerm_resource_group.rg.location
  sku                      = "Standard"
  admin_enabled            = false

}

#Create Azure Container Registry
resource "azurerm_container_registry" "acr-dev" {
  name                     = "acrdevregistrycloudskillslab001"
  resource_group_name      = azurerm_resource_group.rg.name
  location                 = azurerm_resource_group.rg.location
  sku                      = "Standard"
  admin_enabled            = false

}

#Import Container Image to Azure Container Registries
resource "null_resource" "image" {

  provisioner "local-exec" {
    command = <<EOT
       az acr import --name ${azurerm_container_registry.acr-prod.name} --source docker.io/library/hello-world:latest --image hello-world:latest
       az acr import --name ${azurerm_container_registry.acr-dev.name} --source docker.io/library/hello-world:latest --image hello-world:latest
   EOT
   interpreter = ["pwsh", "-Command"]
  }
}
We will run the standard sequence of terraform init followed by terraform apply to deploy our resources. Notice that during terraform init the null provider is downloaded. This is because we are using the null_resource resource block which requires the provider:
To prevent automatic upgrades to new major versions that may contain breaking
changes, it is recommended to add version = "..." constraints to the
corresponding provider blocks in configuration, with the constraint strings
suggested below.

* provider.azurerm: version = "~> 1.41"
* provider.null: version = "~> 2.1"

Terraform has been successfully initialized!
After running terraform apply we can see that our two Azure Container Registries are created, and the hello world image is automatically imported to each of them:

Now, what happens if we changed the location of these Azure Container Registries? The resources would be re-created, but the provisioner task would not run again because it only runs the first time we deploy our resources. When designing infrastructure with Terraform, we want to make our configurations as stable as possible for any scenario. To improve this configuration, we will use a triggers argument to declare that we want our provisioner to run again if any of our Azure Container Registries are modified. The code will look like the following:
triggers = {
     prod = azurerm_container_registry.acr-prod.id
     dev = azurerm_container_registry.acr-dev.id
  }
We will add this to our current configuration and the main.tf should look like the following. Copy and paste the code below and overwrite the current main.tf to include the triggers argument. We are also going to change the location of our resources to West US 2 by modifying the location of the azurerm_resource_group resource block:
#Create Resource Group
resource "azurerm_resource_group" "rg" {
  name     = "rg-acrdemo"
  location = "West US 2"
}

#Create Azure Container Registry
resource "azurerm_container_registry" "acr-prod" {
  name                     = "acrprodregistrycloudskillslab001"
  resource_group_name      = azurerm_resource_group.rg.name
  location                 = azurerm_resource_group.rg.location
  sku                      = "Standard"
  admin_enabled            = false


}

#Create Azure Container Registry
resource "azurerm_container_registry" "acr-dev" {
  name                     = "acrdevregistrycloudskillslab001"
  resource_group_name      = azurerm_resource_group.rg.name
  location                 = azurerm_resource_group.rg.location
  sku                      = "Standard"
  admin_enabled            = false


}

#Import Container Image to Azure Container Registries
resource "null_resource" "image" {

  triggers = {
     prod = azurerm_container_registry.acr-prod.id
     dev = azurerm_container_registry.acr-dev.id
  }

  provisioner "local-exec" {
    command = <<EOT
       az acr import --name ${azurerm_container_registry.acr-prod.name} --source docker.io/library/hello-world:latest --image hello-world:latest
       az acr import --name ${azurerm_container_registry.acr-dev.name} --source docker.io/library/hello-world:latest --image hello-world:latest
   EOT
   interpreter = ["pwsh", "-Command"]
  }
}
Now we will test this out. Run terraform apply against this new configuration. Our resources will be destroyed and recreated in the West US 2 region. During the deployment, we will now see our provisioner is re-executed again because of our triggers argument. In the triggers argument we specified to re-run the provisioner if any modifications are made to our Azure Container Registry resources.
Conclusion
In this article we learned about provisioners in Terraform. We reviewed the concepts of immutable infrastructure and configuration management, and successfully deployed a virtual machine using provisioners to automatically configure Azure DSC on the node. We also created a null_resource block and used it to execute additional tasks when provisioning two Azure Container Registries. Provisioners are a useful way to provide additional configuration beyond what the provider can perform. However, provisioners should be considered a last resort. As you can see in our examples, they complicate the deployment process and can make our configurations more complex and brittle. The provisioner blocks cannot truly be accounted for when running terraform plan since the actions we are taking inside the provisioner block can be anything we specify. Provisioners can also implement network dependencies that prevent Terraform code from being deployed from any environment. Best practice is to lean on the capabilities of Terraform providers or configuration management systems before resorting to using provisioners.
In the next article we will dig into variables which are a core part of creating long lasting reusable and secure Terraform configurations.

Top comments (1)
One of the thing that i was going to start and just stumbled upon. Thanks for sharing :)