In my previous post, we took a look at creating your first Azure Automation PowerShell runbook. We set up the Azure Automation account, authored a PowerShell runbook, and incorporated parameters and variable assets. The next step is to understand how we can access and manage Azure resources from our runbooks.
In this guide, you will learn how Azure Automation can authenticate and access Azure resources. We will also take a look at importing PowerShell modules to add cmdlets to our runbooks. When you're finished, you'll have the skills to elevate your runbooks to the next level.
Prerequisites
Before you begin this guide, you'll need the following:
- Azure tenant and subscription
- Administrator account with sufficient permissions on a subscription, such as Owner, or a role containing Microsoft.Automation resource authorization
- PowerShell knowledge
Azure Automation Run As Account
When I created the Azure Automation account in the first article, I enabled the option to create an Azure Run As account. By enabling this option, Azure will automatically create an Azure AD application. You can use this application identity to authenticate to an Azure subscription to access and manage resources. During the Run As account creation, Azure performs several other functions such as:
- Adding a self-signed certificate to the application account.
- Creating a service principal identity for the application.
- Assigning the Contributor role for the account in the current subscription.
- Creating Automation connection assets named AzureRunAsCertificate and AzureRunAsConnection.
If you want to view more information about the Run As account, from the Automation Account resource page, navigate to Account Settings > Run as accounts.

You can view the account's properties in the portal, including the certificate thumbprint, the Azure AD application information, service principal ID, role assignments, and runbooks utilizing the account.
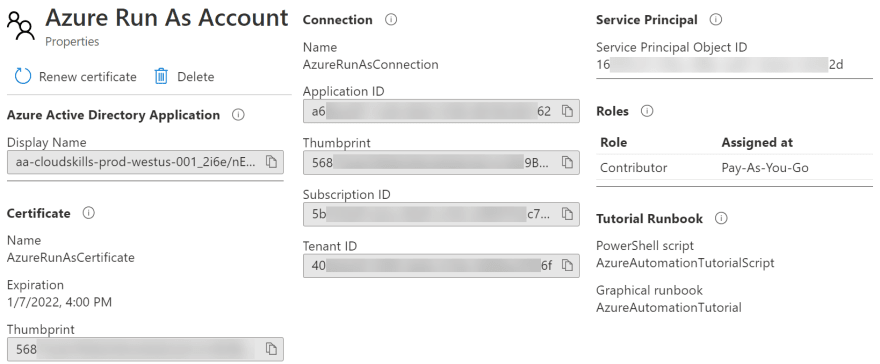
At the top of the properties page, note an action named Renew Certificate. The account's certificate is only valid for one year, so be sure to renew before expiration to keep your runbooks from failing.
Along with the Run As account, Azure will create two connection assets: AzureRunAsCertificate and AzureRunAsConnection. The certificate asset authenticates to Azure so the runbook can manage Azure Resource Manager resources. The connection asset contains the application ID, tenant ID, subscription ID, and certificate thumbprint. Basically, everything you need to connect to Azure to start managing resources! In an upcoming example, I'll use this connection to connect to Azure and to retrieve some resources.
Automation Account Modules
Before I create a new runbook to manage my Azure resources, I need to make sure I have the right PowerShell commands available. When you create a new Automation Account, Azure will automatically import some PowerShell modules for you, such as AzureRM.Automation, AzureRM.Computer, and AzureRM.Resources. However, these modules are a part of the older AzureRM PowerShell module, which Microsoft is no longer developing. Microsoft has replaced this module with the newer Az PowerShell module.
Luckily, I'm not stuck using the older modules in my PowerShell runbooks. I can import the new Az modules into the Automation Account for use with my PowerShell code. From the Automation Account, navigate to Shared Resources > Modules gallery. The first module I need to import is the Az.Accounts module so I can use the Connect-AzAccount cmdlet in my runbook. Search for "Az.Accounts", then select the resulting module.

From the module page, I can search the module for the cmdlets and functions to verify it has what I need. From here, I can select the Import action at the top. Once the import is successful, I need to navigate the Modules gallery and perform the same steps for the Az.Resources module so I can use the Get-AzResourceGroup in my runbook.
The imports can take a few minutes, but you can verify the status by navigating back to Shared Resources > Modules. In this list of modules, verify the module import progress in the Status column. From this Modules page, also note there are options to import a custom module. Select the + Add a module and choose a .zip file that contains the module code. Note that the module code's file name must match the file name of the zip file. Importing custom written module is a fantastic feature of Azure Automation that allows you to write a runbook to fit any scenario.
Connect to Azure from PowerShell Runbook
Back in the Automation Account, I will create a new runbook that will connect to Azure and retrieve my resource groups. In the Automation Account, navigate to Process Automation > Runbooks, then select + Create a runbook. From here, input a name for the runbook, select the PowerShell runbook type, then select Create.
In the Edit PowerShell Runbook window, I need to write code that will retrieve the information stored in AzureRunAsConnection. For this, I use the Get-AutomationConnection cmdlet and specify the name of the Run As connection. If I store the connection information to a variable, I can reference the tenant ID, application ID, and certificate thumbprint in the Connect-AzAccount cmdlet to authenticate to my Azure tenant.
$connection = Get-AutomationConnection -Name AzureRunAsConnection

Connect-AzAccount -ServicePrincipal `
    -Tenant $connection.TenantID `
    -ApplicationId $connection.ApplicationID `
    -CertificateThumbprint $connection.CertificateThumbprint
If you do not remember the cmdlet to retrieve the Run As connection asset, remember you can expand Assets on the left to view saved connections and other assets. Selecting Add to canvas will insert the necessary PowerShell code.
Once the runbook connects, I can now use other Az cmdlets to work with Azure resources. Since I imported the Az.Resources module, I can retrieve all my resource groups using the Get-AzResourceGroup cmdlet.

From here, I will save the runbook code, publish, and then execute it. When I view the runbook job status, the Output tab will show the runbook successfully authenticating to Azure. It will then start displaying my resource groups.

Retrieving resource groups is only the beginning of what is possible. Imagine what other tasks you could automate within a runbook, such as taking snapshots of virtual machine disks, turning off virtual machines, or automatically resizing resources based on a schedule.
Managing Runbook Authentication without Run As Accounts
You might be asking, "If I don't create a Run As account with the Automation Account, how can I authenticate to Azure?". There are a few options for managing authentication in this scenario, which I outline in the following sections. Remember, if you choose not to use the built-in Run As account, you will need to ensure that whichever account used has permissions to the Azure resources the script is trying to access. The built-in Run As account accomplishes this by being a Contributor at the subscription level, but you may want to apply more granular permissions.
Create the Run As Account
I can still enable the Run As account after the Automation Account has been created. In the account, navigate to Account Settings > Run as accounts. Previously in this screen, we viewed the existing account, but I can also create one if it doesn't exist already. No additional inputs or settings are needed to set up the account.

Create a Service Principal
Applications use a service principal to access resources secured by Azure AD. The service principle represents the application inside the tenant, and you can assign it permissions to resources (just like a user account).
To create a service principal, navigate to Azure Active Directory in the Azure portal. In the Manage section, select App registrations. Select + New registration, then input the application's name, support account type (for now, leave at the default), and redirect URI (this can be blank).
After you create the app registration, on the Overview page, take note of the application ID and tenant ID. You will need this information later to create a new connection or credentials asset (see following sections). In the Manage section, you can navigate to Certificates & secrets to upload a certificate or generate a secret (essentially a password for the account). You can then use either of these to authenticate out to Azure.
Create a New Connection Asset
You can create your own connection asset that includes an ApplicationId, TenantId, Certificate Thumbprint, and Subscription Id. If you created a service principal in the previous section, you could use it for this purpose.
Create a connection asset in the Automation Account by navigating to Shared Resources > Connections, then select + Add a connection. Give a name to the connection asset, select AzureServicePrincipal as the type, and enter the required information from the service principal. Once the connection is created, I can use it just like the AzureRunAsConnection asset in my PowerShell code from earlier.
Create a Credentials Asset
Finally, you can store security credentials as a shared resource. The credentials asset includes a username and password, and you can use these on cmdlets that accept a PSCredential object. In the Automation Account, navigate to Shared Resources > Credentials and select + Add a credential. Name the credential and enter the username and password.
Once you create the asset, you can retrieve the credentials using Get-AutomationPSCredential and store it in a variable. You then pass the credentials to the Connect-AzAccount cmdlet, like so:
$creds = Get-AutomationPSCredential -Name '{CredentialAssetName}'

Connect-AzAccount -Credentials $creds
Don't forget, you can use the Asset explorer on the left to input the correct code and asset name into your script.
Conclusion
In this post, you learned how to configure authentication so your runbooks can access Azure resources. Being able to authenticate to Azure without storing usernames and passwords in the runbook code is a security best practice. Now that you can connect to Azure, start thinking about what tasks you can automate using runbooks. You will need to be sure to import any modules required by your code.
Check back soon for my next post on Azure Automation where I will show how to configure a hybrid worker so you can execute a runbook anywhere.
Jeff Brown is a Systems Engineer and Cloud Administrator with over a decade of experience in server and application administration. In his career, he has managed a wide range of technologies including Windows Server, Exchange Server, Skype for Business, Azure, and Microsoft 365. Jeff enjoys writing about technology topics and creating content for the community. You can find more of his content over at jeffbrown.tech.

Top comments (0)