
Fixing bugs are important part of a development flow. But spotting errors could be a hard task, company should have a team of testers (which probably won't be able to spot all errors) or bug-less code (which is impossible). Also it could be really hard to defeat bugs, even though you know about it. So what can we do with spotting and fixing errors? Use error monitoring and tracking tools. With proper tools it becomes an easy task which increase app's reliability dramatically.
TL;DR
Here a working project with all the configs etc
Why it is so important
These tools allow you to exclude from the workflow the stage at which you need to guess where the error occurred, how it affects users and what it leads to. Moreover, it allows you to separate critical bugs from small ones. After all, disappointing user experience is one of the reasons why users will start looking for an alternative to your product, generate less profit, etc.
But in order to receive comprehensive information about the error, you need to select the appropriate tools and configure them correctly.
In this article, we will consider such a tool as Sentry. However, there are others. If you have just launched a product or it is important for you to see heat maps of user behaviour, I recommend to pay attention to LogRocket. This is the great tool that will allow you to see both errors and user behaviour on the page.
What is source maps
The Source Maps mechanism is used to map program source texts to scripts generated from them.
Currently, in a client-side development environment, source code is almost never integrated into a web page in its native form. Before being integrated, the code goes through various stages of processing such as minification, optimisation, and transpilation. Therefore, for debugging purposes, a mechanism is needed to allows you to see the source code written in a human-understandable language in the debugger. You can read about it in detail here
What is error tracking and monitoring tools
When user encounters a crash or error tracking and monitoring tools capture this event, so you can trace error logs, give you the visibility you need to understand what and where went wrong.
For example imagine this React component
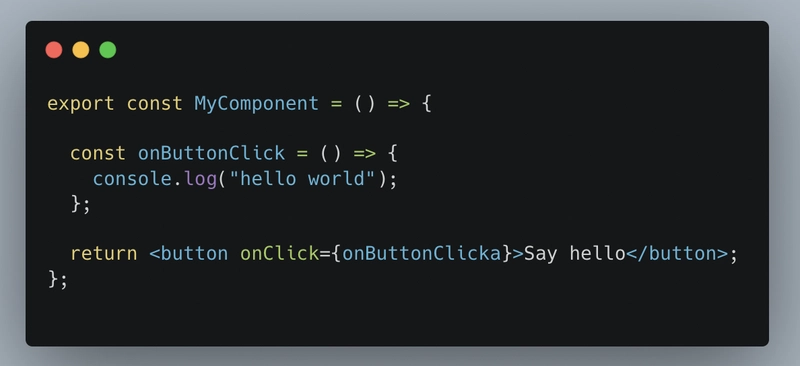
Button has onButtonClicka but there is no such function, it’s a typo. Probably, you can miss it in your code base, but error tracking tools will give you a report on it.
Code part
We will start with a simple installation of Sentry to your React project and then step-by-step add more functionality to it.
Install packages
You need to install:
-
@sentry/reactThis is official Sentry SDK for ReactJS -
@sentry/tracingIt provides integrations for browser
Adding Sentry
-
In your .env file add this line. It could be found in you Sentry project settings.
REACT_APP_SENTRY_DSN='YOUR_SENTRY_DSN' -
In your
index.tsfile add.
import * as Sentry from '@sentry/react'
import { BrowserTracing } from '@sentry/tracing'

Sentry.init({
    dsn: process.env.REACT_APP_SENTRY_DSN,
    integrations: [new BrowserTracing()],
    tracesSampleRate: 0.3,
  })
And thats it. Now you have error tracing tool in your project. In the next steps we will add generating source maps, creating releases for Sentry and associate source maps and releases.
Adding source maps
In this step we will activate source maps generating.
-
In your .env file add this line:
GENERATE_SOURCEMAP=trueThat solution works on both Linux and Windows.
-
In your
tsconfig.jsonadd this line:
"sourceMap": true,Enables the generation of source maps files.
-
In your
.gitignorefile add this line:
# source map
/sourceMap
It will exclude your source maps from git system.
Now in your build/static/js there are file with extension *.chunk.js.map In next steps we will return to our source maps, but now lets
Creating release codes
Release is the version of your code that was deployed to the environment. We will configure the project so that each new deployment creates a new release. Thus, you can easily determine when the problem occurred, in which version, analyse the code, fix the error, and understand if the error is fixed in the new release. We will also set up releases so that each release has its own source maps.
We will set short version of git commit ID as a release ID.
Install additional package:
-
cross-envWe will use cross-env package to make in work on Linux/Windows/MacOs systems. -
Into your .env file add:
REACT_APP_ENV="YOU_ENVIROMENT"It will help to distinguish envs in Sentry releases.
-
In your
package.jsonfile add to your building scripts.
cross-env REACT_APP_SENTRY_RELEASE=`git rev-parse --short HEAD`For example it will look like
"build": "cross-env REACT_APP_SENTRY_RELEASE=`git rev-parse --short HEAD` react-scripts build && npm run upload-source-maps"It will pass env. Works on Linux/Windows/MacOs.
-
Into your
index.tsfile add this line to sentry config
release: process.env.REACT_APP_SENTRY_RELEASE,
environment: process.env.REACT_APP_ENV,
So it will look like
Sentry.init({
    dsn: process.env.REACT_APP_SENTRY_DSN,
        release: process.env.REACT_APP_SENTRY_RELEASE,
    environment: process.env.REACT_APP_ENV,
    integrations: [new BrowserTracing()],
    tracesSampleRate: 0.3,
  })
After these steps let’s look into out Sentry. Open releases in left-side bar

There will be all your releases. Currently we have only one release

Also you could filter only on that envs that you need

We could open our release and see all the errors that happened.

We can see some information about the error, but so far we have no source maps appended to our release so information are not full

So in the next step we will build release and upload it to the Sentry.
Creating scripts for building release and upload it.
Install additional packages
-
shxIt is a wrapper around UNIX shell commands, we will use in our script -
@sentry/cliOfficial Sentry Command Line Interface. We will use it for uploading and creating releases.
Create file .sentryclirc file into your root folder and add:
[defaults]
url=https://sentry.io/
org=YOUR_ORG_NAME
project=YOUR_PROJECT_NAME

[auth]
token=YOUR_AUTH_TOKEN_CODE
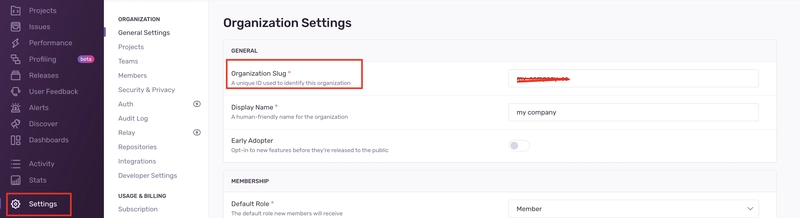
To find you org code in Sentry go to Settings and find your Organization Slug
project is a project name which could be found in a list of projects.
token is placed into Settings → Account → API → Auth Tokens

Also create sentry.js into your root directory and put
const SentryCli = require('@sentry/cli');

(async function () {
  const release = process.env.REACT_APP_SENTRY_RELEASE;
  if (!release) {
    console.warn('REACT_APP_SENTRY_RELEASE are not provided');

    return;
  }

  const cli = new SentryCli();

  try {
    console.log('Now creating sentry release ' + release);

    await cli.releases.new(release);

    console.log('Now uploading source maps');
    await cli.releases.uploadSourceMaps(release, {
      sourceMapPath: 'sourceMap',
      urlPrefix: '~/static/js',
      include: ['sourceMap'],
      rewrite: true,
    });

    console.log('Releasing release');

    await cli.releases.finalize(release);
  } catch (e) {
    console.error('Source maps uploading failed:', e);
  }
})();
This script fill create and upload release and source maps to the Sentry.
Put new script into package.json file
"upload-source-maps": "shx rm -rf sourceMap && mkdir sourceMap && shx mv ./build/static/js/*.map sourceMap/ && cross-env REACT_APP_SENTRY_RELEASE=`git rev-parse --short HEAD` node sentry.js"
This script remove old sourceMap folder, transfer .map files from build directory and invoke sentry.js with REACT_APP_SENTRY_RELEASE = short git commit ID as a release name
Then modify build script:
"build": "cross-env REACT_APP_SENTRY_RELEASE=`git rev-parse --short HEAD` react-scripts build && npm run upload-source-maps",
And start yarn build
on success you’ll get this message in your terminal

your production build has no source map in it

Sentry will associate source maps and .js files, so after all the manipulation in a detailed view of issue you will see the exact problem in your code

Congratulations! Now it will be easier to find out in which release the error occurred. You can also see what exactly caused the error right in Sentry, which will save a lot of time for debugging.

Top comments (2)
Oh, thanks for sharing LogRocket, haven't heard about it, but seems like this what I've been looking for.
And great to see clear guide of how to setup sentry releases, good job
You're welcome !
Glad to hear that. But be careful, there is a limitation on user sessions in LogRocket :)