Dans le précédent article, j’avais parlé de la manière dont les processeurs (CPU, Central Processing Unit) et les processeurs graphiques (GPU, pour Graphics Processing Unit) pouvaient s’associer dans le cadre d’une accéleration de calculs en Deep Learning avec notamment FluxArchitectures.jl :
Prédiction de séries chronologiques avec une carte GPU dans Paperspace Gradient et le langage Julia…
Je vais m’intéresser ici à un package en Julia pour l’écriture de code de haut niveau pour des calculs de stencil parallèles à haute performance qui peuvent être déployés à la fois sur les GPU et les CPU avec ParallelStencil.jl :
Ce projet s’appuie en effet sur ImplicitGlobalGrid.jl. Ce dernier étant le résultat d’une collaboration entre le Centre national suisse de calcul scientifique, l’ETH Zurich (Dr. Samuel Omlin), l’Université de Stanford (Dr. Ludovic Räss) et le Centre suisse de géo-informatique (Prof. Yuri Podladchikov).
Il rend presque triviale la parallélisation distribuée des applications GPU et CPU basées sur des stencils et permet une mise à l’échelle faible, proche de l’idéal, des applications du monde réel sur des milliers de GPU …
Pour rappel, en mathématiques, un stencil est une représentation géométrique d’un réseau nodal illustrant les points d’intérêt utilisés dans un schéma de discrétisation pour la résolution numérique des équations différentielles, notamment des équations aux dérivées partielles combinant des variables spatio-temporelles.
Les stencils peuvent être compacts ou non, selon les niveaux utilisés autour du point d’intérêt. Exemple avec le stencil de la méthode de Crank-Nicolson en une dimension :
Crank-Nicolson method - Wikipedia
ParallelStencil permet donc aux spécialistes du domaine d’écrire un code de haut niveau compatible avec l’architecture pour effectuer des calculs de stencils parallèles à haute performance sur les GPU et les CPU.
Je pars d’un serveur ARM pour l’illustrer chez Equinix Metal dôté d’un processeur à 80 cœurs capable de faire tourner chacun d’entre eux à 3,0 GHz. Il s’agit ici d’un processeur Ampere® Altra® basé sur la technologie Arm, qui est conçu pour offrir des performances élevées prévisibles, une évolutivité linéaire et une efficacité énergétique. La gamme utilisée ici est c3.large.arm64 avec 256 Go de RAM, deux disques SSD 960 Go et deux ports réseau standard de 25 Gbps.
Standard Gen3 Bare Metal Server
Le serveur est actif et je peux y installer Julia avec Juliaup (gestionnaire de version pour le langage Julia):
GitHub - JuliaLang/juliaup: Julia installer and version multiplexer
[root@julia ~]# curl -fsSL [https://install.julialang.org](https://install.julialang.org) | sh

info: downloading installer
Welcome to Julia!

This will download and install the official Julia Language distribution
and its version manager Juliaup.

Juliaup will be installed into the Juliaup home directory, located at:

/root/.juliaup

The julia, juliaup and other commands will be added to
Juliaup bin directory, located at:

/root/.juliaup/bin

This path will then be added to your PATH environment variable by
modifying the profile files located at:

/root/.bashrc
  /root/.bash_profile

Julia will look for a new version of Juliaup itself every 1440 seconds when you start julia.

You can uninstall at any time with juliaup self uninstall and these
changes will be reverted.

✔ Do you want to install with these default configuration choices? · Proceed with installation

Now installing Juliaup
Installing Julia 1.7.2+0 (aarch64).
Julia was successfully installed on your system.

Depending on which shell you are using, run one of the following
commands to reload the the PATH environment variable:

. /root/.bashrc
  . /root/.bash_profile
Et en y ajoutant un Kernel Julia pour le futur notebook Jupyter avec IJulia :
GitHub - JuliaLang/IJulia.jl: Julia kernel for Jupyter
[root@julia ~]# julia
               _
   _ _ _(_)_ | Documentation: [https://docs.julialang.org](https://docs.julialang.org)
  (_) | (_) (_) |
   _ _ _| |_ __ _ | Type "?" for help, "]?" for Pkg help.
  | | | | | | |/ _` | |
  | | |_| | | | (_| | | Version 1.7.2 (2022-02-06)
 _/ |\ __'_|_|_|\__'_| | Official [https://julialang.org/](https://julialang.org/) release
|__/ |

([@v1](http://twitter.com/v1).7) pkg> add IJulia
Installation de Pyston avec Conda dans sa version aarch64 (pour rappel, il s’agit d’un fork de CPython 3.8.12 avec des optimisations supplémentaires pour la performance. Il est destiné aux grandes applications du monde réel, telles que les services Web, et permet d’accélérer jusqu’à 30 % les performances sans nécessiter de travail de développement) …
- Press ENTER to confirm the location
  - Press CTRL-C to abort the installation
  - Or specify a different location below

[/root/pystonconda] >>>
PREFIX=/root/pystonconda
Unpacking payload ...
Collecting package metadata (current_repodata.json): done
Solving environment: done

## Package Plan ##

environment location: /root/pystonconda

added / updated specs:
    - _openmp_mutex==4.5=1_gnu
    - brotlipy==0.7.0=py38ha99fdf8_1003
    - bzip2==1.0.8=hf897c2e_4
    - ca-certificates==2021.10.8=h4fd8a4c_0
    - certifi==2021.10.8=py38h8bd2641_2
    - cffi==1.15.0=py38h75de86d_0
    - charset-normalizer==2.0.12=pyhd8ed1ab_0
    - colorama==0.4.4=pyh9f0ad1d_0
    - conda-package-handling==1.8.0=py38ha99fdf8_0
    - conda==4.12.0=py38h74e7ebe_0
    - cryptography==36.0.2=py38hfcaa8e2_0
    - freetype==2.10.4=hdf53a3c_1
    - idna==3.3=pyhd8ed1ab_0
    - jbig==2.1=hf897c2e_2003
    - jpeg==9e=h3557bc0_0
    - lerc==3.0=h01db608_0
    - libdeflate==1.10=hf897c2e_0
    - libffi==3.4.2=h3557bc0_5
    - libgcc-ng==11.2.0=hf1cc4e7_14
    - libgomp==11.2.0=hf1cc4e7_14
    - libpng==1.6.37=hbd635b3_2
    - libstdcxx-ng==11.2.0=h0d0a5bb_14
    - libtiff==4.3.0=hdea21e4_3
    - libwebp-base==1.2.2=hf897c2e_1
    - libzlib==1.2.11=h4e544f5_1014
    - lz4-c==1.9.3=h01db608_1
    - ncurses==6.2=h7fd3ca4_4
    - openssl==1.1.1n=h4e544f5_0
    - pip==22.0.4=pyhd8ed1ab_0
    - pycosat==0.6.3=py38ha99fdf8_1009
    - pycparser==2.21=pyhd8ed1ab_0
    - pyopenssl==22.0.0=pyhd8ed1ab_0
    - pysocks==1.7.1=py38h74e7ebe_4
    - pyston2.3==2.3.3=13_23_pyston
    - pyston==2.3.3=4
    - python==3.8.12=4_23_pyston
    - python_abi==3.8=2_23_pyston
    - readline==8.1=h1a49cc3_0
    - requests==2.27.1=pyhd8ed1ab_0
    - ruamel_yaml==0.15.80=py38hf9daa5f_1006
    - setuptools==61.3.0=py38h8bd2641_0
    - six==1.16.0=pyh6c4a22f_0
    - sqlite==3.37.0=hc164836_0
    - tk==8.6.12=hd8af866_0
    - tqdm==4.63.1=pyhd8ed1ab_0
    - tzdata==2022a=h191b570_0
    - urllib3==1.26.9=pyhd8ed1ab_0
    - wheel==0.37.1=pyhd8ed1ab_0
    - xz==5.2.5=h6dd45c4_1
    - yaml==0.2.5=hf897c2e_2
    - zlib==1.2.11=h4e544f5_1014
    - zstd==1.5.2=h41fb7a4_0

Preparing transaction: done
Executing transaction: done
installation finished.
Do you wish the installer to initialize PystonConda
by running conda init? [yes|no]
[no] >>> yes
no change /root/pystonconda/condabin/conda
no change /root/pystonconda/bin/conda
no change /root/pystonconda/bin/conda-env
no change /root/pystonconda/bin/activate
no change /root/pystonconda/bin/deactivate
no change /root/pystonconda/etc/profile.d/conda.sh
no change /root/pystonconda/etc/fish/conf.d/conda.fish
no change /root/pystonconda/shell/condabin/Conda.psm1
no change /root/pystonconda/shell/condabin/conda-hook.ps1
no change /root/pystonconda/lib/python3.8/site-packages/xontrib/conda.xsh
no change /root/pystonconda/etc/profile.d/conda.csh
modified /root/.bashrc

==> For changes to take effect, close and re-open your current shell. <==

If you'd prefer that conda's base environment not be activated on startup,
   set the auto_activate_base parameter to false:

conda config --set auto_activate_base false

Thank you for installing PystonConda!
Enfin, j’ajoute Jupyter Lab via Conda :
Installation - JupyterLab 3.4.0rc0 documentation
et ce dernier se retrouve en exécution :
(base) [root@julia ~]# jupyter lab --ip "0.0.0.0" --port "80" --allow-root
[I 2022-04-30 21:28:18.371 ServerApp] jupyterlab | extension was successfully linked.
[I 2022-04-30 21:28:18.371 ServerApp] jupyterlab_tabnine | extension was successfully linked.
[I 2022-04-30 21:28:18.378 ServerApp] nbclassic | extension was successfully linked.
[I 2022-04-30 21:28:18.497 ServerApp] notebook_shim | extension was successfully linked.
[I 2022-04-30 21:28:18.497 ServerApp] webio_jupyter_extension.serverextension | extension was successfully linked.
[I 2022-04-30 21:28:18.541 ServerApp] notebook_shim | extension was successfully loaded.
[I 2022-04-30 21:28:18.542 LabApp] JupyterLab extension loaded from /root/pystonconda/lib/python3.8-pyston2.3/site-packages/jupyterlab
[I 2022-04-30 21:28:18.542 LabApp] JupyterLab application directory is /root/pystonconda/share/jupyter/lab
[I 2022-04-30 21:28:18.544 ServerApp] jupyterlab | extension was successfully loaded.
 install dir: /root/pystonconda/lib/python3.8-pyston2.3/site-packages/jupyterlab_tabnine
Begin to download Tabnine Binary from [https://update.tabnine.com/bundles/4.4.6/aarch64-unknown-linux-musl/TabNine.zip](https://update.tabnine.com/bundles/4.4.6/aarch64-unknown-linux-musl/TabNine.zip)
[I 2022-04-30 21:28:18.579 ServerApp] Registered jupyterlab_tabnine extension at URL path
[I 2022-04-30 21:28:18.580 ServerApp] jupyterlab_tabnine | extension was successfully loaded.
[I 2022-04-30 21:28:18.587 ServerApp] nbclassic | extension was successfully loaded.
[I 2022-04-30 21:28:18.588 ServerApp] webio_jupyter_extension.serverextension | extension was successfully loaded.
[I 2022-04-30 21:28:18.588 ServerApp] Serving notebooks from local directory: /root
[I 2022-04-30 21:28:18.588 ServerApp] Jupyter Server 1.17.0 is running at:
[I 2022-04-30 21:28:18.588 ServerApp] [http://julia:80/lab?token=d1997c56bda8f1ad9a3b551e91674a6ccdd3be5ca855a9f1](http://julia:80/lab?token=d1997c56bda8f1ad9a3b551e91674a6ccdd3be5ca855a9f1)
[I 2022-04-30 21:28:18.588 ServerApp] or [http://127.0.0.1:80/lab?token=d1997c56bda8f1ad9a3b551e91674a6ccdd3be5ca855a9f1](http://127.0.0.1:80/lab?token=d1997c56bda8f1ad9a3b551e91674a6ccdd3be5ca855a9f1)
[I 2022-04-30 21:28:18.588 ServerApp] Use Control-C to stop this server and shut down all kernels (twice to skip confirmation).
Depuis le notebook Jupyter, j’utilise un Kernel mettant en oeuvre le Multi-Threading avec ces 80 coeurs disponibles :
using IJulia

installkernel("Julia-80-threads", env=Dict("JULIA_NUM_THREADS"=>"80"))
Depuis ce Kernel avec IJulia, j’installe le package Parallelstencil.jl et des dépendances pour la première démonstration :
using Pkg
Pkg.add(["Plots", "Printf", "Statistics", "ParallelStencil"])
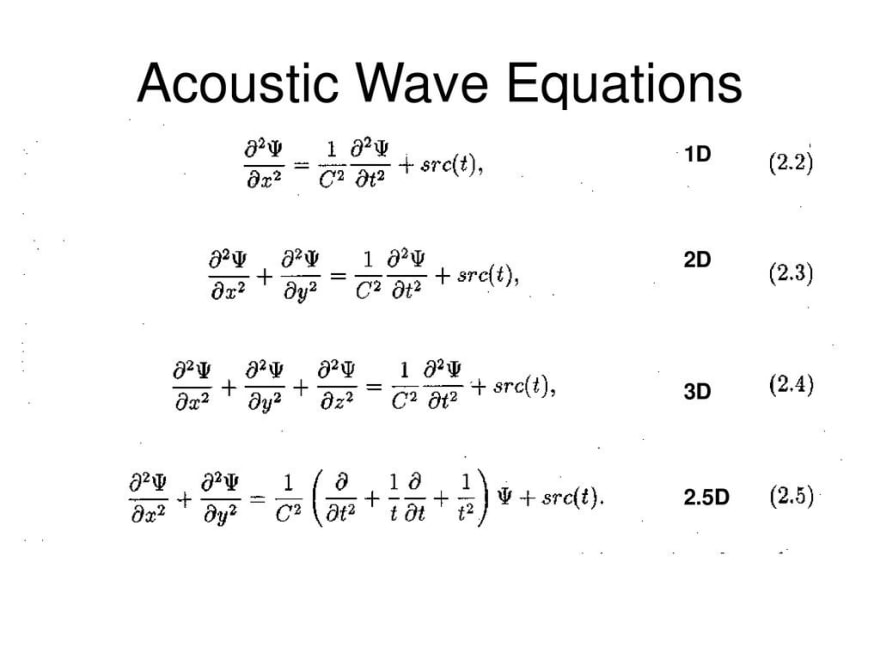
qui reprend l’exemple des ondes acoustiques en 2-D en utilisant la formulation de vitesse-pression fractionnée en utilisant ce code en Julia :
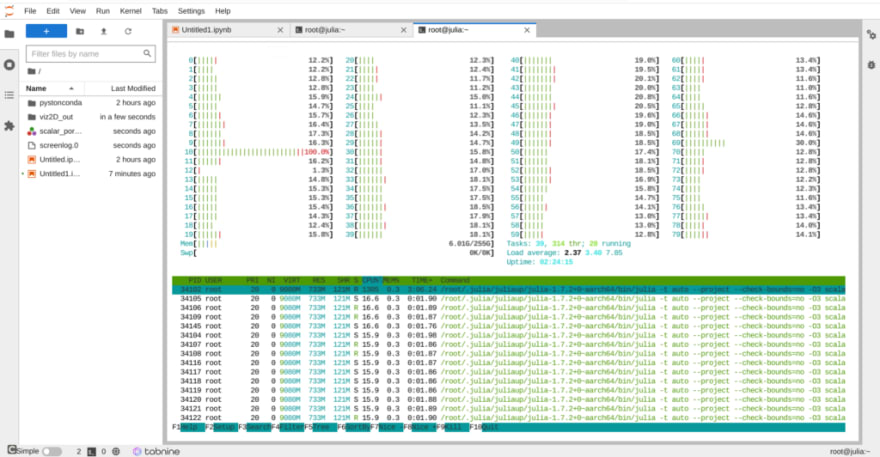
On voit ici que l’ensemble des coeurs est sollicité pour le calcul :
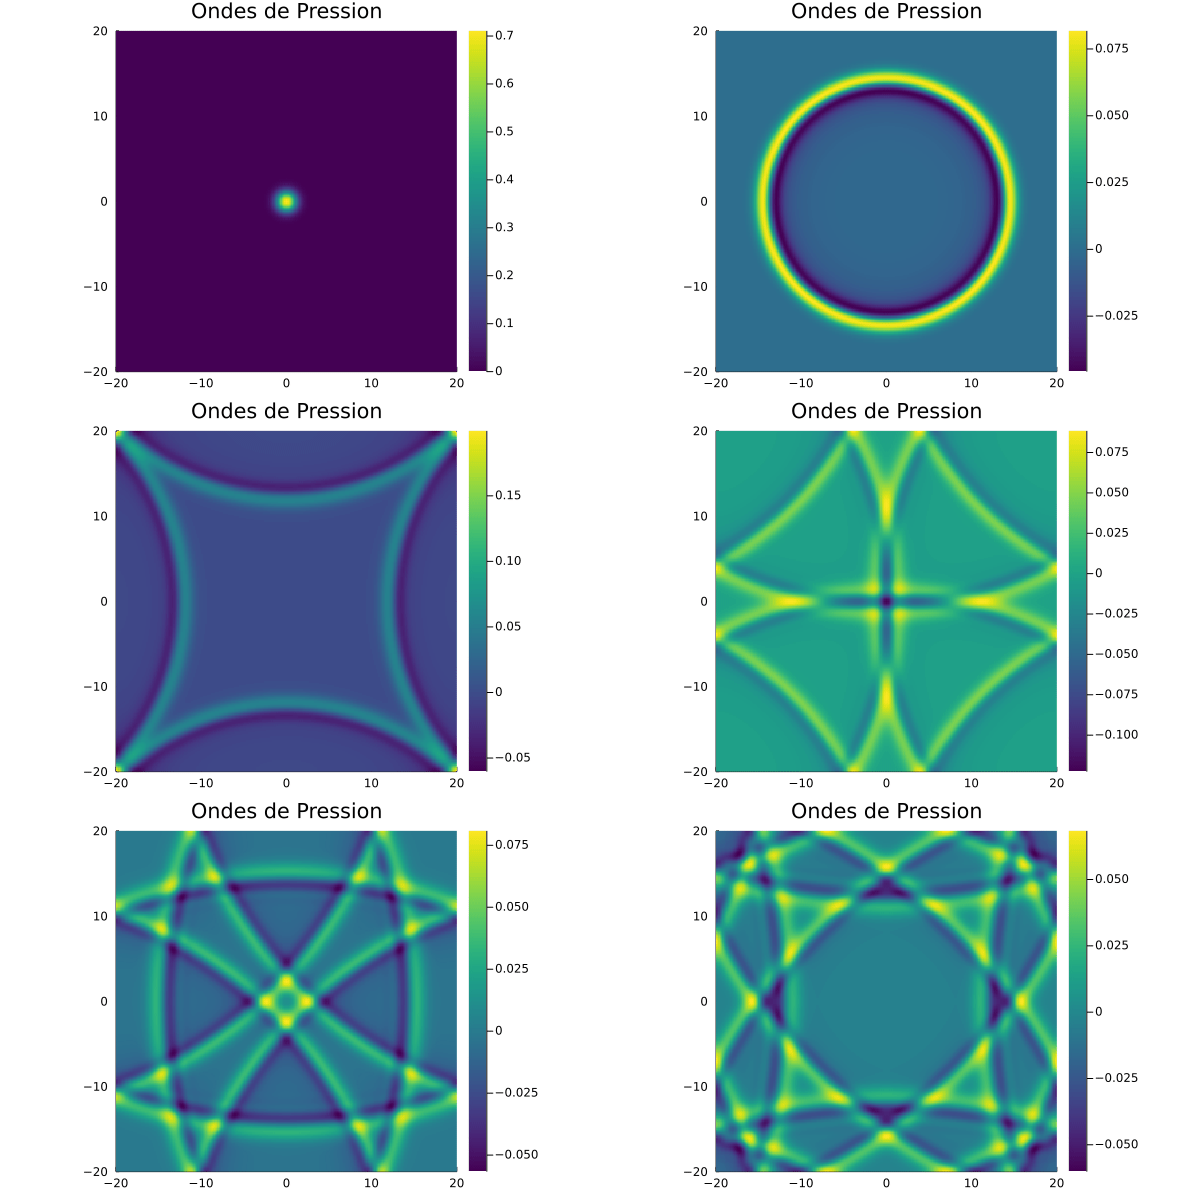
J’obtiens cette simulation numérique :
Autre démonstration avec la convection thermique en 2-D (par exemple la convection du manteau terrestre) combinant un écoulement visqueux de Stokes à l’advection-diffusion de la chaleur et incluant une viscosité de cisaillement dépendant de la température.
Convection (heat transfer) - Wikipedia
La résolution s’effectue au niveau de cellules de convection thermique via ce code depuis le notebook Jupyter :
où tous les coeurs CPU sont utilisés conjointement :
Le calcul se termine …
avec cette simulation numérique :
Ce calcul aurait pû etre lancé sans le notebook Jupyter avec des performances optimales depuis le terminal directement :
$ julia -t auto --project --check-bounds=no -O3 ThermalConvection2D.jl
avec un temps d’exécution inférieur …
Autre exemple avec les ondes de porosité scalaire qui résout les équations des ondes solitaires scalaires en 2-D en supposant que la pression totale est lithostatique (éliminant ainsi le besoin de résolution pour la pression totale explicitement) …
avec ce code :
Je le lance également directement depuis le terminal :
$ julia -t auto --project --check-bounds=no -O3 scalar_porowaves2D.jl
pour obtenir cette simulation numérique …
En comparaison, pour illustrer cette fois-çi l’utilisation d’une carte GPU NVIDIA avec CUDA, je lance une instance dans Azure :
Série NCas T4 v3 - Azure Virtual Machines
Elle possède une carte GPU NVIDIA Tesla T4 avec ces caractéristiques :
https://medium.com/media/cbdcb36f169af9ad92bbfe80354fa81f/href
et ce système optimisé avec Ubuntu 20.04 et les bibliothèques / SDK pour CUDA :
Cela peut prendre la forme d’un script de ce type avec Azure CLI dans le cadre d’un Scale Set de machines virtuelles comme vu précédemment :
#!/bin/bash
az group create --name RG-GPU --location eastus2
az network nsg create -g RG-GPU -n nsg-gpu
az network vnet create --address-prefixes 10.0.0.0/16 --name Net1 --resource-group RG-GPU --subnet-name Subnet1 --subnet-prefixes 10.0.0.0/24 --network-security-group nsg-gpu
az vmss create \
  --resource-group "RG-GPU" \
  --name GPU \
  --instance-count 1 \
  --image nvidia:ngc_azure_17_11:gen2_21-11-0:21.11.0 \
  --vm-sku Standard_NC4as_T4_v3 \
  --vnet-name Net1 \
  --subnet Subnet1 \
  --nsg nsg-gpu \
  --priority Spot \
  --accelerated-networking true \
  --lb "" \
  --public-ip-per-vm \
  --upgrade-policy-mode manual \
  --eviction-policy delete \
  --admin-username ubuntu \
  --os-disk-size-gb 128 \
  --ssh-key-values ~/.ssh/id_rsa.pub
J’ajoute CUDA.jl pour reprendre l’exemple de la convection thermique 2-D :
GitHub - JuliaGPU/CUDA.jl: CUDA programming in Julia.
Je modifie le code précédent pour activer l’utilisation de CUDA et de la carte GPU NVIDIA avec une itération double :
const USE_GPU = true
using ParallelStencil
using ParallelStencil.FiniteDifferences2D
@static if USE_GPU
    @init_parallel_stencil(CUDA, Float64, 2)
else
    @init_parallel_stencil(Threads, Float64, 2)
end
using Plots, Printf, Statistics, LinearAlgebra
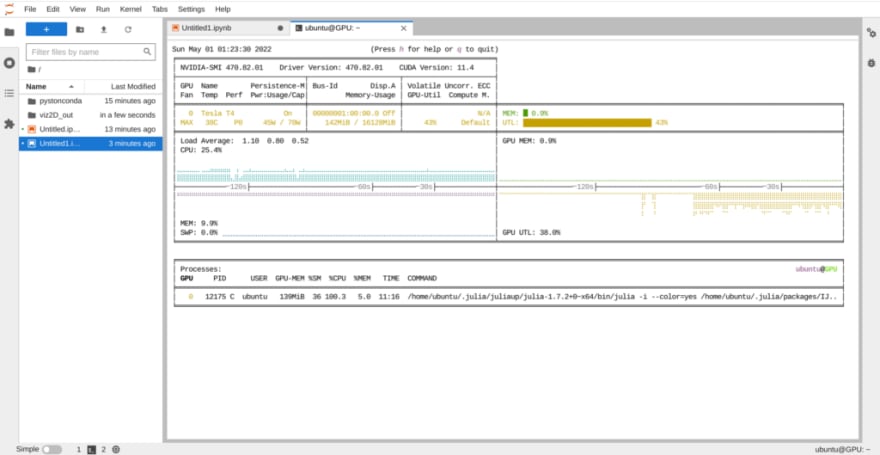
Cette dernière participe au calcul comme le démontre Nvitop :
Le calcul se termine avec un temps largement inférieur au précédent …
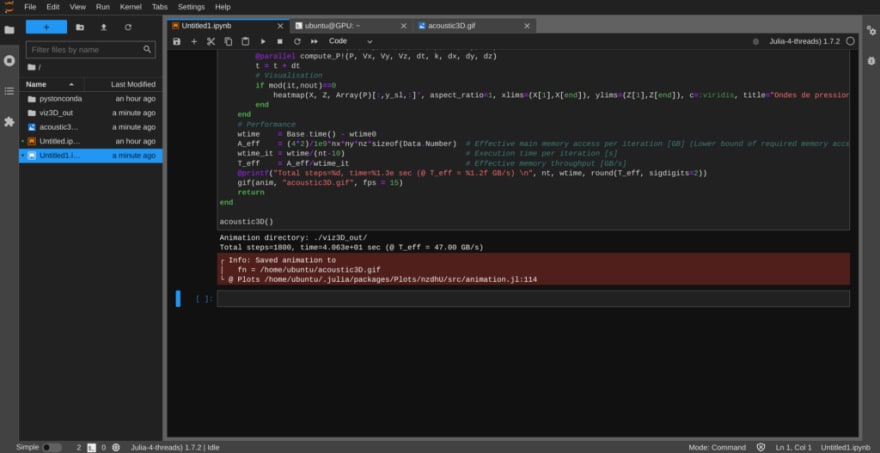
Même résultat avec l’équation acoustique 3-D :
const USE_GPU = true
using ParallelStencil
using ParallelStencil.FiniteDifferences3D
@static if USE_GPU
    @init_parallel_stencil(CUDA, Float64, 3)
else
    @init_parallel_stencil(Threads, Float64, 3)
end
using Plots, Printf, Statistics

@parallel function compute_V!(Vx::Data.Array, Vy::Data.Array, Vz::Data.Array, P::Data.Array, dt::Data.Number, ρ::Data.Number, dx::Data.Number, dy::Data.Number, dz::Data.Number)
    @inn(Vx) = @inn(Vx) - dt/ρ*@d_xi(P)/dx
    @inn(Vy) = @inn(Vy) - dt/ρ*@d_yi(P)/dy
    @inn(Vz) = @inn(Vz) - dt/ρ*@d_zi(P)/dz
    return
end

@parallel function compute_P!(P::Data.Array, Vx::Data.Array, Vy::Data.Array, Vz::Data.Array, dt::Data.Number, k::Data.Number, dx::Data.Number, dy::Data.Number, dz::Data.Number)
    @all(P) = @all(P) - dt*k*(@d_xa(Vx)/dx + @d_ya(Vy)/dy + @d_za(Vz)/dz)
    return
end

##################################################
@views function acoustic3D()
    # Physics
    lx, ly, lz = 40.0, 40.0, 40.0 # domain extends
    k = 1.0 # bulk modulus
    ρ = 1.0 # density
    t = 0.0 # physical time
    # Numerics
    nx, ny, nz = 255, 255, 255 # numerical grid resolution; should be a mulitple of 32-1 for optimal GPU perf
    nt = 1000 # number of timesteps
    nout = 10 # plotting frequency
    # Derived numerics
    dx, dy, dz = lx/(nx-1), ly/(ny-1), lz/(nz-1) # cell sizes
    # Array allocations
    P = @zeros(nx ,ny ,nz )
    Vx = @zeros(nx+1,ny ,nz )
    Vy = @zeros(nx ,ny+1,nz )
    Vz = @zeros(nx ,ny ,nz+1)
    # Initial conditions
    P .= Data.Array([exp(-((ix-1)*dx-0.5*lx)^2 -((iy-1)*dy-0.5*ly)^2 -((iz-1)*dz-0.5*lz)^2) for ix=1:size(P,1), iy=1:size(P,2), iz=1:size(P,3)])
    dt = min(dx,dy,dz)/sqrt(k/ρ)/6.1
    # Preparation of visualisation
    ENV["GKSwstype"]="nul"; if isdir("viz3D_out")==false mkdir("viz3D_out") end; loadpath = "./viz3D_out/"; anim = Animation(loadpath,String[])
    println("Animation directory: $(anim.dir)")
    y_sl = Int(ceil(ny/2))
    X, Y, Z = -lx/2:dx:lx/2, -ly/2:dy:ly/2, -lz/2:dz:lz/2
    # Time loop
    for it = 1:nt
        if (it==11) global wtime0 = Base.time() end
        @parallel compute_V!(Vx, Vy, Vz, P, dt, ρ, dx, dy, dz)
        @parallel compute_P!(P, Vx, Vy, Vz, dt, k, dx, dy, dz)
        t = t + dt
        # Visualisation
        if mod(it,nout)==0
            heatmap(X, Z, Array(P)[:,y_sl,:]', aspect_ratio=1, xlims=(X[1],X[end]), ylims=(Z[1],Z[end]), c=:viridis, title="Ondes de pression"); frame(anim)
        end
    end
    # Performance
    wtime = Base.time() - wtime0
    A_eff = (4*2)/1e9*nx*ny*nz*sizeof(Data.Number) # Effective main memory access per iteration [GB] (Lower bound of required memory access: H and dHdτ have to be read and written (dHdτ for damping): 4 whole-array memaccess; B has to be read: 1 whole-array memaccess)
    wtime_it = wtime/(nt-10) # Execution time per iteration [s]
    T_eff = A_eff/wtime_it # Effective memory throughput [GB/s]
    @printf("Total steps=%d, time=%1.3e sec (@ T_eff = %1.2f GB/s) \n", nt, wtime, round(T_eff, sigdigits=2))
    gif(anim, "acoustic3D.gif", fps = 15)
    return
end

@time acoustic3D()
Je termine avec le mode XPU pour l’équation acoustique 3-D combinant simultanément CPU et GPU dans le calcul en ajoutant MPI.jl et ImplicitGlobalGrid.jl :
GitHub - JuliaParallel/MPI.jl: MPI wrappers for Julia
On utilise ici ParallelStencil en conjonction avec ImplicitGlobalGrid.jl avec un seul thread CPU ou sur des milliers de GPU/CPU. Encore une fois, un simple booléen USE_GPU définit s’il fonctionne sur un ou plusieurs GPU ou CPU ( JULIA_NUM_THREADS définit le nombre de cœurs utilisés dans ce dernier cas).
Le solveur peut être exécuté avec un nombre quelconque de processus. ImplicitGlobalGrid.jl crée automatiquement une grille de calcul globale implicite basée sur le nombre de processus avec lesquels le solveur est exécuté (et basée sur la topologie du processus, qui peut être explicitement choisie par l’utilisateur ou déterminée automatiquement).
D’où ce code modifié :
const USE_GPU = true
using ParallelStencil
using ParallelStencil.FiniteDifferences3D
@static if USE_GPU
    @init_parallel_stencil(CUDA, Float64, 3)
else
    @init_parallel_stencil(Threads, Float64, 3)
end
using ImplicitGlobalGrid, Plots, Printf, Statistics
import MPI

@parallel function compute_V!(Vx::Data.Array, Vy::Data.Array, Vz::Data.Array, P::Data.Array, dt::Data.Number, ρ::Data.Number, dx::Data.Number, dy::Data.Number, dz::Data.Number)
    @inn(Vx) = @inn(Vx) - dt/ρ*@d_xi(P)/dx
    @inn(Vy) = @inn(Vy) - dt/ρ*@d_yi(P)/dy
    @inn(Vz) = @inn(Vz) - dt/ρ*@d_zi(P)/dz
    return
end

@parallel function compute_P!(P::Data.Array, Vx::Data.Array, Vy::Data.Array, Vz::Data.Array, dt::Data.Number, k::Data.Number, dx::Data.Number, dy::Data.Number, dz::Data.Number)
    @all(P) = @all(P) - dt*k*(@d_xa(Vx)/dx + @d_ya(Vy)/dy + @d_za(Vz)/dz)
    return
end

##################################################
@views function acoustic3D()
    # Physics
    lx, ly, lz = 60.0, 60.0, 60.0 # domain extends
    k = 1.0 # bulk modulus
    ρ = 1.0 # density
    t = 0.0 # physical time
    # Numerics
    nx, ny, nz = 127, 127, 127 # numerical grid resolution; should be a mulitple of 32-1 for optimal GPU perf
    nt = 1000 # number of timesteps
    nout = 20 # plotting frequency
    # Derived numerics
    me, dims, nprocs, coords, comm = init_global_grid(nx, ny, nz) # MPI initialisation
    select_device() # select one GPU per MPI local rank (if >1 GPU per node)
    dx, dy, dz = lx/(nx_g()-1), ly/(ny_g()-1), lz/(nz_g()-1) # cell sizes
    # Array allocations
    P = @zeros(nx ,ny ,nz )
    Vx = @zeros(nx+1,ny ,nz )
    Vy = @zeros(nx ,ny+1,nz )
    Vz = @zeros(nx ,ny ,nz+1)
    # Initial conditions
    P .= Data.Array([exp(-(x_g(ix,dx,P)-0.5*lx)^2 -(y_g(iy,dy,P)-0.5*ly)^2 -(z_g(iz,dz,P)-0.5*lz)^2) for ix=1:size(P,1), iy=1:size(P,2), iz=1:size(P,3)])
    dt = min(dx,dy,dz)/sqrt(k/ρ)/6.1
    # Preparation of visualisation
    ENV["GKSwstype"]="nul"
    if (me==0)
        if isdir("viz3D_out")==false mkdir("viz3D_out") end; loadpath = "./viz3D_out/"; anim = Animation(loadpath,String[])
        println("Animation directory: $(anim.dir)")
    end
    nx_v, ny_v, nz_v = (nx-2)*dims[1], (ny-2)*dims[2], (nz-2)*dims[3]
    if (nx_v*ny_v*nz_v*sizeof(Data.Number) > 0.8*Sys.free_memory()) error("Not enough memory for visualization.") end
    P_v = zeros(nx_v, ny_v, nz_v) # global array for visu
    P_inn = zeros(nx-2, ny-2, nz-2) # no halo local array for visu
    y_sl = Int(ceil(ny_g()/2))
    Xi_g = dx:dx:(lx-dx) # inner points only
    Zi_g = dz:dz:(lz-dz)
    # Time loop
    for it = 1:nt
        if (it==11) tic() end
        @hide_communication (16, 8, 4) begin # communication/computation overlap
            @parallel compute_V!(Vx, Vy, Vz, P, dt, ρ, dx, dy, dz)
            update_halo!(Vx, Vy, Vz)
        end
        @parallel compute_P!(P, Vx, Vy, Vz, dt, k, dx, dy, dz)
        t = t + dt
        # Visualisation
        if mod(it,nout)==0
            P_inn .= Array(P[2:end-1,2:end-1,2:end-1]); gather!(P_inn, P_v)
            if (me==0) heatmap(Xi_g, Zi_g, P_v[:,y_sl,:]', aspect_ratio=1, xlims=(Xi_g[1],Xi_g[end]), ylims=(Zi_g[1],Zi_g[end]), c=:viridis, title="Ondes de pression"); frame(anim) end
        end
    end
    # Performance
    wtime = toc()
    A_eff = (4*2)/1e9*nx*ny*nz*sizeof(Data.Number) # Effective main memory access per iteration [GB] (Lower bound of required memory access: H and dHdτ have to be read and written (dHdτ for damping): 4 whole-array memaccess; B has to be read: 1 whole-array memaccess)
    wtime_it = wtime/(nt-10) # Execution time per iteration [s]
    T_eff = A_eff/wtime_it # Effective memory throughput [GB/s]
    if (me==0) @printf("Total steps=%d, time=%1.3e sec (@ T_eff = %1.2f GB/s) \n", nt, wtime, round(T_eff, sigdigits=2)) end
    if (me==0) gif(anim, "acoustic3D.gif", fps = 15) end
    finalize_global_grid()
    return
end

@time acoustic3D()
Exemple d’écoulement visqueux de Stokes qui met en oeuvre les équations incompressibles de Stokes avec une rhéologie de cisaillement linéaire en 3D.
Navier-Stokes equations - Wikipedia
La configuration du modèle représente une inclusion sphérique flottante dans une matrice. On réutilise ici le mode XPU :
https://medium.com/media/b2ca4a2e83d14802d2133209e64506e9/href
On obtient cette simulation numérique avec le champ de pression dynamique, la vitesse verticale Vz, le log10 du résidu d’équilibre de la quantité de mouvement verticale Rz et le log10 de l’évolution de la norme d’erreur en fonction des itérations pseudo-transitoires.
On peut retrouver ParallelStencil.jl dans d’autres projets comme celui-çi :
Comme on l’a vu, ParallelStencil permet de cacher la communication derrière le calcul avec un simple appel de macro. Tout ceci pour une utilisation la plus simple possible par les scientifiques du domaine, rendant ainsi le développement rapide et interactif d’applications multi-GPU massivement évolutives et performantes, facilement accessible …
À suivre !













Latest comments (0)