
Table Of Contents
Introduction
Most people have heard of AWS and developers have started learning how they can use it to further augment the quality of their projects. Recently I have begun the process of becoming one of those people. So far it has been an enlightening deep dive into the different services they offer. It’s hard to get your bearings with something as huge as AWS so for my learning journey I decided to focus on projects I thought would be cool and see how AWS might help facilitate what I build.
One project I have been wanting to get into is a Twitter bot using a new language I have been learning, Go. A simple twitter bot is easy to set up. Their API makes it easy to interface with and there are thousands of libraries that utilize this API. I am all for anything which makes my job easier. Let’s see how much easier still I can make this using AWS Lambda.
Lambda is a compute service for running code on the cloud. With which you can create functions and triggers to start those functions and Lambda runs your code without having to provision a server. It’s serverless. I realized this is uniquely appropriate for things like a regularly scheduled Twitter bot. With Lambda I do not need to spin up an EC2 or a local VM instance and continually run my bot. I can simply set a schedule and create the bot and Lambda starts up, runs my function, and powers down.
Lambda’s free services are also a great use case because the first 1 million requests per month are free. After which you pay $0.20 per additional million requests; The first 400,000 GB seconds are also free and $0.0000166667 for every GB second after that. This Twitter bot is a quote regurgitation service so there is very little chance of it ever exceeding any of that.
Twitter App Set-Up
The Twitter API has been in v1.1 since 2016. In 2020 however, they began rolling out v2. Rebuilt from the ground up they also overhauled their pricing. For our purposes, we can still use the free tier. Let’s talk about the Twitter end first. If you go to Twitter’s Developer portal you can head to the dashboard and set up a new app. We are assuming here that you have already set up a developer account with Twitter. If you have not, check this out on how to get started.
Once we get the developer account set up we can head to the Apps portal. Here we can click the top right to create a new app.

There is some information required for setting up an app. You need to provide information about the app and a website if the app is going to be attached to one. Once that is set up, we can grab our keys and tokens so and start accessing Twitter through the API library.

Quick note:
Make sure to check the permissions for your Twitter App. By default, the permissions are set to read. So, if by the end you see permission errors from the API this might be the culprit. Make sure to set the permissions to the least necessary. Here we are making a bot to post Tweets, so we need “Read and write” permissions. I do not need the ability to DM anyone, so I chose “Read and write”. So, go to the “Keys and tokens” section, copy your consumer key, consumer secret, access token, and access secret. Now that we got our credentials, we are ready to party
Twitter Bot Code
Creating a custom library for dealing with the API is preferable for any production system as it allows for the customization needed. For our purposes, we only need to open a stream and send a tweet through it to post. So, I decided to use the Anaconda Library which still uses v1.1 of the Twitter API.
The first thing we do is set up our development environment. I use VS Code with the Go plugin to help me. I also use a Windows environment to make everything. Later I will circle back to why this isn’t a great idea. We are also going to use Go modules to keep track of our dependencies. Go 1.11 and up can support Go modules and anything above Go 1.13 is going to use them by default. With that in mind, we set up our file directory as such
- Bot
- go.mod
We CD to the root of our project and run:
go mod init bot/main
Now we have our directory and our mod file which is where our dependencies are housed. Next, we create our bot file.
- Bot
- go.mod
- bot.go
- quotes.json
You will also notice that there is a JSON file called quotes.json this is where we will store our quotes for now. Now we can get started building. The first thing is we add our dependencies. I added a few here and I will explain the need for them as we go along.

The next part you will see is our data types we created for the bot.
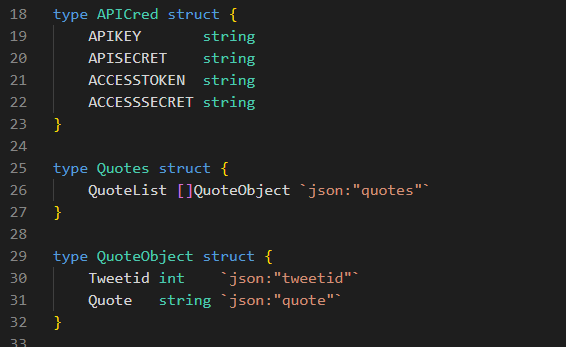
Here we created structs to house some data. Structs in Go are a way to group related data. I have found them to be some of the most useful data type collections to perform a variety of tasks with. The first named APICred is just a way to house and reuse the API credentials that we grabbed from the Twitter App we created.
The next structs are for the quote object we will be grabbing from the JSON file. We have a struct made for the individual quotes and one for an array of the aforementioned QuoteObject structs. This makes it easier to grab all our quotes and use the list to set our bot logic. This is not an ideal solution as it assumes we will always grab all the quotes from the list. This is not a scalable solution as we would not want to grab all the entries from say a database and then sort through them manually. However, for this low threshold example, it works.

Quick Note
You will notice for the struct keys that they are all capitalized. This is good practice because for me it looks neater and some issues can come up when working with things like JSON data. When unmarshalling the data into struct fields those fields are only exported if they are capitalized. This allows the JSON package to use the field names to unmarshal the data from the JSON file for use in our bot. I learned this after seeing my data come up blank when grabbing the quotes from the file. You can also see the issue in this Stack Overflow article and save yourself some time.
Another thing to note on the structs is the tags or annotations attached to the struct keys. In many cases, this might not be necessary. As in the case where everything is named the same on the JSON fields and the struct fields; The package should be smart enough to match them. However, I program as defensively as I can so the JSON tags allow for me to match them up directly. The annotations tell the JSON package that the TweetId field needs to be matched with the tweetid field in the JSON file. The tags do that for all of them. The QuoteList field will grab that entire “quotes” block from the JSON file. This also works when working with binary JSON or BSON information, say from grabbing information from Mongo DB.
Here is the next block of code for facilitating some functions in our bot:

Now comes some more fun. When working with local files stuff like tokens, keys, DB params, etc we would use a .env file and import it into our code. In this case, we are not using this locally or on a production machine, we are creating an AWS Lambda function! The env variables can be set on the Lambda dashboard. On the code side, we do not need to load an environment library, we can just use the os library to load our environment variables directly from AWS. Above we create a new instance of the APICred and call it env and return that from the function. Here we make use of Go’s return type naming in the function signature to initialize our returned item. Then we set the fields and we are ready to party rock the Twitterverse.
The next function is a helper function to come up with a random index used to randomly search for a quote to tweet out. We use the math/rand library along with the Seed function to get a random index within the range of quotes that we have. We serve a minimum index value which should always be 0 (maybe make a const next time?) and a max value. In this case, we will count the number of entries (quotes) and use that as the max value. We do this so that we can always come to an index with the range of quotes we have. In other words, if we have ten quotes we want to return an index between 0-10 and use that to match to the tweetid field in the JSON file and grab a quote. The “Seed” function here is important as the rand function is deterministic. As in it will return the same value each time you run it. The “rand” function is considered pseudo-random for this reason. If Seed is not called rand will by default using Seed(1) which will get us the same number each time. By using the Seed function to set the seed on each run and using the Unix time will make sure to feed in an int64 number representing the time that changes every second.
Next, we come up with the logic to grab our quote:

This function is used to get a quote and return it as a string to our API object, which then sends the string to Twitter. The first part is to grab the file and return a file object using the os.Open function. This assumed the JSON file is in the same directory as the bot file. If not an error is thrown. We set up the defer quote_file.Close() so that all the other logic in our function runs and the defer runs last. This keeps our file open for us until we are done. This is great for flow control.
Next, we need to convert what is in the files into a []byte list so that we can unmarshal the data. The ioutil.ReadAll function call allows us to assign the contents of the file to a byte object. After that, we unmarshal the data using the json package. Here we set it to unmarshal the quotes_bytes object into a pointer for our quotes object which is initialized in the line above that. Here is where our annotations go to work and make everything work automagically. We set some error handling and then we get to work getting our quote.
We set the maximum number of quote objects by referencing the QuoteList field and counting the number of objects in the array. Next, we get our random_tweetid which will grab a random index from zero to the max number of quotes. Finally, we get our quote by calling the Quote field from one of the random indexes in our QuoteList which returns a quote ready to be served to Twitter.
The last part of our bot puts everything together and execute:
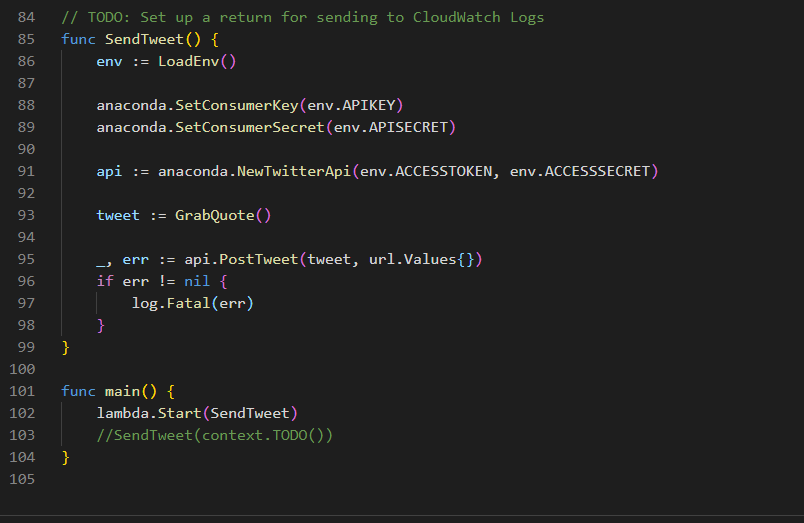
We load our environment variables using the APICred struct and using the Anaconda library we set our Consumer key and secret and then create the API instance using the access token and secret. Now with all the power at our fingertips, we call our GrabQuote function which grabs a random quote from our JSON file and sets it to the tweet variable. In the PostTweet function call you can see that we pass in our quote via the tweet object and we also pass in url.Value{} which we can call from the net/url library import. If you look through the Anaconda source, in the PostTweet function the url values are used to set some required API fields. Once those are set the library creates a channel to pass in all the fields to send to the API. Diving into how the libraries source is a good idea. You should know how every line in your program works. This includes knowing how a library handles inputs and outputs. We set some error handling, just in case, for the PostTweet and we send the tweet through the API and into the timeline.
Every Go program has the main function where everything is called. Here we utilize the AWS Lambda for Go library to call our function. The lambda.Start() is how Lambda will call our function. In our case, we house all the logic in the SendTweet function and use the logic in main() to call it. If we were creating say an API we would create a handler function which is called from the lambda.Start() function. In our case I decided not to return anything however, Lambda allows for the return of between 0-2 arguments. This is good for returning logs of the events run and or errors. AWS Lambda offers great tools for logging the actions of your function and the returns are how they are recorded. If setting returns one of the returns must implement an error according to the docs. So you can say return a success log with some information you want to track and an error for when stuff goes wrong. AWS Lambda also allows for passing in between 0-2 function arguments. They do say in the documentation that if passing in an argument a context is required. I have not tested this yet, but I will, and I will probably write about it.
Our bot is done! Let’s party.

But Wait, we can't party yet!

Before that, we need to set up a way for our bot to run. It would suck to have to manually run this every time I want to send a quote. Might as well open an alt account and do it manually. It would suck even more to have to provision a cloud instance to run all day for the sake of posting a tweet once or twice a day. Screw that, let’s use Lambda.
Setting up a Lambda Function
Here we are going to assume that we already have an AWS account set up. If you don’t go set it up. It’s useful to have. Now that we’re set up go find your AWS Management Console and search the services for Lambda:

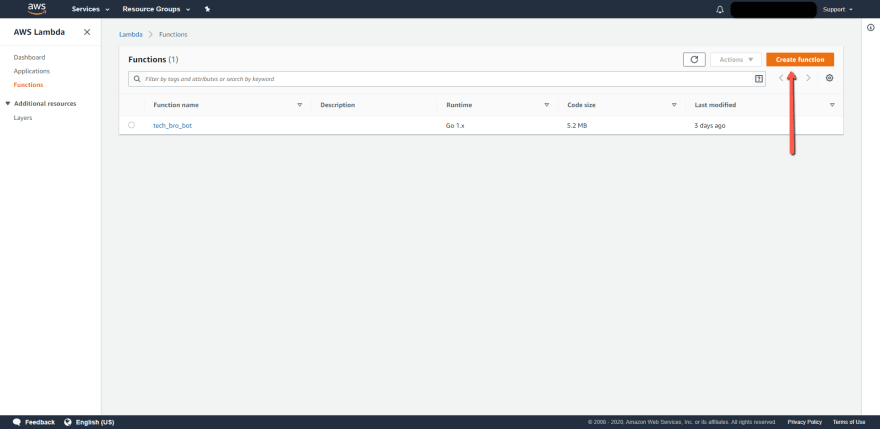
Click Lambda and you will be brought to the Lambda screen. Here you can find a list for all your applications, functions, and layers. In addition to all that you have a dashboard dedicated to monitoring all your Lambda stuff.

It will show the number of functions you have going, the storage used up by your functions, your concurrency, and tons of other stuff. We mentioned the pricing for Lambda; The prices vary depending on the amount you allocate. The pricing also takes into account the duration of time it takes for your functions to execute as well as the number of requests. For us, we are using far less than what is allowed on the free tier since we are only invoking once a day at this point. This will change as I further develop the project.
Now, let’s make a function:
On the next screen, we have some information to fill out. The first is authoring options. Here we can leave the default “Author from scratch” option selected. There is also the option for using blueprints to develop our app. If you select this, you are given a list of different already made sample projects which you can use to quickly develop apps. You can also filter out what you are looking for. This makes it easier to quickly prototype an app and start standing up your back end. There is also another option to Browse serverless app repository where you have a similar solution for quickly standing up apps. For our purposes, we are going to author from scratch.
We put in our function name and select the runtime. The runtime we will circle back to but be sure to select Go 1.x which will set us up to use Golang as our function language. For the permissions, we default to Create a new role with basic Lambda permissions which is fine for now. If you have existing roles created in your IAM console you can feel free to use one. Just be sure that the role has the correct permissions for running Lambda functions. You can also Create a new role from AWS policy templates which allows you to create a role using policy templates built by AWS.
Now we are ready to stand up our function. We are taken to the home page for the function. Here we can start setting up everything:

The first thing we are going to do is set our environment variables. As I mentioned above, we are not loading in an env library and we are getting our variables directly from AWS. Here is where we set those up:

If you scroll down you will come to a section labeled Environment variables, hit the Edit button and you are taken to the next page where we can set up our vars. If you hit the Add environment variable you can start entering in all your needed variables. In our case, we set up one for the consumer key, consumer secret, access key, and access secret. As noted in our code we will import them in our code using the os.GetEnv function. AWS even notes in the margins how this is done for each language. So spice. AWS lets us set up encryption for our variables as well. This will allow for sensitive information (like API credentials) to be encrypted on the Lambda console and when being used by the API. AWS provides a Key Management API service for encrypting and decrypting your sensitive information. I will not go into how to use the API here but setting up encryption is probably a good idea, so I will write a follow up about it at some point. Once all our variables are set, we can go back to the main page and upload our code.
The function code is usually available for editing in the “Function Code” section. There a Cloud9 IDE is set up for looking at and editing our code. I have used it and it is a useful tool. I don’t think it is compatible with the Golang runtime though. I will come back to this as I ran into issues when building my function.
Now we have to bundle our code and put it into AWS through our newly made function. As mentioned above I used Windows to create this package so I will go over what I did as reflected in the docs. However, I ran into issues when using Windows to do this. Based on my experimenting and some feedback from some smart people I found that I needed to use a Unix based endpoint to build out the project. I will break down why after.
Once we have everything set to go on the AWS side, we are ready to build our package. So CMD your way to the root of the package. Now we will set our build environment to Linux using this command:
Set GOOS=linux
We do this to set the build command to tell the compiler to use the Linux binary. So far as I can tell this is a bit of a known issue with using Windows to do all this. This has not been solved as of the publication of this, but I am sure a fix will come through. Earlier when we set our runtime to Go 1.x we were also setting the server operating system which runs our function. When we say "serverless" we mean someone else’s servers. In this case when setting the Go run time we are setting the OS to run the Amazon Linux operating system. Amazon Linux is a server operating system made to run AWS based services. You can also create images using Amazon Linux for running tons of stuff.
After we set the binary, we can build our package:
go build -o main bot.go
It is important to make sure our executable is called main. As the main function is the invocation point and we are going to set the handler to run main. We need to upload the executable created by the build command to our Lambda function as a zip file. So we send our main executable to a zip file. In our case, we need to zip up the main executable and the quotes.json file since we will need that for our quotes. I did this manually but there is a command you can run for zipping up everything. Shown below:
%USERPROFILE%\Go\bin\build-lambda-zip.exe -output main.zip main
Quick Note:
So far as I can tell when you zip the contents of the package using Windows it retains Windows permissions. Retention of POSIX permissions is a known issue with using Lambda cross-platform. POSIX permissions are a Unix standard which defines the permission structure used to interact with files and applications. From what I can tell these permissions are not set correctly when doing all this in Windows. However, when I used my Mac (a Unix based OS) I was able to build and test my function without issue.
After we zip up our executable and our quotes file we can navigate down to the “Function code” and upload our zip:

Select the Upload as zip option and we can upload our newly created zip file.
The final step is we need to scroll down to the Basic Settings section and select Edit. The edit basic settings page is where we can set a description, change our run time, edit the handler, set the memory, set a time out period, and edit the Execution rule. One thing to note is the memory that you can set to whatever you would like. The default 512 MB is fine, especially in our case. But keep in mind that the more memory the more it may cost. Additionally, you may not need all the memory you set and that could end up costing you money needlessly. For our purposes, it’s fine where it is.

We need to edit the handler and set that to main. As I mentioned above, we are using the main handler to invoke our executable within Lambda. So, make sure that when you build your package you name it as main so that the handler will work.
Congrats! Now that we are set up, but wait! We should test this. On the top right of the function home page, there is a drop-down for selecting a test to run. Clicking this gives us the option for setting up a new test. You can use this to set up regular scenarios, edge cases, or any other specific tests you want to run. For us we just need to hit “Configure test events” and this will bring up the test creation page:

Here we will want to select the Create new test event which will allow us to select an event template. The default Hello World template is fine for now but there are built-in test templates which you can choose from depending on your needs. Once this test is created it can be used as a test template for our function. You can leave the default JSON there, and make sure to name your test event. The JSON can be edited to accommodate whatever you are using. For example, we can test the ability to run a Lambda function via an Alexa trigger. So, the testing JSON file would be where you would pass in echo API session information. For now, the default is fine, when we’re done hit Create. Now we can test our function by hitting the Test button:

Huzzah! We tested good. Now what? Well, I think we would like to run this bot on a schedule. Lambda allows for a lot of different triggers but for our purposes, we want to run on a regular schedule. Like a cron job. To do this we select the Add trigger button on the Designer section of our function home.
Then we are taken to the trigger page where we want to search for EventBridge (formally CloudWatch Events).

Next, we hit select the rule for EventBridge:
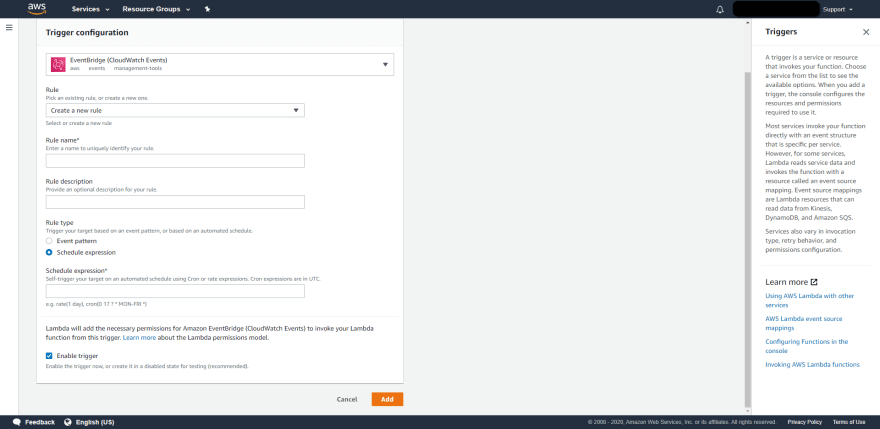
We can reuse old rules we have created or we can hit the Create a new rule option. That opens a bunch of configuration options. We can set the name of the rule, whether it is scheduled or based on an event, and if we want to enable the trigger. We want to schedule this to run daily so we select the Schedule expression option and then enter cron(0 12 * * ? *) as our expression. This is an awesome reference for the cron syntax. This is set to run daily at noon Keep in mind for cron expressions UTC is used. This will run every day at noon UTC. Then we hit save. Now we are done! We have officially added to the background noise of Twitter!
Conclusion
Doing this allowed me to check out how cool and simple running stuff off Lambda is. I most likely will continue to do stuff with it as I continue to develop this project. A couple of things I will experiment with is using a Cloud9 IDE available in AWS to develop things like this. It is Unix based so performing the build functions won’t pose too many new issues. It looks as if AWS is bringing the users to the cloud, even by force if needed. It’s not a bad thing though, nothing is perfect, and this is a great solution for running serverless back end services.
The second part of this series will focus on integrating a database into our Lambda function. Putting six quotes in a JSON file might be an interesting challenge to pull from but it hardly makes for a good way to send out information or useless quotes in our case. I am also going to explore possible language interpretation to create a trained bot that throws out randomly generated quotes based on input data. I’m not looking to replicate the racism, sexism, and pure unadulterated horribleness flying through the Twitter pipes. So, it will be an interesting challenge to try and filter much of that out. We shall see. For now, use Lambda, it’s awesome!
Now we can actually party!


Latest comments (0)