The tutorial that would have spared me hours of struggling with my keyboard
Have you ever been in a situation that started with …
Someone at work: “Look, it’s super simple, let me explain …”
… that continued with …
[ … agony of arcane jargon …]
Same enthusiastic colleague: “See, did you get it?”
You (poker face): “Sure, gotcha, aha, no problem, whoo, super simple indeed, aha … ”
… but that ended up with you sneaking into the bathroom to babble chunks of keywords you barely remember.
“Ok Google, what is a cluster of Ingress in a cube of nodes? … Please please please help me.”
Nope. Hasn’t happened to me. Not even once. No Sir!
But let’s pretend that it did happen (hypothetically) several years ago, and that all the articles I stumbled upon during my research were made of such cryptic symbols that tears started to come out of my eyes (and they weren’t tears of joy).
I said: Let’s pretend.
So based on this fictional situation, let’s try to write the easiest tutorial that involves setting up Traefik as an Ingress Controller for Kubernetes. (And I promise: I will explain everything that is not obvious.)
You can skip this part if you’re familiar with Kubernetes.
What You Need to Know about Kubernetes
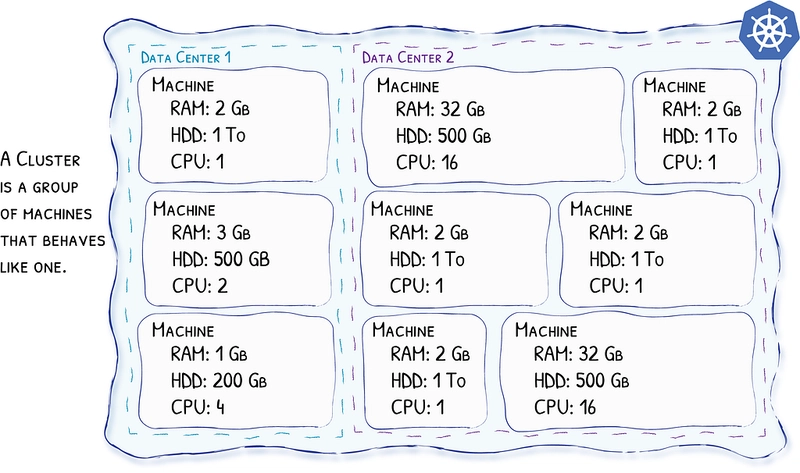
Kubernetes, as in Cluster
Kubernetes is a cluster technology. It means that you will see a cluster of computers as one entity. You will not deploy an application on a specific computer, but somewhere in the cluster, and it’s Kubernetes’s job to determine the computer that best matches the requirements of your application.
Nodes
Each computer in the cluster is called a node. Eventually, the nodes will host your applications. The nodes can be spread throughout the world in different data centers, and it’s Kubernetes’s job to make them communicate as if they were neighbors.

Containers
I guess that you are already familiar with containers. Just in case you’re not, they used to be the next step of virtualization, and today they are just that: the de-facto standard for virtualization. Instead of configuring a machine to host your application, you have your application wrapped into a container (along with everything your application needs — OS, libraries, dependencies, …) and deployed on a machine that hosts the container engine which is in charge of actually running the containers.
Containers technically don’t belong to Kubernetes; they’re just one of the tools of the trade.

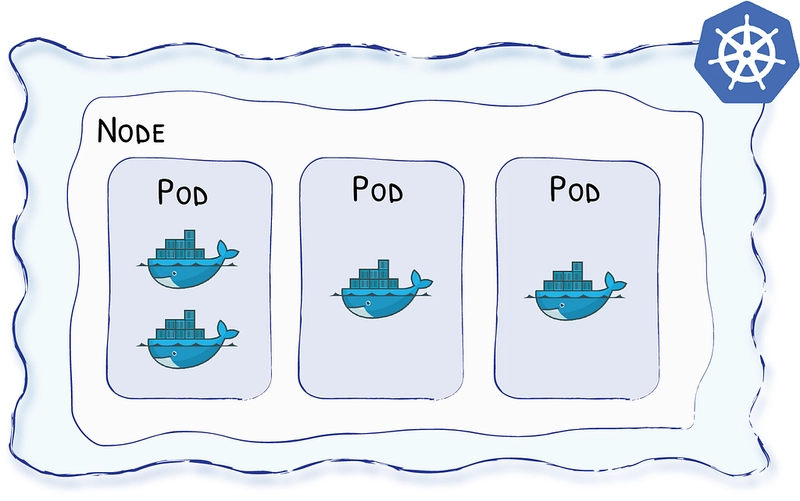
Basically, Kubernetes sees containers like in the following diagram:

Pods
Because Kubernetes loves layers, Kubernetes adds the notion of Pods around your containers. Pods are the smallest unit you will eventually deploy to the cluster. A single Pod can hold multiple containers, but for the sake of simplicity let’s say for now that a single Pod will host a single container.
So, in a Kubernetes world, a Pod is the new name for an instance of your application, an instance of your service. Pods will be hosted on the Nodes, and it’s Kubernetes’s job to determine which Node will host which Pod.
Deployments
Here comes the fun part! Deployments are requirements you give to Kubernetes regarding your applications (your Pods). Basically, with deployments you tell Kubernetes:
Hey Kube, always keep 5 instances (or replicas) of these Pods running — always.
It’s Kubernetes’s job to ensure that your cluster will host 5 replicas of your Pods at any given time.

Services
Oh, yet another fun concept …
Pods’ lifecycle are erratic; they come and go by Kubernetes’ will.
Not healthy? Killed.
Not in the right place? Cloned, and killed.
(No, you definitely don’t want to be ruled by Kube!)
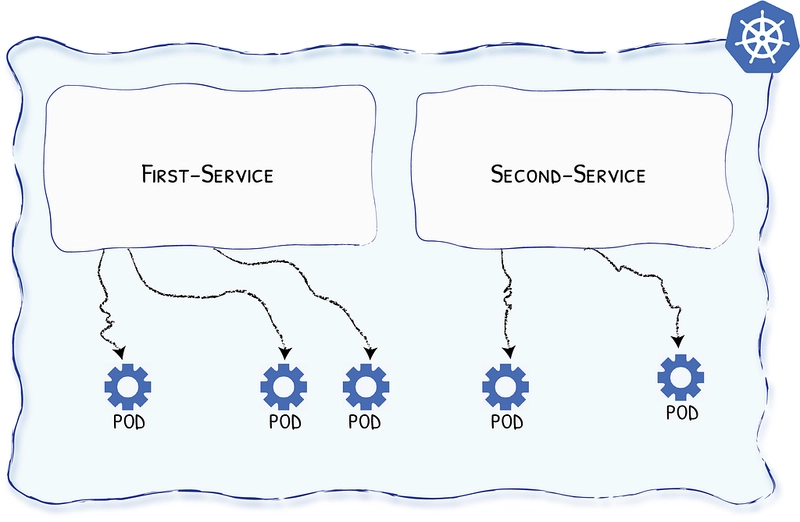
So how can you send a request to your application if you can’t know for sure where it lives? The answer lies in services.
Services define sets of your deployed Pods, so you can send a request to “whichever available Pod of your application type.”
Ingress
So we have Pods in our cluster.
We have Services so we can talk to them from within our cluster. (Technically, there are ways to make services available from the outside, but we’ll purposefully skip that part for now.)
Now, we’d like to expose our Services to the internet so customers can access our products.
Ingress objects are the rules that define the routes that should exist.

Ingress Controller
Now that you have defined the rules to access your services from the outside, all you need is a component that routes the incoming requests according to the rules … and these components are called Ingress Controllers!
And since this is the topic of this article — Traefik is a great Ingress Controller for Kubernetes.
What You Need to Know about Traefik
- It rocks.
- It’s easy to use.
- It’s production ready and used by big companies.
- It works with every major cluster technology that exists.
- It’s open source.
- It’s super popular; more than 150M downloads at the time of writing.
… oh? Is my opinion biased? Well, maybe … but all of the above is true!
Let’s Start Putting Everything Together!
This is the part where we actually start to deploy services into a Kube cluster and configure Traefik as an Ingress Controller.
Prerequisite
You have access to a Kubernetes cluster, and you have kubectl that points to that cluster.
Just so you know, here I’m using Kubernetes embedded in Docker for Mac.
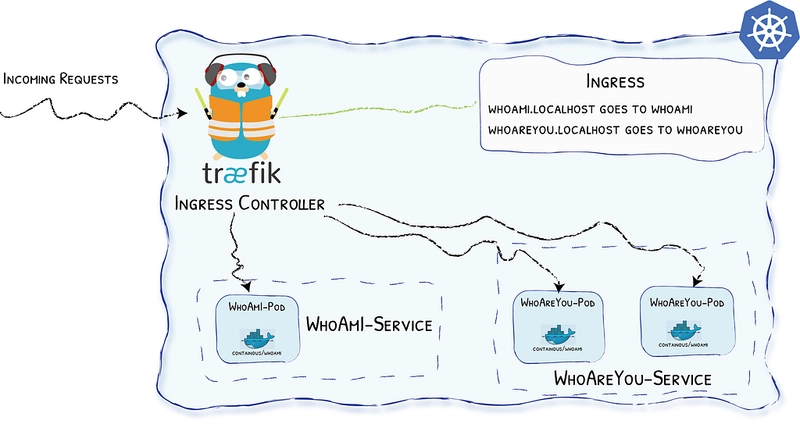
What We’ll Do
- We’ll use a pre-made container — containous/whoami — capable of telling you where it is hosted and what it receives when you call it. (Sorry to disappoint you, but I can confirm we won’t build the new killer app here^^)
- We’ll define two different Pods, a whoami and a whoareyou that will use this container.
- We’ll create a deployment to ask Kubernetes to deploy 1 replica of whoami and 2 replicas of whoareyou (because we care more about others than we care about ourselves … how considerate!).
- We’ll define two services, one for each of our Pods.
- We’ll define Ingress objects to define the routes to our services.
- We’ll set up Traefik as our Ingress Controller.
And because we love diagrams, here is the picture:
Setting Up Traefik Using Helm
Helm is a package manager for Kube and, for me, the most convenient way to configure Traefik without messing it up. (If you haven’t installed Helm yet, doing so is quite easy and fits in two command lines, e.g. brew install kubernetes-helm, and helm init.)
To set up Traefik, copy / paste the following command line:
helm install stable/traefik --set dashboard.enabled=true,dashboard.domain=dashboard.localhost
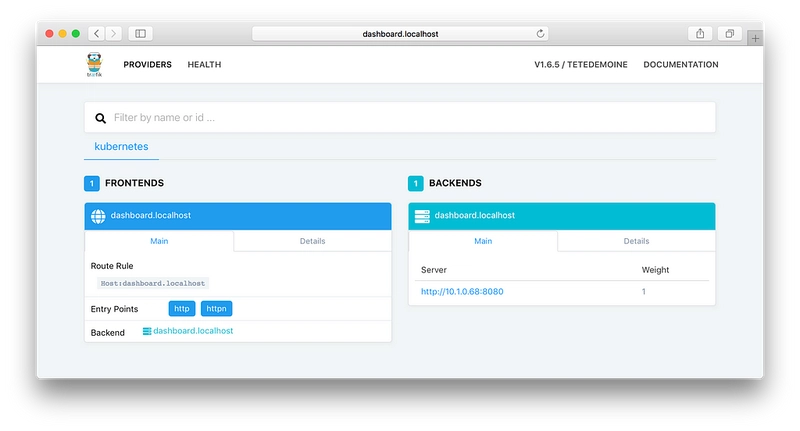
In the above command line, we enabled the dashboard (dashboard.enabled=true) and made it available on http://dashboard.localhost (dashboard.domain=localhost.domain).
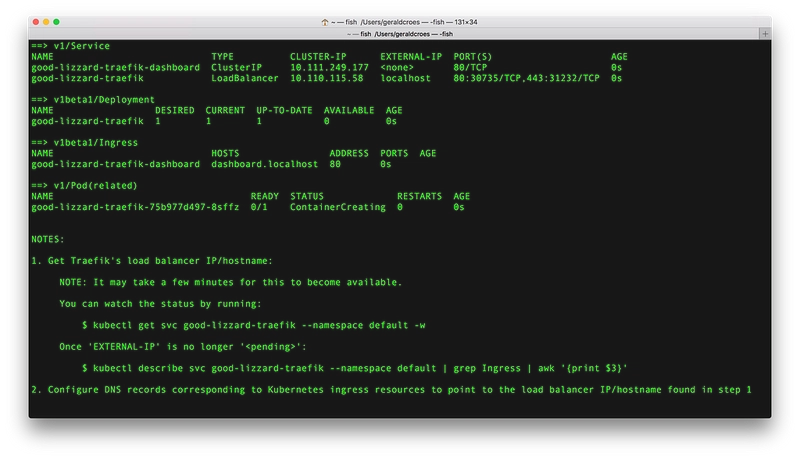
The output of the helm install command line will look like:
In my case, EXTERNAL-IP is already available and is localhost.
EXTERNAL-IP is the address of the door to my cluster; it is the public address of the Ingress Controller (Traefik).
And as we said before, we should be able to access the dashboard right away!
Let’s Deploy Some Pods!
Now it’s time to deploy our first WhoAmI!
As a reminder, we want one Pod with one container (containous/whoami).
Kubernetes uses yaml files to describe its objects, so we will describe our deployment using one.
To provide some explanations about the file content:
- We define a “deployment” (kind: Deployment)
- The name of the object is “whoami-deployment” (name: whoami-deployment)
- We want one replica (replicas: 1)
- It will deploy pods that have the label app:whoami (selector: matchLabels: app:whoami)
- Then we define the pods (template: …)
- The Pods will have the whoami label (metadata:labels:app:whoami)
- The Pods will host a container using the image containous/whoami (image:containous/whoami)
📗 Note: You can read more about deployments in the Kubernetes documentation.
Now that we have described our deployment, we ask Kubernetes to take the file into account with the following command:
kubectl apply -f whoami-deployment.yml
And let’s check what happened with:
kubectl get all

Let’s Define a Service!
If you remember correctly, we need services so we can talk to “any available Pod” of a given kind.

Once again, we need to define the object:
Some explanations:
- We define a “service” (kind: Service)
- The name of the object is “whoami-service” (name: whoami-service)
- It will listen on port 80 and redirect on port 80 (ports: ...)
- The target Pods have the label whoami (selector:app:whoami)
📗 Note: You can read more about services in the Kubernetes documentation.
Now that we have described our service, we ask Kubernetes to take the file into account with the following command:
kubectl apply -f whoami-service.yml
And let’s check what happened with:
kubectl get all
Ingress
At last, we’re about to define the rules so that the world can benefit from our (kick-ass) service.
You know the drill, let’s write the YML file to describe the new object:
Some explanations:
- We define an “ingress” (kind: Ingress)
- The name of the object is “whoami-ingress” (name: whoami-ingress)
- The class of the Ingress is “traefik” (kubernetes.io/ingress.class:traefik). This one is important because it tells Traefik to take this Ingress into account.
- We add rules for this Ingress (rules: …)
- We want requests to host whoami.localhost (host:whoami.localhost) to be redirected to the service whoami-service (serviceName:whoami-service) using http (servicePort: http).
📗 Note: You can read more about Ingress in the Kubernetes documentation.
Now that we have described our Ingress, we ask Kubernetes to take the file into account with the following (same old) command:
kubectl apply -f whoami-ingress.yml
And now, since Traefik is our Ingress Controller, let’s see if something has changed in the dashboard …
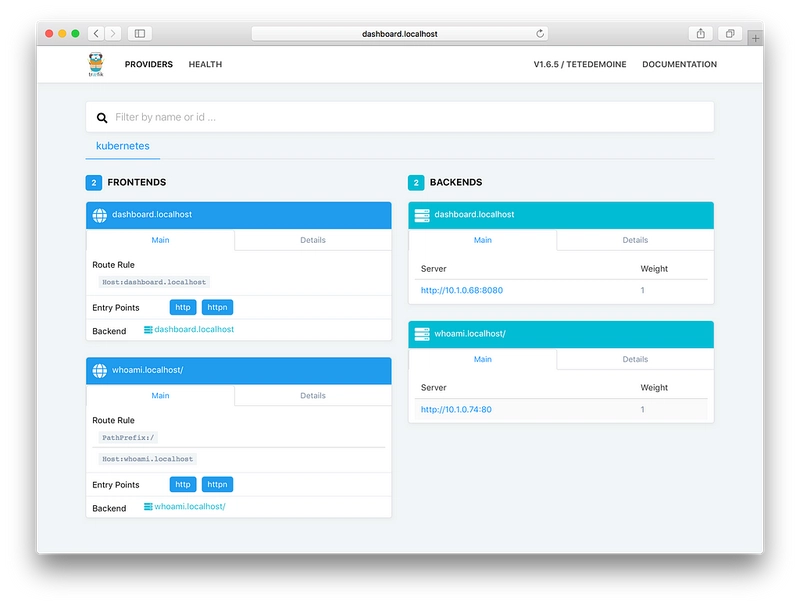
That’s it, no reload, no additional configuration file (there were enough). Traefik has updated its configuration and is now able to handle the route whoami.localhost!
Let’s check …
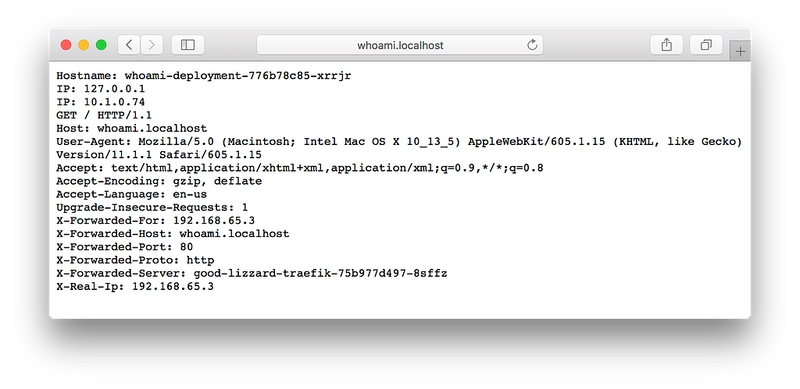
Yes, our service is useful, but its UI could use a bit of love ❤️
Here, we confirm that Traefik is our Ingress Controller and that it is ready to bring its features to your services!
May I Ask For Load Balancing in Action?
Earlier, we talked about a WhoAreYou deployment with 2 replicas.
Let’s do it in just one file :-)
There is not much to say here, except that this time we have 2 replicas … (replicas: 2)
So let’s ask Kubernetes to apply our new configuration file.
kubectl apply -f whoareyou.yml
And let’s go right away to Traefik’s dashboard.
And voilà!


Conclusion
If I had wanted to write an article that dealt with “just” configuring Traefik as an Ingress Controller for Kubernetes, well, it would have fit in one line:
helm install stable/traefik
Because it’s actually the only configuration operation that we’ve needed in the article. The rest is just explanations and demos.
Yes, this step was indeed as simple as that!
Go Further With Traefik!
Now that you know how to configure Traefik, it might be a good time to delve into its documentation and learn about its other features (auto HTTPS, Let’s Encrypt automatic support, circuit breaker, load balancing, retry, websocket, HTTP2, GRPC, metrics, etc.)
Containous is the company that helps Træfik be the successful open-source project it is (and that provides commercial support for Traefik).
Follow me & Træfik on Twitter :-)
Your comments & questions are welcome!
You can clone the files from my github repository geraldcroes/kubernetes-traefik-article.





Top comments (4)
Best tutorial I'v read so far on the subject !
There's a mistake in regards to the first definition of deployment though, the code shown is actually the one for the ingress. Nevertheless found the according deployment on your github page.
Keep it up for more tutorials !
Thx for reporting the problem (and for letting me know you liked the tutorial )
I think I fixed the problem.
Holy cow, this looks amazing. And I just skimmed it - looking forward to reading it soon, as I'm just starting out with Docker. Thanks!
This is a incredible explanation of Kubernetes and Traefik. Thank you.