
There are circumstances where the data in your FlexGrid needs to be displayed in a single view without horizontal scrollbars to make it more readable and structured without using grouping. ComponentOne for WinForms introduced the C1FlexGridBandedView component, which helps organize columns into logical groups, known as bands, and avoids horizontal scrolling. Two or more columns should be gathered under a single header to create the multi-level banded view. You may get more information about it on this blog.
When you need to display many data columns in a single view, but they take up a lot of space, this is where the need for an Advance Banded View comes into play. An Advanced Banded View is created when the RowSpan and ColSpan properties are used to arrange the columns, one under another by occupying multiple rows. It makes rows higher but lets you see more columns in the view simultaneously to make the view more readable. In Advance Banded View, the grid caption area is divided into two sections: Header Bands and Record Bands. The Header Band acts as the header for logically grouped columns, while the Record Bands indicate logical groups of columns linked to individual columns.
To understand the Advance banded view in a better way, let’s take a use case of creating a Sales Slip to show product information with price and profit detail using the C1FlexGrid control. The sample will include an export function that allows it to be exported as an Excel or Pdf file.
Let’s implement the use case by using four significant steps as described below:
- Create a Windows Forms Application With the Required Nuget Packages
- Bind the C1FlexGrid to the Data Source
- Create and Assign Banded View to C1FlexGrid
- Export the Sales Record to Excel and PDF Files
Create a Windows Forms Application With the Required Nuget Packages
ComponentOne C1FlexGrid is a Windows Forms-based control. To use the C1FlexGrid control, you must first create a Windows Forms .NET 6 application using Visual Studio 2022 and install the following packages to use the Advanced Banded View feature with export functionality:
- https://www.nuget.org/packages/C1.Win.FlexGrid/
- https://www.nuget.org/packages/C1.Win.FlexGrid.ImportExport/
- https://www.nuget.org/packages/C1.Win.FlexGrid.BandedView/6.0.20221.548-beta
- https://www.nuget.org/packages/C1.Win.Themes/
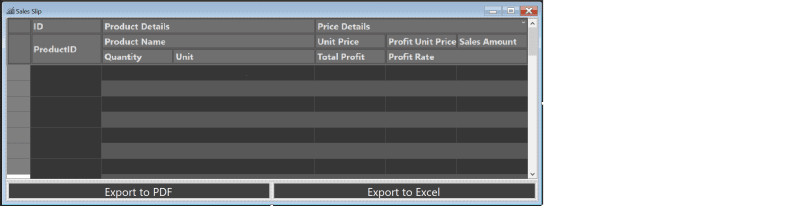
The C1FlexGrid control and the C1FlexGridBandedView component can be found in the Visual Studio Toolbox when these packages have been installed. You may design your layout by dragging and dropping the controls into the form designer, which looks like this:

Note: We have added two buttons at the bottom of the form so that the users can use the export feature. In addition, we've included the ThemeController component to give our application a more refined touch.
Bind the C1FlexGrid to the Data Source
After finishing the layout, use the DataSource property to connect the data to the grid. This blog uses a class named DataSource.cs to get product data from the NORTHWIND database. This database is located at the following location in our system:
C:\Users\UserName\Documents\ComponentOne Samples\Common
The GetRows function of the custom class is used to retrieve data from a DataTable object using the query string below.
    private DataTable data;
    data = DataSource.GetRows("Select ProductID, ProductName, UnitPrice, UnitsInStock as Quantity, QuantityPerUnit as Unit from Products where UnitPrice>15 and Quantity >0");
DataColumn's Expression functionality can be used to add and calculate required columns that are not already present in the data.
    data.Columns.Add("ProfitUnitPrice", typeof(int), " UnitPrice -8");
    data.Columns.Add("SalesAmount", typeof(int), "UnitPrice * Quantity");
    data.Columns.Add("TotalProfit", typeof(int), "ProfitUnitPrice * Quantity");
    data.Columns.Add("ProfitRate", typeof(int), "(TotalProfit / SalesAmount)*100");
After setting up the data table, assign it to the DataSource property of the C1FlexGrid:
c1FlexGrid1.DataSource = data;
Create and Assign Banded View to C1FlexGrid
If you are working with the.NET Framework version of the control, you can construct the bands during the design time by using the Band Editor, as described in this blog post.
We are using .NET 6 controls for this blog, so you can use the Band Collection Editor, which you can access from the smart tag panel of the FlexGridBandedView component.

If you will create bands at design time and assign it to FlexGrid, then it will look something like this:
This blog post will go over how to code the entire banded view from scratch.
The advanced banded view is constructed based on the RowSpan, and ColSpan attributes to display numerous rows in a single view. The RowSpan property of the Band class allows you to specify the minimum number of rows that a band must occupy in this view, and the ColSpan property of the Band class enables you to specify the maximum number of columns that a band must occupy in this view.
    Band band1 = new Band();
    Band band2 = new Band();
    Band band3 = new Band();
    Band band4 = new Band();
    Band band5 = new Band();
    Band band6 = new Band();
    Band band7 = new Band();
    Band band8 = new Band();
    Band band9 = new Band();
    Band band10 = new Band();
    Band band11 = new Band();
    Band band12 = new Band();
    Band band13 = new Band();

    //Create Header Bands
    band1.Caption = "ID";
    band1.ColSpan = 1;
    band2.Caption = "Product Details";
    band2.ColSpan = 3;
    band3.Caption = "Price Details";
    band3.ColSpan = 3;

    //Add Child bands to band1
    band4.Caption = "ProductID";
    band4.ColSpan = 1;
    band4.Name = "ProductID";
    band1.Children.Add(band4);

    //Add Child bands to band2
    band5.Caption = "Product Name";
    band5.ColSpan = 3;
    band5.Name = "ProductName";
    band6.Caption = "Quantity";
    band6.ColSpan = 1;
    band6.Name = "Quantity";
    band7.Caption = "Unit";
    band7.ColSpan = 2;
    band7.Name = "Unit";
    band2.Children.Add(band5);
    band2.Children.Add(band6);
    band2.Children.Add(band7);

    //Add Child bands to band3
    band8.Caption = "Unit Price";
    band8.ColSpan = 1;
    band8.Name = "UnitPrice";
    band9.Caption = "Profit Unit Price";
    band9.ColSpan = 1;
    band9.Name = "ProfitUnitPrice";
    band10.Caption = "Sales Amount";
    band10.ColSpan = 1;
    band10.Name = "SalesAmount";
    band11.Caption = "Total Profit";
    band11.ColSpan = 1;
    band11.Name = "TotalProfit";
    band12.Caption = "Profit Rate";
    band12.ColSpan = 2;
    band12.Name = "ProfitRate";
    band3.Children.Add(band8);
    band3.Children.Add(band9);
    band3.Children.Add(band10);
    band3.Children.Add(band11);
    band3.Children.Add(band12);

    //Add parent bands to C1FlexGridBandedView control
    c1FlexGridBandedView1.Bands.Add(band1);
    c1FlexGridBandedView1.Bands.Add(band2);
    c1FlexGridBandedView1.Bands.Add(band3);
After finishing with the band layout, you can assign the grid you configured in the previous steps to the FlexGrid property of the FlexGridBandedView control.
c1FlexGridBandedView1.FlexGrid = this.c1FlexGrid1;
Export the Sales Record to Excel and PDF File
Allowing your user to export their data to a file is often necessary when simply presenting the records would not suffice.
To export the FlexGrid data to a PDF file, use the System.PrintDocument class. You can set its PrinterName property to "Microsoft Print to PDF" and invoke the Print method of the class.
    private void pdfExportButton_Click(object sender, EventArgs e)
    {
    var printDocument = c1FlexGrid1.PrintParameters.PrintDocument;
    c1FlexGrid1.PrintParameters.PrintGridFlags = PrintGridFlags.FitToPageWidth;
    printDocument.PrinterSettings.PrinterName = "Microsoft Print to PDF";
    // Print document into Microsoft PDF printer
    printDocument.Print();
    }
Note: For more advanced options like setting borders, printing by specific page or column breaks, and so on, check out the doc link here.
To export FlexGrid data to an Excel file, you need to use the SaveExcel extension method as shown below:
  private void excelExportButton_Click(object sender, EventArgs e)
    {
    SaveFileDialog saveFileDialog1 = new SaveFileDialog();
    saveFileDialog1.DefaultExt = "xlsx";
    saveFileDialog1.Filter = ".xlsx Files (*.xlsx)|*.xlsx";
    saveFileDialog1.RestoreDirectory = true;
    if (saveFileDialog1.ShowDialog() == DialogResult.OK)
    {
    c1FlexGrid1.SaveExcel(saveFileDialog1.FileName, FileFlags.AsDisplayed| FileFlags.IncludeMergedRanges|FileFlags.IncludeFixedCells|FileFlags.SaveMergedRanges);
    }
    }
If you've followed the instructions correctly, your app should look and behave as shown in the following gif:

Hopefully, you will enjoy this new feature of C1FlexGrid control.
Happy coding!
You can learn more about the Column Bands from this documentation.
You can download the sample here.

Top comments (0)