
Flutter is an open-source framework used for building cross-platform applications with a single code base. While building applications using the built-in widgets in Flutter is highly efficient. The real magic happens when Firebase, a powerful backend cloud computing service, is integrated into these applications. Firebase is a powerful backend cloud computing service that equips mobile developers with a wide range of tools and functionalities. One of the key advantages of Firebase is its integration of essential features such as authentication, push notifications, and real-time database capabilities.
With Firebase's authentication services, you can implement robust user authentication systems, including;
- Email/password Authentication,
- Social Media Logins,
- Phone Number Authentication
- and even Custom Authentication Methods. This ensures that the user’s data remains secure, protects sensitive information, and reduces potential security risks. In this article, I will guide you through the process of integrating Firebase into your Flutter application.
Prerequisites:
Before delving in, it is important to have a basic understanding of Flutter and Firebase.
If you are new to Flutter, the official Flutter documentation is a wonderful place to start Flutter.dev
I have also set up registration and login screens here GitHub
Do well to clone the repo so you will follow along with me.
Table of Content
- Understanding how to Set up Firebase in Flutter
- Creating Firebase project
- Adding the Flutter app to the Firebase project
- Adding Firebase dependencies to the Flutter application
- Collect User Registration Information
- Validation of user input
- Implementing the registration logic
- Handling registration success and failure
- Validation of user input
- Implementing the login logic
- Handling login success and failure
Setting up Firebase for Flutter is quite easy, by following these simple steps, you can easily understand and complete the setup in minutes.
Step 1: Create a Firebase Project
to begin the setup process, follow these steps;
- Go to the official Firebase website at firebase console
- Sign in using your email credentials.
- Enter the desired name for your project.
- Enable Google Analytics by toggling it on, then click on "Continue".
Step 2: Register Your App with Firebase
Next, you need to register your app with Firebase.
Follow these steps:
- Click on "Add app to get started."
- Choose Flutter as your platform.
- Click on "Continue."
Adding Flutter App to Firebase Project
To ensure easy integration of Firebase in your Flutter application, you will need to use a Flutter plugin called FlutterFire CLI. FlutterFire CLI is a set of plugins that allows developers to connect Flutter applications to Firebase easily.
To install FlutterFire CLI;
- Open your terminal
- In the root directory of your project execute the following command
dart pub global activate flutterfire_cli
Now, you need to configure flutterfire
In the root directory of your project, run the command below
flutterfire configure
Step 3: Choosing the Platform
Next, choose the platform that corresponds to the Firebase services you intend to utilize. You can select from the following options:
Web
macOS
Windows
iOS
Once a platform is selected, the FlutterFire CLI will create a Firebase app for each of the listed platforms and generate a file called firebaseoptions.dart for these projects.
Congratulations! You have successfully added Firebase to your Flutter project. Now, let's proceed to explore Firebase Services.
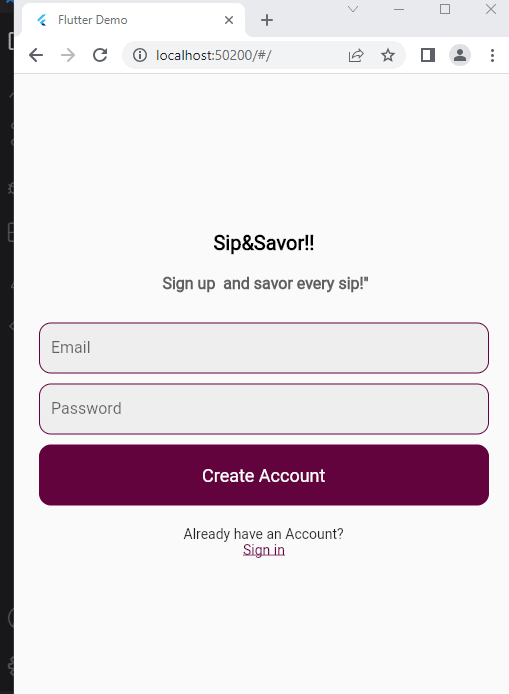
Sign up With Emailandpassword
Adding Firebase Dependencies to Flutter Application
To use Firebase tools in your application you need to add some Firebase dependencies to your flutter application.
Here is how;
- Locate
pubspec.yamlin the root directory of your Flutter project. - Scroll to the dependencies and add the following lines of code.
  firebase_core: ^2.14.0
  firebase_auth: ^4.6.3
Firebase Core : is a foundational package in the Firebase SDK that provides the essential functionality for initializing and configuring Firebase services within your Flutter application. It serves as the starting point for Firebase integration.
Firebase Auth is a Firebase service that provides user authentication and authorization functionalities for your Flutter application. It allows you to easily add secure user authentication features to your app, such as;
- email and password authentication
- social media sign-in (e.g., Google, Facebook, Twitter),
- phone number verification, and more.
In your terminal, navigate to the root directory of your Flutter project.
Run the following command:
Flutter pub get
This command will download and update the dependencies you just added to your project.
Next, In your main.dart file, import the following packages
import 'package:firebase_core/firebase_core.dart';
import 'firebase_options.dart'
These import statements are necessary for using Firebase in your Flutter application, it helps you access the Firebase options defined in the firebase_options.dart file.
After importing the packages above, you will need to Initialize widgetflutterbinding by adding the following lines of code to your main.dart file
void main() async {
  WidgetsFlutterBinding.ensureInitialized();
  await Firebase.initializeApp(
    options: DefaultFirebaseOptions.current platform,
  );
  runApp(MyApp());
}
Explanation: These lines of code ensure that the Flutter framework is properly initialized using the DefaultFirebaseOptions for the current platform.
The runApp() function is called to start the Flutter application by running the MyApp widget.
Collect User Registration Information:
If you clone the repository I attached to this article earlier, navigate to the registration screen and import thIS package
import 'package:firebase_auth/firebase_auth.dart';
Before you start writing the createAccount function
- Go back toFirebase console
- open the project you created earlier
- Click on Build
- Under build click on Authentication.
- Click “Get Started”
- Enable Sign in with email and password.
You will now implement the createAccount()function that takes the email and password as parameters. It uses the createUserWithEmailAndPassword method from FirebaseAuth.instanceto create a new user account with the provided credentials.
Here is how;
Future createAccount() async{
    final UserCredential userCredential;
   try{
      userCredential = await
      FirebaseAuth.instance.createUserWithEmailAndPassword
      (email: _emailController.text.trim(),
       password: _passwordController.text.trim()

       );

    } catch{

    }

  }
createAccount() function is defined as an asynchronous function, which awaits a Usercredential variable where the result of the user creation will be stored.
Now you need to send an email verification to the provided email.
await userCredential.user!.sendEmailVerification();
If you notice, the catch block is empty, now you go ahead to handle some exceptions in the catch block
add the following lines of code to your catch block
on FirebaseAuthException catch (e) {

      if (e.code == 'weak-password') {

        showDialog(
            context: context,
            builder: (context) => const AlertDialog(
                  title: Text('Password is Weak'),
                ));
      } else if (e.code == 'email-already-in-use') {
        showDialog(
            context: context,
            builder: (context) => const AlertDialog(
                  title: Text('Email Already in Use'),
                ));
      }
    }
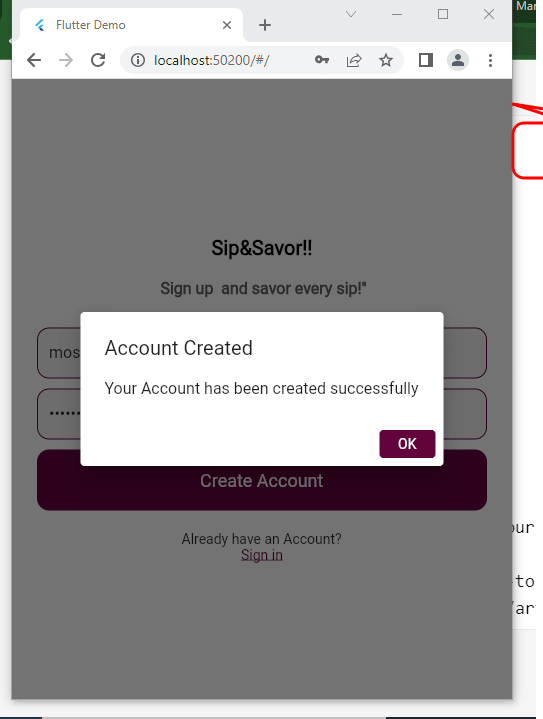
To ensure that the account has been created successfully, you will need to add a dialog box in your try block.
here is the complete code for the createAccount()
Future creatAccount() async {
    final UserCredential userCredential;
    try {
      userCredential = await FirebaseAuth.instance
          .createUserWithEmailAndPassword(
              email: _emailController.text.trim(),
              password: _passwordController.text.trim());

      await userCredential.user!.sendEmailVerification();

      if (userCredential != null) {
        // ignore: use_build_context_synchronously
        showDialog(
            context: context,
            builder: (context) => AlertDialog(
                  title: Text('Account Created'),
                  content: Text('Your Account has been created successfully'),
                  actions: [
                    TextButton(
                        onPressed: () {
                          Navigator.push(context, MaterialPageRoute(builder: (context) => LoginPage()));
                        },
                        style: TextButton.styleFrom(
                          backgroundColor: Color.fromARGB(255, 99, 3, 62),
                        ),
                        child: Text(
                          'OK',
                          style: TextStyle(color: Colors.white),
                        ))
                  ],
                ));
      }
    } on FirebaseAuthException catch (e) {
      if (e.code == 'weak-password') {
        showDialog(
            context: context,
            builder: (context) => const AlertDialog(
                  title: Text('Password is Weak'),
                ));
      } else if (e.code == 'email-already-in-use') {
        showDialog(
            context: context,
            builder: (context) => const AlertDialog(
                  title: Text('Email Already in Use'),
                ));
      }
    }
  }
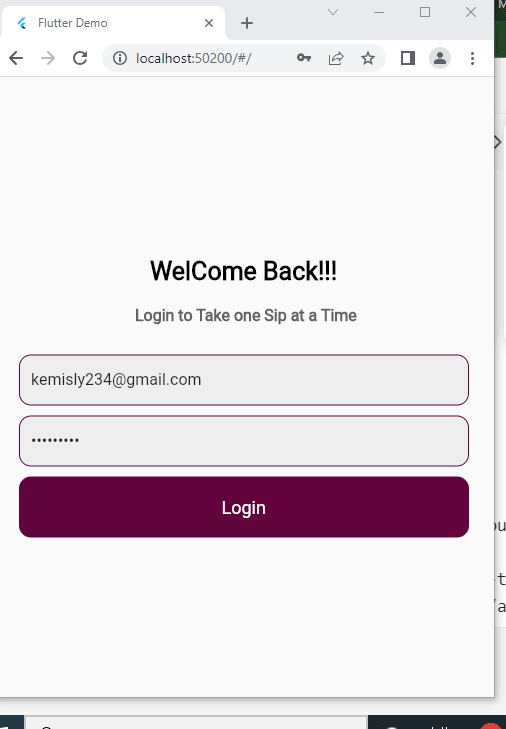
User Login
To connect the login screen to Firebase we follow the steps below;
Import the following dependencies
import "package:firebase_auth/firebase_auth.dart";
Create a future function named "login". This function will handle the login functionality just like the createAccount()
here is how;
Future login() async {
    try {
      UserCredential userCredential = await FirebaseAuth.instance
          .signInWithEmailAndPassword(
              email: emailController.text, password: passwordController.text);}}
Explanation : In the code above we initialize a variable userCredential to store the result of the authentication process, we then invoke the signInWithEmailAndPassword method from the FirebaseAuth.instance object. This method will allow users to sign in using their email and password.
If you run this on your local device now, it will throw an error; that is because we need to add the catch block, In the catch block we will handle some exceptions using the firebase exceptions.
on FirebaseException catch (e) {
      if (e.code == 'invalid-email') {
        showDialog(
            context: context,
            builder: (context) => const AlertDialog(
                  title: Text('Email is Invalid'),
                ));
      } else if (e.code == 'user-not-found') {
        showDialog(
            context: context,
            builder: (context) => const AlertDialog(
                  title: Text('User not Found'),
                ));
      } else if (e.code == 'wrong-password') {
        showDialog(
            context: context,
            builder: (context) => const AlertDialog(
                  title: Text('Your Password is Wrong'),
                ));
      }
    }
to ensure the login is successful you will add an alert box,
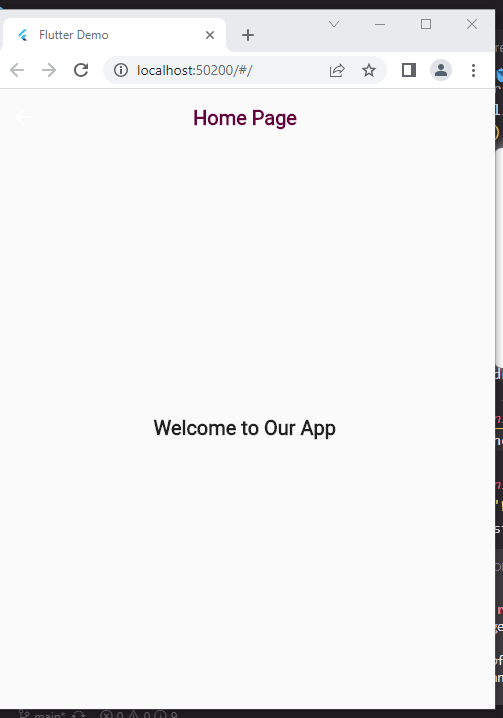
if login is successful it will show successful and take you to the home screen.
this is all the code we have written for, the signin screen
Future login() async {
    try {
      UserCredential userCredential = await FirebaseAuth.instance
          .signInWithEmailAndPassword(
              email: emailController.text, password: passwordController.text);

      if (userCredential != null) {
        showDialog(
            context: context,
            builder: (context) => AlertDialog(
                  title: const Text('Status'),
                  content: const Text('Logged in Successful'),
                  actions: [
                    TextButton(
                      onPressed: () {
                        Navigator.push(
                            context,
                            MaterialPageRoute(
                                builder: (context) => const HomePage()));
                      },
                      child: const Text('Proceed'),
                    )
                  ],
                ));
      }
    } on FirebaseException catch (e) {
      if (e.code == 'invalid-email') {
        showDialog(
            context: context,
            builder: (context) => const AlertDialog(
                  title: Text('Email is Invalid'),
                ));
      } else if (e.code == 'user-not-found') {
        showDialog(
            context: context,
            builder: (context) => const AlertDialog(
                  title: Text('User not Found'),
                ));
      } else if (e.code == 'wrong-password') {
        showDialog(
            context: context,
            builder: (context) => const AlertDialog(
                  title: Text('Your Password is Wrong'),
                ));
      }
    }
  }

  @override
  void dispose() {
    emailController.dispose();
    passwordController.dispose();
    super.dispose();
  }
Now let's try to run our app on our local device
In conclusion, in this article, you have learned a step-by-step guide on integrating Firebase into Flutter applications. the article highlights the integration of essential features offered by Firebase and provides instructions on setting up Firebase in a Flutter project. we coverer user registration, email verification, and login authentication.
By following this guide, you can enhance the security and functionality of your Flutter applications with Firebase's backend services.
If you like this content, follow me onsocial media

Top comments (2)
Very enlightening, the guide was very thorough, when I decide to return to flutter I'd definitely be using this article
Thank you andybawo