
Written by David Omotayo✏️
Since its inception in 2010, Three.js has been the de facto standard for building 3D visuals on the web. Over the years, several abstractions have been built on top of this library, consolidating its features and the large ecosystem of JavaScript libraries to create fast, stunning, and performant web applications.
As Vue.js has matured, it has become one of the top libraries of choice for component-based user interface development. Vue and Three.js are both designed with similar goals; both tools control UI elements in different ways to create interactive visuals on the web.
In this article, we'll introduce Lunchbox.js, a custom renderer for Three.js. We’ll cover everything you need to know to start building 3D visuals in Vue using Lunchbox.js:
- Prerequisites
- What is Lunchbox.js?
- Getting started with Lunchbox.js
- Creating a scene
- Adding meshes
- Adding textures
- Adding animation
- Adding events
Prerequisites
To follow along with this article, you should have the following:
- Foundational knowledge of Vue and its concepts
- Basic understanding of Three.js
What is Lunchbox.js?
Lunchbox.js uses Vue's component-based model and declarative style to handle imperative Three.js functionalities under the hood. This library provides access to primitive Three.js objects and classes through components, such as:
- mesh
- lights
- geometries
- group
- materials
These components are the building blocks of Lunchbox.js. They are direct translations of Three.js classes.
For example, when creating a standard mesh in a vanilla Three.js project, we would use a geometry class like BoxGeometry() to create a cuboid shape, apply color to it with a material class like MeshBasicMaterial(), and then map it to the geometry by combining both objects with the Mesh() class, just like in the following code:
// create geometry with sides of length 1
const geometry = new THREE.BoxGeometry(1, 1, 1)
// create yellow basic material
const material = new THREE.MeshBasicMaterial({ color: 0xffff00 })
// combine geometry + material in mesh
const mesh = new THREE.Mesh(geometry, material)
// add that mesh to the scene (assuming you've created a scene)
scene.add(mesh)
To create the same mesh in a Lunchbox.js app, we‘d use the same classes, except as components and, instead of assigning them to variables and combining them with a Mesh() class, we would nest them inside a <mesh> component, like so:
<Lunchbox>
    <mesh>
        <boxGeometry :args="[1, 1 ,1]" />
        <meshBasicMaterial :color="0xffff00" />
    </mesh>
</Lunchbox>
You'll notice in the examples above that each <Lunchbox> component matches the corresponding Three.js class with a camelCase name.
// three.js
new THREE.Mesh()
<!-- Lunchbox -->
<mesh/>
// three.js
new THREE.BoxGeometry()
<!-- Lunchbox -->
<boxGeometry/>
Lunchbox.js and Three.js syntaxes are very much alike, but there are a few differences to note. For example, every <Lunchbox> component takes arguments as props using the args property. The argsprop takes an array of arguments and passes it to the component's class constructor.
new THREE.BoxGeometry(1, 2, 3)
The above code above would translate to the following in Lunchbox:
<boxGeometry :args="[1, 2, 3]" />
Other Three.js object properties, such as the color property of the MeshBasicMaterial class, can be added as a reactive prop on a <Lunchbox> component. This is just like what we saw in the previous example.
<meshBasicMaterial :color="red" />
However, properties that utilize dot notations, like the position vector, would be set with a dash, -, in a <Lunchbox> component like so:
<mesh :position-x="3" />
Lunchbox offers inbuilt support for most Three.js classes; you can find the list of components here.
Classes not available in the included components can be added using Lunchbox's app.extend method. For example, here’s how we’d add the orbitControl class to Lunchbox:
import { createApp } from 'lunchboxjs'
import App from 'YourApp.vue'
//Import the class from three.js
import { OrbitControls } from 'three/examples/jsm/controls/OrbitControls'
// tell the app to extend Lunchbox to include OrbitControls and mount the app
createApp(App)
    .extend({ OrbitControls })
    .mount('#app')
The extend() method is one of Lunchbox's unique features, classes added with the method inherit all the features of a <Lunchbox> component.
We've looked at the core concepts of Lunchbox.js, next we'll see how we can build with Lunchbox. We'll learn more about the library's concepts as we move through the tutorial.
Getting started with Lunchbox.js
To set up a Lunchbox.js app, first install Vue using Vite's CLI:
npm create vite@latest
After running the command, choose Vue from the list of libraries and give the project a name. Next, cd into the project folder and run the following command:
npm install lunchboxjs three
This command will install Lunchbox.js and Three.js as dependencies of the Vue app. You can view them inside the package.json file in the root directory.
Next, clean up the boilerplate codes in the project, open the main.js file, and replace the following code:
import { createApp } from 'vue'
import App from './App.vue'
createApp(App).mount('#app')
With this code:
import { createApp } from 'lunchboxjs'
import App from './App.vue'
createApp(App).mount('#app')
Here, we imported the createApp function from lunchboxjs instead of from vue. This will transform the Vue app into a Lunchbox environment.
Now we can start building and rendering 3D objects in our app.
Creating a scene
A scene is an object that allows us to set up the items that are to be rendered. It’s like a display area where objects can be put together and rendered to the browser. The following is an example of a scene set up in Three.js:
const scene = new THREE.Scene();
const camera = new THREE.PerspectiveCamera( 75, window.innerWidth / window.innerHeight, 0.1, 1000 );
const renderer = new THREE.WebGLRenderer();
renderer.setSize( window.innerWidth, window.innerHeight );
document.body.appendChild( renderer.domElement );
Setting up a scene in Lunchbox.js is more straightforward and less cryptic. The library provides a <Lunchbox> component that contains the underlying codes for creating a renderer and scene in Three.js.
To set it up, go over to the App.vue main component and place the <Lunchbox> component inside the template section, like so:
<template>
  <Lunchbox>
            <!-- ... -->
  </Lunchbox>
</template>
Every object nested within the <Lunchbox> tag will be rendered to the browser. If you save your code and start the development server, you should see a black screen similar to the one below.
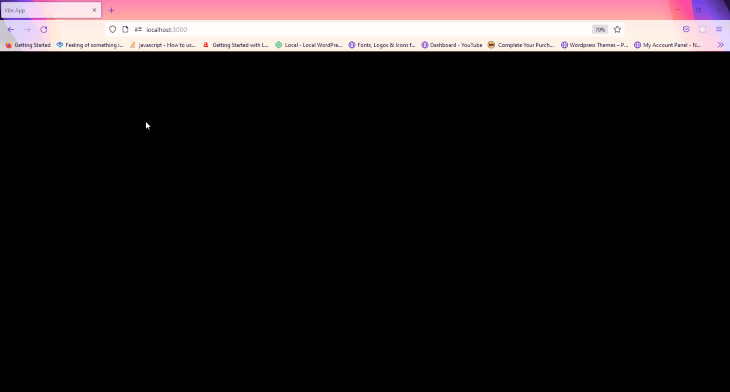
This black screen is our app's renderer; whatever we add to the scene will be displayed here. You can change the background color with a background prop, like so:
<Lunchbox background="indigo">
            <!-- ... -->
</Lunchbox>

Here are just some of the props you can use on the <Lunchbox> component:
-
background -
cameraPosition -
camera -
zoom -
shadow
Adding meshes
Geometries are Three.js classes used for defining a mesh's shape. Earlier in this article, we demonstrated how to render a cuboid mesh using the boxGeometry component. Here, we'll see how we can render more 3D shapes to the browser.
Lunchbox.js comes with several auto-generated, inbuilt geometry components, you can see the list of available components here.
Go ahead and add a <mesh> component inside the Lunchbox tags and nest any geometry component of your choice inside. Don't forget to include a material component with a color prop.
<Lunchbox>
  <mesh>
     <boxGeometry />
     <MeshBasicMaterial color="red"/>
  </mesh>
</Lunchbox>

The material component utilizes the Three.js Material() class to define the various surface properties of the mesh.
A <mesh> component only accepts a single Geometry() and Material() component. To add more shapes to the scene, we'd have to create more meshes, one for each Geometry(), as shown below.
<Lunchbox>
      <mesh>
         <boxGeometry />
         <MeshBasicMaterial color="red"/>
      </mesh>
      <mesh>
         <torusKnotBufferGeometry />
         <MeshBasicMaterial color="grey"/>
      </mesh>
</Lunchbox>

Alternatively, we could create separate components for each shape and import them inside the main component like so:
<script>
      import {Sphere} from './Sphere.vue'
</script>
<template>
      <Lunchbox>
            <Sphere />
      </Lunchbox>
</template>
Each Geometry component accepts unique parameters that can be used to fine-tune and manipulate its width, height, smoothness, and other visual features. These parameters can be set in Lunchbox using the args prop.
<torusKnotBufferGeometry :args="[1, 0.4, 240, 20]"/>
The <mesh> component also accepts several props. And since it serves as a container for the Geometry(), it can also be used to manipulate the position, rotation, and more.
<Lunchbox>
  <mesh position-x="4" position-x="4">
      ...
  </mesh>
</Lunchbox>
In the above code, we’re adding a position prop that will move the sphere mesh 4px to the right along the x-axis.
Here are some of the mesh props that you can use to manipulate your shapes:
-
position (x, y, z) -
rotation (x, y, x) -
scale (x, y)
Meshes can also be grouped using the <group> component. This component serves as a container for Geometries, and we can add as many <mesh> as we like within each <group>.
<Lunchbox>
     <group>
        <mesh>
           <boxGeometry />
           <MeshBasicMaterial color="red"/>
        </mesh>
        <mesh>
           <torusKnotGeometry />
           <MeshBasicMaterial color="grey"/>
        </mesh>
     </group>
</Lunchbox>
Adding textures
Currently, our meshes don't look very realistic. The applied materials make them look a bit plastic. We can apply textures, using the <textureLoader> component in Lunchbox, to give each mesh a more realistic appearance.
The <textureLoader> component utilizes the Three.js Texture() class that lets us map realistic textures to mesh surfaces under the hood. To demonstrate the process, we'll create a 3D model of the Earth.

To create the globe, clean up the scene and then create a new mesh with a spherical geometry using the <sphereGeometry> component.
<Lunchbox>
  <mesh>
     <sphereGeometry />
  </mesh>
</Lunchbox>
Next, add a <meshPhysicalMaterial> component inside the mesh and nest the <textureLoader> inside it, like so:
<Lunchbox>
  <mesh>
      <sphereGeometry :args="[1, 32, 32]" />
      <meshPhysicalMaterial>
            <textureLoader />
      </meshPhysicalMaterial>
  </mesh>
</Lunchbox>
The <textureLoader> component accepts an src and an attach prop. The src prop takes in a relative or absolute path of the texture material, while the attach prop accepts the mapping option.
We'll be using the map and bumpMap options for this example. In other words, we have to declare a second <textureLoader> inside the mesh component.
Grab the below images and place them inside the /public folder in your project:
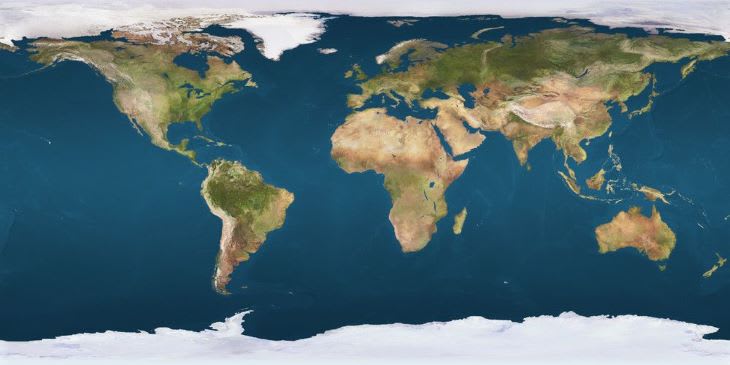

Next, add the first image's path to the src prop of the first <textureLoader> component and give the attach prop a "map" value.
<meshPhysicalMaterial>
      <textureLoader src="/first-image" attach="map" />
      <textureLoader ... />
</meshPhysicalMaterial>
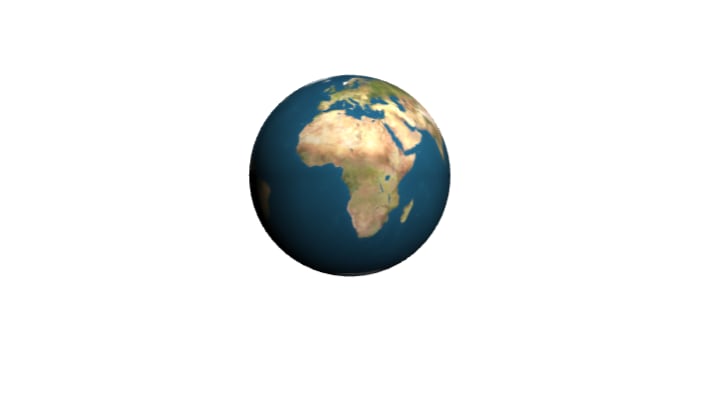
If you save the project right now, a spherical silhouette will appear in the browser. This is because our scene doesn’t have a light source. 
To fix this, add <pointLight> and <directionalLight> components inside the <Lunchbox> component.
<Lunchbox>
  <directionalLight />
  <pointLight />
  <mesh>
      ...
  </mesh>
</Lunchbox>
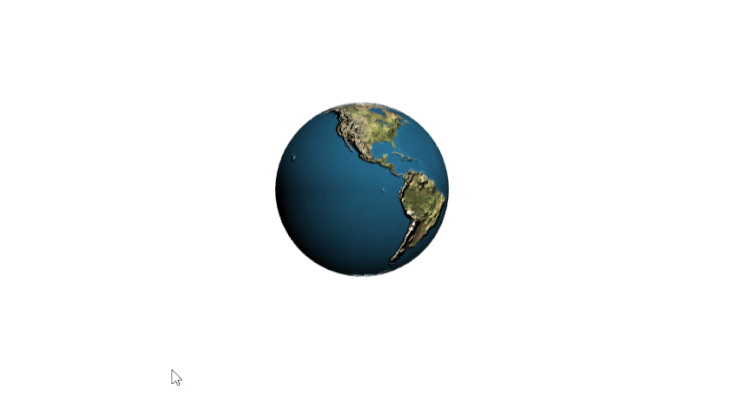
Now, if you save the project and return to the browser, you should see something similar to the image below:
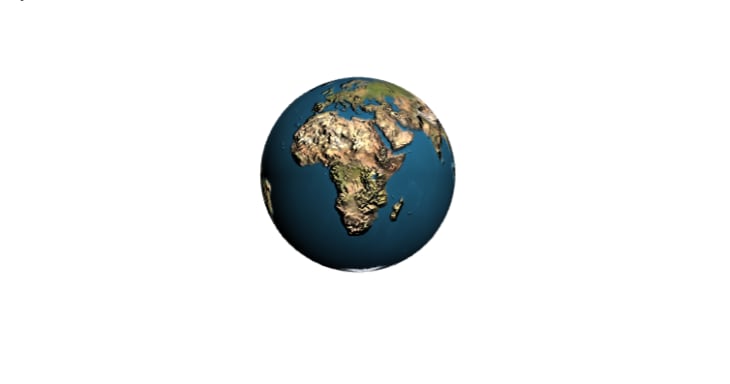
To make the image more interesting and visually stunning, we'll use the second image to add realistic contours to the globe.
We'll go about this similarly to how we handled the first image. Add the image's path to the src prop, but this time around give the attach prop a "bumpMap" value.
Adding animation
Lunchbox.js provides an onBeforeRender function that is called for every frame before or after render. With this function, we can animate our globe by adding a value to its rotation property on every frame.
Go to the script section of the App.vue component and import ref from Vue and the onBeforeRender function from Lunchbox.
import {ref} from 'vue'
import {onBeforeRender} from 'lunchboxjs'
Next, assign the ref to a rotation variable and pass it an object with the following property:
const rotation = ref({y: 0});
Then, call the onBeforeRender function and add the following code:
onBeforeRender(() =>{
   rotation.value.y += 0.02
})
Here, we're adding 0.02deg to the y-axis rotation of the object on every frame. Finally, add a rotation-y prop to the globe's mesh and pass it the rotation.y value, like so:
<mesh rotation-y="rotation.y">
        <sphereGeometry />
        <meshPhysicalMaterial>
              <textureLoader ... />
              <textureLoader ... />
        </meshPhysicalMaterial>
  </mesh>
Now, if you save the project, your globe should animate nicely like the below example.
You can add more rotation animations by including the x and z properties to the ref, onBeforeRender function, and the globe's mesh.
Adding events
We can add event listeners to <Lunchbox> components just as we would any other element in Vue. To demonstrate, we'll add a click event that'll pause our globe's animation when it is triggered.
Go ahead and create an onClick event on the globe mesh like so:
<mesh rotation-y="rotation.y" @click="">
    ...
</mesh>
Next, create a variable with ref and pass it a Boolean value of true. Wrap the declaration inside the onBeforeRender function with an if statement:
const active = ref(true)
onBeforeRender(() =>{
 if(active){
   rotation.value.y += 0.02
  }
})
Here, we're assigning the active variable as the if statement's condition. When the value is set to false, the code within the statement will not be executed and the animation will pause.
Finally, add the following code to the onClick event on the <mesh> component:
<mesh rotation-y="rotation.y" @click="active = !active">
    ...
</mesh>
Now the globe's animation will pause and play when it is clicked, as shown below:
 That's it! We've successfully built 3D visuals in Vue!
As a challenge, try adding a black background with stars to the scene to give the globe an even more realistic feel. You can easily achieve this by adding a plane geometry to the scene and mapping a texture of the night sky. Good luck!
Conclusion
In this article, we introduced the core concepts of Lunchbox.js and demonstrated how to use this tool to create 3D visuals in Vue. In our tutorial, we created a scene, built different mesh geometries, added textures to meshes, animated meshes, and added event listeners to objects in a scene.
Lunchbox.js is still a work in progress, but it’s ready for production. You can ship it with your applications worry free. To learn more about the library, visit the official docs and check out some sample projects built with Lunchbox.js.
WazirX, Bitso, and Coinsquare use LogRocket to proactively monitor their Web3 apps
Client-side issues that impact users’ ability to activate and transact in your apps can drastically affect your bottom line. If you’re interested in monitoring UX issues, automatically surfacing JavaScript errors, and tracking slow network requests and component load time, try LogRocket.

LogRocket is like a DVR for web and mobile apps, recording everything that happens in your web app or site. Instead of guessing why problems happen, you can aggregate and report on key frontend performance metrics, replay user sessions along with application state, log network requests, and automatically surface all errors.
Modernize how you debug web and mobile apps — Start monitoring for free.

Top comments (0)