
Written by Glauber Costa✏️
There is no database in the world that’s more widely used than SQLite. While this is a statement made by the project itself, it is easy to believe — SQLite runs everywhere. It’s small, self-contained, and has a reputation for extremely high quality. It also has available source code. After all, it is the 21st century and developers expect to at least see the source code for tools that they rely on.
With that much usage, you might expect SQLite to have contributors from many companies and a robust development ecosystem. But you’d be wrong.
SQLite claims to be “open source, not open contribution”. There are less than 30 contributors in the whole history of the project, with the vast majority of the contributions made by just three individuals. This is in stark contrast to, for example, the Linux Kernel, where I spent the first 10 years of my career, which is also a piece of software that is used everywhere, from cars and IoT devices to supercomputers.
In this article, I’ll introduce you to libSQL, an open source, open contribution fork of SQLite. I’ll review how to get started with sqld, the networked version of libSQL. Finally, I’ll walk through a tutorial example, demonstrating how to use libSQL with Express.js and Vue.js to build a simple movie list application.
Jump ahead:
Prerequisites
To follow along with the tutorial portion of this article, you will need the following:
- pnpm and Node.js installed on your system
- an OMDb API key
What is libSQL?
libSQL is an open source, open contribution of SQLite created by my team at ChiselStrike. We aim to evolve libSQL to suit many more use cases than those for which SQLite was originally designed.
There are changes happening to our industry that make SQLite a perfect fit for use cases it wasn’t initially intended for, and that may not necessarily be on the SQLite team’s radar. These changes are largely driven by the exponential growth and computing power and storage we’ve seen in the last decade (e.g., yesterday’s big data fits in today’s smartphones). In addition, there’s the Web Edge, represented by platforms like Vercel, Netlify, and Cloudflare.
The Web Edge has significantly fewer resources than the cloud, so full-fledged database replication is expensive. Lightweight embeddable databases are perfect for that, except that you need to actually replicate the data, making it available as soon as possible for queries.
While other solutions exist for using SQLite in a networked fashion, they operate under the constraint that SQLite has to be used as is. My position is that the best technical solutions would involve changes to SQLite to accommodate those requirements. I also believe that an open contribution environment can lead to great developments in unexpected directions.
Getting started with libSQL
In this article, we’ll cover sqld, the networked version of libSQL. sqld is designed to offer a local development experience that can be easily upgraded to a production-ready, networked database that works well in serverless and edge environments.
Because edge functions are usually very restricted in what they can do, access to sqld happens mostly over HTTP.
Let’s see how it works.
Installing the binaries
If you use Homebrew, you can install sqld, like so:
//sh
brew tap libsql/sqld
brew install sqld-beta
For instructions on how to build sqld from source, see the docs.
Basic usage
Now let’s create a local instance of sqld, listening on 127.0.0.1:8000:
//sh
sqld -d /tmp/data.db --http-listen-addr=127.0.0.1:8000
This will start sqld in standalone mode. Because it works over HTTP, it can be queried with common tools, including curl. First, let’s make sure it’s working:
//sh
$ curl -s -d '{"statements": ["select 1"] }' \
        http://127.0.0.1:8000
[{"results":{"columns":["1"],"rows":[[1]]}}]
It works fine! As you can see, the result is a JSON string with similar information to what SQLite would return. A select statement returning just a literal is not very useful, though. So let’s try to query a table:
//sh
$ curl -s -d '{"statements": ["select * from movies"] }' \
        http://127.0.0.1:8000
[{"error":{"message":"no such table: movies"}}]
OK, that error message is expected — since we haven’t created any tables yet. We’ll do that soon.
Native clients
HTTP is a universally accessible way to query sqld, but in practice, we most likely want a client library for use in an application. At this time, there are client packages available for TypeScript/JavaScript, Rust, and Python, with more to come.
The client libraries handle all communication over HTTP, with the option of talking to a local file or an in-memory database.
Let’s try to create the database and insert some data using one of those drivers. For this example, we’ll choose JavaScript, so the first step is to create a Node.js project and install the libSQL client:
//sh
$ mkdir demo
$ cd demo
$ pnpm init
$ pnpm install @libsql/client
This code is simple — we will create a libSQL client from a URL, and use two separate calls to the database. With the first call, we’ll create the table. With the second call, we’ll insert some movie data into the table.
To the best of my knowledge, the movie Logging a Rocket doesn’t exist, but if someone is willing to sponsor it, I’m game!
Here’s the code that should end up in the index.js file:
const libsql = require("@libsql/client")

const create = `
create table if not exists movies (
        id integer primary key,
        title varchar(255),
        year integer default 2023,
        rated varchar(20),
        run_time varchar(20) default '120 min',
        plot text,
        genres varchar(255),
        poster varchar(255),
        watched boolean default false
)
`

const insert = `
insert into movies (title, rated, plot, watched) values (
        'logging a rocket',
        'PG-13',
        'faced with the prospect of having to workaround a solution to data distribution, a software engineer forks his favorite embedded database',
        1
)
`

async function initDb() {
        const config = {
                url: process.env.LIBSQL_URL ?? "file:test.db"
        };
        const db = libsql.connect(config);

        const cRet = await db.execute(create);
        console.log(cRet);
        const cIns = await db.execute(insert);
        console.log(cIns);
}
initDb()
Notice how we used file:test.db as the default URL. This means we’ll use a local file instead of doing any network calls, leaning on SQLite’s ability as an embedded database. This is a great way to test your application without setting up any external database process. Just add a SQLite database file to your CI pipelines and execute test functions that make database calls against it. Then, check to be sure the database file has the state you expect.
If we execute the code above without setting the LIBSQL_URL, we’ll see a test.db file generated in the current directory, and we can query it with the SQLite standard shell:
//sh
$ node index.js
{ success: true, columns: [], rows: [], meta: { duration: 0 } }
{ success: true, columns: [], rows: [], meta: { duration: 0 } }

$ sqlite3 test.db "select title from movies"
logging a rocket
Now let’s execute the code again, but this time setting the environment variable to the HTTP address of the sqld server we used previously:
//sh
$ LIBSQL_URL="http://127.0.0.1:8000" node index.js
{ columns: [], rows: [], success: true, meta: { duration: 0 } }
{ columns: [], rows: [], success: true, meta: { duration: 0 } }
Repeating the curl command we used to query the movies over HTTP now yields the expected result:
//sh
$ curl -s -d '{"statements": ["select title from movies"] }' \
        http://127.0.0.1:8000
[{"results":{"columns":["title"],"rows":[["logging a rocket"]]}}]
Replication
Querying the database over HTTP is powerful, but we’re still not really edge-capable if the data is not replicated to a location close to where our end users might be.
To keep the previous example simple, we started sqld in standalone mode, meaning it doesn’t replicate its state anywhere. Replication in sqld works over gRPC, with the replicas asking the primary for new data since the last sync. For that to work, we need to tell the replica who the primary is.
Let’s stop the primary and restart it, but this time we’ll add the --grpc-listen-addr parameter, in order to open a gRPC port that replicas can connect to:
//sh
$ sqld -d /tmp/data.db --http-listen-addr=127.0.0.1:8000 \
        --grpc-listen-addr=127.0.0.1:5001
Because we used the same database path, the data we inserted in the previous steps is still there. Now we can initiate a new replica:
$ sqld -d /tmp/replica.db --http-listen-addr=127.0.0.1:8001 \
    --primary-grpc-url=http://127.0.0.1:5001
There are a few things to note here:
- The replica sqld is using a different port (
8001) for HTTP commands - The
--primary-grpc-urlflag refers to the primary’s gRPC endpoint - The replica and the primary cannot use the same database file; in practice, this would not be an issue, since they would most likely be running on different machines
Now let’s query the replica directly using port 8001, noting the same result as the primary, without any additional work on our part:
$ curl -s -d '{"statements": ["select title from movies"] }'  http://127.0.0.1:8001
[{"results":{"columns":["title"],"rows":[["logging a rocket"]]}}]
If you’re following along, don’t shut down the sqld processes! We’ll walk through building an example application to tie this all together, and we’ll add more data to this instance soon.
OK, let’s put this to good use!
libSQL demo: Movie list app
To demonstrate how this all fits together, let’s use Express.js, Vue.js, and libSQL to build a simple application that displays information about movies. We’ll call the app Popcorn Time!
Popcorn Time contains a dynamic list of movies that we’d like to watch in the future. We’ll be able to add a movie from the IMDb catalog, search for movies, and mark movies that we’ve watched so they can be removed from our database.
We’ll add new movie entries by submitting their respective IMDb IDs, which is found in the second part of an IMDb movie page URL after /title/. In the below example, the MOVIE_ID is tt0800369: 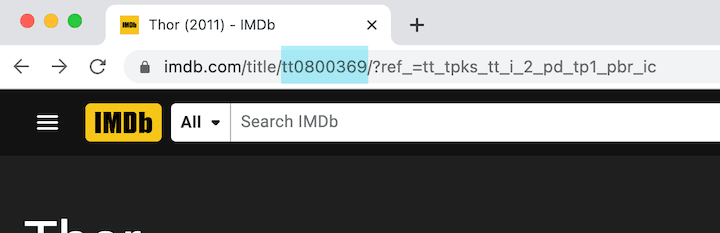
To make our lives easier, we will use OMDb, a REST API service that exposes IMDb metadata.
For this article, we’ll primarily focus on the libSQL-intensive portions of the demo and libSQL’s interaction with Express. For the full source code and a frontend client, visit or clone the GitHub repo.
Creating the Express.js app
To create the Express app, we’ll initialize the Express server with the following configuration for CORS, HTTP data parsing, and environment variables:
// /index.js

const dotenv = require("dotenv");
const path = require("path");
const express = require("express");
const cors = require("cors");
const { connect, Connection } = require("@libsql/client");
dotenv.config({
  path: path.resolve(__dirname, ".env"),
});

const app = express();

// Environment variables
const port = process.env.PORT || 5001;
const dbUrl = process.env.LIBSQL_URL;
const omdbApiKey = process.env.OMDB_API_KEY;
const omdbAPIUrl = process.env.OMDB_URL;
const moviesApi = `${omdbAPIUrl}?apikey=${omdbApiKey}`;

// Database connection
const config = {
  url: dbUrl,
};
const client = connect(config);

// helper functions

// Apply plugins
app.use(cors());
app.use(express.json());
app.use(express.urlencoded({ extended: true }));

// routes

app.listen(port, () => console.log("running server on " + port));
N.B., we’re using this set of CORS rules for local development purposes
Running and seeding
After cloning the project’s repository, we’ll install all the dependencies, like so:
//sh
$ pnpm install --filter ./apps/server && \
pnpm install --filter ./apps/client
As we can see above, our app lives under the apps directory, and there are two subdirectories: server and client. Inside the server directory, let’s rename the .sample.env file to .env, assign our OMDb API key to the OMDB_API_KEY variable, and run the Express server with the following command:
//sh
$ pnpm --filter ./apps/server dev
To initialize the project, we’ll add an /init route:
app.use("/init", async function (req, res) {
  const movieTableCreationQuery = `
    create table if not exists movies(
        id integer primary key,
        title varchar(255),
        year integer default 2023,
        rated varchar(20),
        run_time varchar(20) default '120 min',
        plot text, genres varchar(255),
        poster varchar(255),
        watched boolean default false
    )`;
  await client.execute(movieTableCreationQuery);
  const seeAvailableTables = await client.execute(
    "select name from sqlite_schema where name not like 'libsql%'"
  );
  return res.status(200).json(seeAvailableTables);
});
The client is similar to what we have already established, using the LIBSQL_URL environment variable to control whether we’ll use a local SQLite file or query over HTTP. Because the table may already exist, it’s important to add the if not exists clause from SQL. We also return all tables present in the database, skipping the internal tables.
Assuming the sqld instances we had started in the previous section are still running, let’s send a POST request to the Express server’s /init path to create the database’s movies table:
$ curl -X POST http://localhost:3000/init
{"columns":["name"],"rows":[["movies"]],"success":true,"meta":{"duration":0}}
Next, we need to seed the database with some actual movie data. We’ll use the seed route: /seed.js. We can issue POST to the /seed path to seed some data to our table:
$ curl -X POST http://localhost:3000/seed
"Added 10 movies!"
Adding new movies
To add a new movie, we need to fetch its information from the OMDb API and then add it to the database. We’ll do this by adding an /add route, which will respond to POST requests with an imdbId variable passed in the submitted JSON payload.
To keep the code concise, we’ll use two helper functions:
-
getMovieByImdbId(): Takes an IMDb movie ID as an argument and fetches the movie's information using the OMDb API -
addMovieInfoToDatabase(): Adds the movie’s information to the database; this is just a normal SQL insert query
The general implementation looks like this:
app.use("/add", async function (req, res) {
  const { imdbId } = req.body;
  let responsePayload;

  if (!imdbId) {
    return res.status(422).json("imdbId is missing!");
  }

  try {
    // get movie data
    const movieInfo = await getMovieByIMDBId(imdbId);
    if (!movieInfo) {
      return res.status(404).json("Movie not available");
    }

    // Populate db
    const response = await addMovieInfoToDatabase(movieInfo, client);
    responsePayload = response?.success
      ? "Added movie"
      : "Movie not added";
  } catch (error) { /* handle errors */ }

  return res.json(responsePayload);
});
And now, let’s dive into the helper functions. Getting a movie ID is just a matter of fetching it from the OMDb API, like so:
async function getMovieByIMDBId(movieId) {
  if (!movieId) throw "Missing arguments";

  try {
    const data = await fetch(`${moviesApi}&i=${movieId}`);
    const movie = await data.json();
    return movie.Response === "False" ? null : movie;
  } catch (error) {
    console.log({ error });
    return null;
  }
}
Adding a movie’s information to the database happens with a simple SQL insert query:
async function addMovieInfoToDatabase(movie, dbClient) {
  const {
    Title: title, Year: year, Rated: rated, Runtime: run_time,
    Plot: plot, Genre: genres, Poster: poster,
  } = movie;
  const movieAddQuery =
    `insert into movies(title, year, rated, run_time, plot, genres, poster) values(
      ?, ?, ?, ?, ?, ?, ?
      )`;
  return dbClient.execute(movieAddQuery, [
    title, year, rated, run_time, plot, genres, poster,
  ]);
}
Marking movies as watched
The /update route will handle logical deletes. It’s helpful to retain movies watched in the app, so we’ll just set the watched flag to true. The route takes a movieId, and just uses the SQL UPDATE query:
app.use("/update", async function (req, res) {
  const { movieId, watched } = req.body;
  let responsePayload;
  const watchedInt = watched ? 1 : 0;

  try {
    const movieWatchStateUpdateQuery =
      "update movies set watched = ? where id = ?";
    const response = await client.execute(movieWatchStateUpdateQuery, [
      watchedInt,
      movieId,
    ]);
    responsePayload = response.success
      ? "Movie updated"
      : "Failed to update movie";
  } catch (error) { /* handle errors */ }}

  return res.json(responsePayload);
});
Viewing and searching
Generating a list of the movies is easy. The route is /movies, and all it does is issue a SELECT statement. As we discussed in the /update route, there is a watched flag. To create our movie watch list, we’ll filter based on that flag being false:
app.use("/movies", async function (req, res) {
  let responsePayload;
  try {
    const unwatchedMoviesSelectQuery =
      "select * from movies where watched = false order by id desc";
    responsePayload = await client.execute(unwatchedMoviesSelectQuery);
  } catch (error) {
    console.log({ error });
    responsePayload = null;
  }

  return res.json(responseDataAdapter(responsePayload));
});
Searching is similar. We’ll add a very simple search under the /search route, without any external search engines. Because we’re searching our watch list, we’ll also filter for movies where watched = false:
function responseDataAdapter(data) {
  if (!data?.columns || !data?.rows) {
    return data;
  }

  const { columns, rows } = data;
  const formattedData = [];

  for (const row of rows) {
    const rowData = {};
    for (const key of columns.keys()) {
      rowData[columns[key]] = row[key];
    }
    formattedData.push(rowData);
  }

  return formattedData;
}
And now, it’s popcorn time!
Testing
With these routes set, we can start making API calls to the server to see if everything works.
Let’s try changing the value of LIBSQL_URL inside the server’s .env file to that of a replica database to test data synchronicity between the replica and primary databases.
Here’s the full demonstration of a frontend client consuming data from our Express server: 
What’s next?
There are many other things that I’d love to tackle next, both in the libSQL core and sqld projects. Here are some examples:
- Native support for CRDTs, similar to the VLCN project. This will allow for fast, local writes, for applications that can sustain lower consistency
- Asynchronous APIs, allowing for better performance
- A new and revamped SQL shell, for a more ergonomic shell experience
For a comprehensive view, check out the issues list for libSQL core and sqld. But mostly, I want libSQL to be a home for all builders who believe there is room to take a lean, mean, and SQLite-compatible embedded database to new heights. I’d love to see your contribution!
Cut through the noise of traditional error reporting with LogRocket

LogRocket is a digital experience analytics solution that shields you from the hundreds of false-positive errors alerts to just a few truly important items. LogRocket tells you the most impactful bugs and UX issues actually impacting users in your applications.
Then, use session replay with deep technical telemetry to see exactly what the user saw and what caused the problem, as if you were looking over their shoulder.
LogRocket automatically aggregates client side errors, JS exceptions, frontend performance metrics, and user interactions. Then LogRocket uses machine learning to tell you which problems are affecting the most users and provides the context you need to fix it.
Focus on the bugs that matter — try LogRocket today.

Top comments (0)