
In this tutorial, we will create an API to manage contacts. We connect the API to MongoDB Atlas, a cloud provider for MongoDB. We are going to use a Deno framework called Oak to create our backend server and Postman for testing our routes. We start with a short intro to Deno and MongoDB atlas, if you want to skip this part you can go directly to the API building, or take a look at the code.
Before you continue
You should have basic knowledge about what an API is, newer JavaScript features such as async-await, destructuring, arrow-functions, and a basic understanding of TypeScript.
Table Of Contents
Introduction
Deno was created by Ryan Dahl, the creator of Node.js. Despite the success of Node.js, there were some things that Ryan wanted to change, and he felt the best way was to create a new runtime. Deno is built in Rust and uses V8 and Tokio (event loop).
Deno is secure by default, meaning you must give Deno permission for certain things. Deno executes the code in a sandbox, which means that the runtime has no access to things like the file system, network, executions of scripts, and env variables. This means you have to explicitly tell Deno what it can and cannot use. To access the file system, you must use the –allow-write flag. For network, use –allow-net and –allow-env for env variables. If you do not care about security measures you can use the flag -A to give Deno access to everything, however, this is not recommended.
Deno uses de-centralized Packages, which means that we do not need node_modules to install our dependencies. Instead, we load it directory from an URL. You can find the Standard Library from Deno's website and other third-party libraries.
Deno allows you to use TypeScript out of the box with built-in features like testing and linting. It also has something called first-class await wich means that you do not need to wrap asynchronous code into functions.
Installing Deno is quite straight forward and depending on your OS.
For MAC you can use Shell
$ curl -fsSL https://deno.land/x/install/install.sh | sh
You can also use Homebrew
$ brew install deno
Windows users can use Powershell
$ iwr https://deno.land/x/install/install.ps1 -useb | iex
For more options and information take a look at Denos documentation.
Create a simple server with Oak
We use Oak to set up a simple server. Create a file called mod.ts (this is the standard naming convention in Deno) and paste this in.
import { Application, Context, Router } from 'https://deno.land/x/oak/mod.ts'

const app = new Application()
const port = 8000
const router = new Router()

router.get('/', (context: Context) => {
  context.response.body = 'Hello Deno!'
})

app.use(router.routes())
app.use(router.allowedMethods())

await app.listen({ port })
To start the server, run: deno run –-allow-net mod.ts
Notice that we must give Deno permission to use the network.
Then you can navigate to http://localhost:8000/ and see the Hello Deno! Message.
Oak is a middleware framework for HTTP servers with Deno, it has a 'router' object used for navigation. Oak is inspired by Koa, a framework for Node.js
The context object gives us access to the request and response.
To learn more about Oak click this link
MongoDB Atlas
We are going to use MongoDB Atlas to store our data. Head over to their website to create a free account, or log in with google.
Once logged in, create a cluster. Choose the free tier, your provider, and the host. I picked AWS and Irland.

It will take a couple of minutes to create the cluster. You should be redirected to your dashboard after it has finished.

Now we need to set up a collection for our data. Click on Collections and Add my own data. Name your database 'contacts' and your collection 'friends'.

Now we are ready to create our backend and connect it to the database. Go back to the overview and click “connect”.

First, we need to whitelist our IP address. Then we have to create a database user, keep in mind that you will have to remember both the username and password, you will need in the next step. Chose the “Connect your application” option. It tells you to select driver and version, select Node.js (at the time of creating this tutorial Deno had not yet been added). Copy your connection string and change password and dbname.
We are going to use a deno library called mongo to connect our backend with our database.
Inside Visual Studio Code create a file called db.ts, and paste the following code. Here you can see my database credentials, username, and password. Make sure you use your own connection string.
import { MongoClient } from 'https://deno.land/x/mongo@v0.8.0/mod.ts'

const client = new MongoClient()
client.connectWithUri(
'mongodb+srv://martin:deno123@cluster0.p3gf0.mongodb.net/contacts?retryWrites=true&w=majority'
)

const db = client.database('contacts')

export default db
Building our API
Now we can create our main entry point. Create a file called mod.ts and paste in the following.
import { Application, Router } from 'https://deno.land/x/oak/mod.ts'

import {
  addFriend,
  getFriends,
  updateFriend,
  deleteFriend,
} from './controllers/friends.ts'

const app = new Application()
const port = 8000
const friends = new Router()

friends
  .get('/friends', getFriends)
  .post('/friends', addFriend)
  .patch('/friends/:id', updateFriend)
  .delete('/friends/:id', deleteFriend)

app.use(friends.routes())
app.use(friends.allowedMethods())

await app.listen({ port })
Before we create our endpoints, we can install something called Denon. If you have used Node before it is the same as Nodemon, the server will automatically restart when we make changes to our code.
$ deno install --allow-read --allow-run --allow-write --allow-net -f --unstable https://deno.land/x/denon@2.3.0/denon.ts
Then run this command to initialize the Denon config.
$ denon --init denon.config.ts
You should see a file called denon.config.ts in your folder. Make sure it looks like this:
import { DenonConfig } from 'https://deno.land/x/denon/mod.ts'

const config: DenonConfig = {
  scripts: {
    start: {
      cmd: 'deno run mod.ts',
      desc: 'run my mod.ts file',
      allow: ['plugin', 'net', 'read', 'write', 'env'],
      unstable: true,
    },
  },
}

export default config
Next up we need to create our controller functions. Inside your src folder create a new folder called 'controllers'. Inside, create a file called friends.ts
Import your database and get the friends' collection. Then we create an interface for our Friend object.
import db from '../db.ts'
import { Context } from 'https://deno.land/x/oak/mod.ts'

interface Friend {
  name: string
  address: string
  phone: number
}

const friends = db.collection('friends')
The first thing we need to do is be able to create new friends in the database.
export const addFriend = async ({ request, response }: Context) => {
  const body = await request.body()
  if (!request.hasBody) {
    response.status = 404
    response.body = {
      success: false,
      message: 'No data provided',
    }
  }
  try {
    const { name, address, phone } = body.value
    await friends.insertOne({
      name,
      address,
      phone,
    })
    response.body = {
      success: true,
      body: `Contact information was created for: ${name}`,
    }
    response.status = 201
  } catch (error) {
    response.body = null
    response.status = 500
  }
}
We use the MongoDB method insertOne() to insert a document into our collection.
Navigate over to Postman and create a POST request to http://localhost:8000/friends
Click on Body. Chose raw and JSON. Create your JSON object and click send.

Next up we create the API for reading our friends.
export const getFriends = async ({ response }: Context) => {
  const data: Friend[] = await friends.find({})
  if (data) {
    response.body = data,
    response.status = 200
  } else {
    response.body = 'not found',
    response.status = 204
  }
}
We use the MongoDB method find() to get all documents from our collection and store them in an array called data.
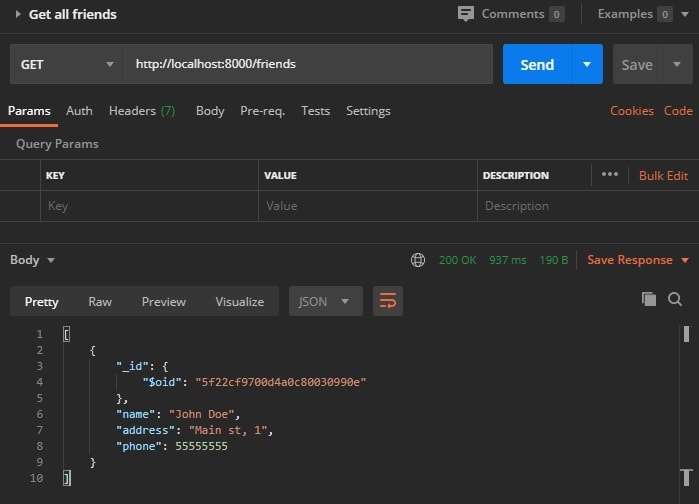
In postman, make a GET request to http://localhost:8000/friends
In the response we get an array with our friend, we only have one at the moment.
export const updateFriend = async ({
  request,
  response,
  params,
}: Context | any) => {
  try {
    const body = await request.body()
    const { id } = params
    const fetchedFriend = await friends.findOne({ _id: { $oid: id } })

    if (fetchedFriend) {
      const { matchedCount } = await friends.updateOne(
        { _id: { $oid: id } },
        { $set: { ...body.value } }
      )
      if (matchedCount) {
        response.body = {
          success: true,
          body: `Updated contact with id: ${id}`,
        }
        response.status = 204
      }
    } else {
      response.body = {
        success: false,
        body: `No contact with id: ${id} found`,
      }
      response.status = 404
    }
  } catch (error) {
    response.body = {
      success: false,
      body: error.message,
    }
    response.status = 500
  }
}
We get the ID from the params object. Then use it to find our friend in the database, and update it with the data we provide. In this case, John Doe has moved and we need to update his address. First, get the unique ID. In our GET request, we could see John's _id, this is something MongoDB adds automatically. In my case his id is 5f22cf9700d4a0c80030990e.
In Postman create a PATCH request to http://localhost:8000/friends/ followed by the id, in my case, it will look like this http://localhost:8000/friends/5f22cf9700d4a0c80030990e

Lastly, we'll create a function for removing a friend in the database.
export const deleteFriend = async ({ response, params }: Context | any) => {
  try {
    const { id } = params
    const fetchedContact = await friends.findOne({
      $oid: id,
    })

    if (fetchedContact) {
      await friends.deleteOne({
        _id: { $oid: id },
      })
      response.body = {
        success: true,
        body: `Contact with id: ${id} was deleted`,
      }
      response.status = 204
    }
  } catch (error) {
    response.body = {
      success: false,
      body: error.message,
    }
    response.status = 500
  }
}
Once again use the unique object to find the correct friend to delete.

Summary
We have now created an API with Deno! We implemented addFriend, getFriend, updateFriend, and deleteFriend in friends.ts. The API allows you to manage your database through HTTP requests.
If you want to learn more about Deno I suggest you check out Brad Traversy's two-part crash course on youtube.
I would also highly recommend this course on udemy.
References
https://deno.land/
https://deno.land/x/mongo
https://deno.land/x/oak

Top comments (1)
This is a great tutorial! I'll save to try it out later, thank you!