On Part4 we discussed how to use .plist files with different values for each target. The .plist approach will help us build the brand for each target, avoiding the boilerplate code.
We couldn't build the brand for each target without discussing the target's app icons. There are two ways to use a different set of App icons and we are going to discuss them both.
You can download the project here as we left it on Part4.
The first and easiest way is to use the Assets.xcassets for every target. Just go to plus sign and select App Icons & Launch Images -> New iOS App Icon and name it TargetName-AppIcon. Then, at the target's General tab and select the TargetName-AppIcon in AppIcon Source. That's it!
The second way is to create a different .xcassets for each target, that will contain only the AppIcon of the specific target. For our project, we are going to create a new asset catalog called TestCoffee.xcassets (under TestCoffee resource folder) with target membership only for TestCoffee target and then we are going to set it as AppIcon Source in its General tab. Now, we have to create an AppIcon called AppIcon. The tricky part now, is to set the appropriate AppIcon for each target. For some reason, Xcode won't let you set it directly but I found a workaround. You need to select "Don't use assets catalog", then select any other file in Xcode and then go back to the target's General tab. You will notice that a new button appeared called "Use assets catalog". Tap on that and select the appropriate asset, then select "Migrate". Now you can select the AppIcon from the specific Asset Catalog. Repeat the same procedure for every target.
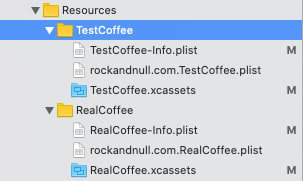
I personally prefer the second way because is a cleaner structure especially if you have a big number of targets.
That's the end of the "White label" series! I hope you found it helpful! If you have any other part that you want me to cover or you want to discuss, please don't hesitate to drop me an email.
You can find the final project here.
Happy coding!
How to create a white label iOS app (Part 1)
How to create a white label iOS app (Part 2)
How to create a white label iOS app (Part 3)
How to create a white label iOS app (Part 4)
How to create a white label iOS app (Part 5)

Latest comments (0)