
APIs are everywhere and I’m pretty sure you might have come across or interacted with it in one form or the other. Its existence plays a vital role in how applications interact with each other and how resources are being shared and executed using specific set of protocols as a way of controlling who gets access to what resources to prevent abuse.
This article attempts to describe in the simplest possible terms what APIs really are, how to call/consume them and the reason some things are the way they are but first let’s get some brief history under our belt.
Disclaimer: During the course of this article, it is safe to assume that all the codes were used within a ReactJs project and so if it isn’t expressly stated it is infact inferred.
What’s an API
An Application Programming Interface as stated above is an interface provided by either a third-party provider or from in-house developers as a way to interact with the database from the front end. It was first used as we now use it by Salesforce in the year 2000 and has since been constantly improved on to meet growing needs thus, providing a good documentation of your API will always be of tremendous benefit to everyone involved.
Examples of third-party APIs are:
https://api.twitter.com/2/tweets/:id (twitter)https://accounts.spotify.com/api/token (spotify)
Sometimes, you’d be asked to sign up and get an Access key or Token as a unique identifier and to authenticate your licence to use their API.
Types of APIs
There are already multiple packages for calling APIs, Javascript has a built-in tool called Fetch API for fetching and managing APIs. Other popular API management tools are jQuery AJAX, SWR, Apollo Client (for GraphQL).
But before we talk about how to call an API, we have to understand that all APIs are not built the same way or use the same technologies – For example, we have different architectural patterns in which they’re designed. Two of the most popular approaches are REST API and GraphQL. Let’s take a look at them briefly.
- REST API (Representational State Transfer): As the name implies, REST is an architectural style that uses a representation of a data format such as JSON or XML to pass data around between the host and the client. It uses HTTP methods to perform CRUD operations on resources which are identifiable by a unique identifier, the URL (Uniform Resource Locator).

Since they use HTTP methods to perform operations, they also adopt the status codes which are designed to briefly communicate the status of the request – the codes range from 200 to 5xx (You may likely not see errors with status code 1xx as they’re rare).
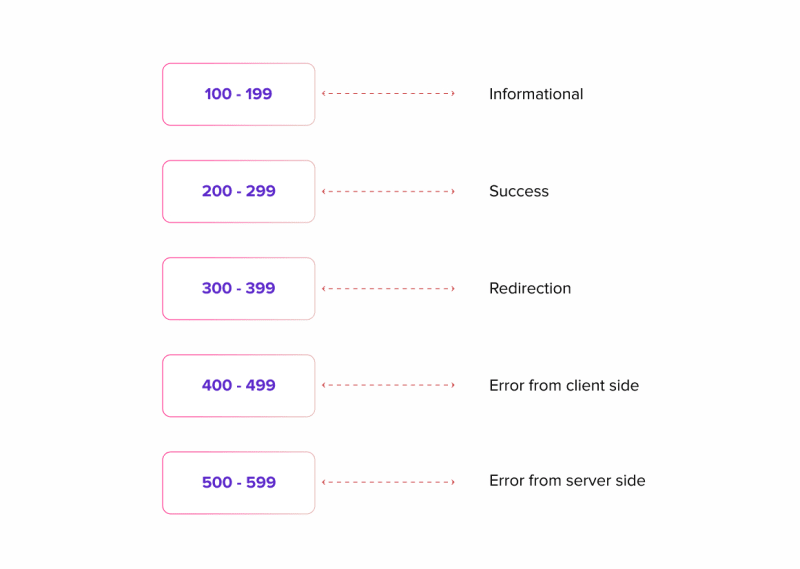
For an API to be called RESTful (Any API that behaves in this way is called a RESTful API), it must be cacheable (response data can be stored and be able to be retrieved), layered (Calls made to the API all work the same way however it’s being called – client to server directly or a proxy service), stateless (all API calls are made independently from each other).
It's ok if all these doesn’t make much sense to you, you’ll begin to see them in action during the course of this article.
- GraphQL: While RESTful APIs return all the resources at once using multiple endpoints in a fixed data structure, GraphQL works a bit differently in that it only has a single endpoint. The client can also specify the structure of data being received and can request for a very specific set of data; this means the data fields must be known beforehand.
Although these two are the most popular, there are other API protocols such as SOAP (Simple Object Access Protocol) API and RPC (Remote Procedure Call) API.
Promises and Failed Hopes
Now that we have all that out of the way, let’s take a brief look at what a typical API call looks like.
fetch(“URL”)
.then(res => res.json());
.then(data => console.log(data))
.catch(err => console.log(err))
This is a GET request that fetches data from an endpoint (URL), the first line uses the keyword “fetch” to indicate the technology being used and also to pre-empt the call of the api using the url in brackets. Once that is done, the response is converted into JSON format using “res.json()” because it’s still in its raw format. Since that returns a promise also, another “.then” command is used to get the data from the response which is then printed in the console. If there’s an error while the data is fetched or that prevents the data from being fetched, it prints the error in the console alongside the codes listed above.
Before we can fully understand what the call above request does let’s take a detour to understand what promises are – A Promise, just like in the real world is a piece of code that represents an eventual success or failure of an asynchronous operation (Another big word – more on that latter); Or you can see it this way – I promise to buy you a PS5 if you sign-up for, start and complete the London marathon next year. A promise always has three states; a pending state, a success state and a failure state. Signing up, turning up on that day and starting the race are all part of the pending state, now if you eventually complete the race, you’ve met the conditions required so you get a PS5 but if you don’t, the failure state is activated and you get nothing.
At this point I believe a sample code will help solidify your knowledge:
const PSfiveFunction = new Promise((resolve, reject) => {
    let finishRace = true;
    if (finishRace == true) {
      resolve("You've received your PS5");
    } else {
      reject("No PS5 for you");
    }
});
This is the part where you’re promised a PS5 if you finish the race. The if statement implies that if the race is completed i.e., “finishRace” is true, you automatically receive your PS5, if you don’t the else statement kicks in and you don’t receive any. Now here’s how I’m using the function:
 PSfiveFunction.then((message) => {
    console.log(message);
  }).catch((message) => {
    console.log(message);
  });
Here I called the promise function and told it if the race was completed, it should print the message in the resolve argument using the “.then” keyword. If the race wasn’t completed and “finishRace” is false, the reject argument is activated using the “.catch” keyword.
Since “fetch” returns a promise, it is treated exactly the same way – execute the result of a response using the “.then” keyword or return a failure message if something went wrong or promise wasn’t fulfilled using the “.catch” key word.
Now will be a great time to define the terms I’ve used:
Fetch: Fetch() is a built in JavaScript function used to interact with APIs that make HTTP requests to retrieve resources from a network.
Promise: As I’ve stated earlier, a promise is a JavaScript object that represents what happens when an asynchronous operation is being executed. This also includes how the success and failure of the operation is being handled.
Asynchronous operation: An operation is said to be asynchronous if it doesn’t prevent other actions from executing while itself is still in process. It allows other programs and actions to coexist alongside it. An example of an asynchronous operation is an API request – since you wouldn’t want fetching a piece of data from preventing your site from loading the current page, you’ll have to make that task run asynchronously. Other asynchronous operations are event handling and reading/writing files.
Synchronous operation: As a direct opposite to asynchronous operations, a synchronous operation refers to an action that prevents the execution of other actions until it is completed. Examples of such tasks are basic arithmetic and loop iterations.
Interacting with APIs
If you’ve made it this far, congratulations; you now have a good understanding of how an API works and how all the little pieces come together. We’ll now perform some API operations such GET and POST using Fetch API.
Using Fetch (GET request)
In the previous example, I used “URL” to represent the endpoint but I’m going to use a live api for this one called jsonplaceholder. JSONPlaceholder is a “free fake API for testing and prototyping” as it is stated on the site. It’s basically where you go to if you want to learn how to interact with an API without spending a dime. I've added the link at the end of the article.
Let’s rewrite the example:
fetch(“https://jsonplaceholder.typicode.com/users”)
.then(res => res.json());
.then(data => console.log(data))
.catch(err => console.log(err))
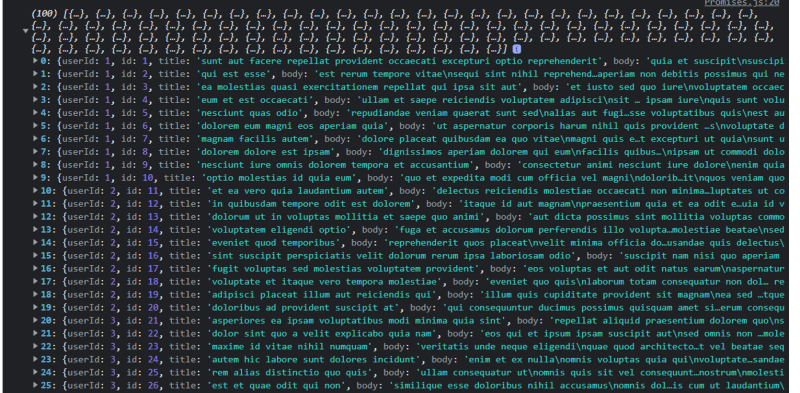
The API used is supposed to provide a list of 10 users and their respective details. If you put the api in your browser address bar right now, you’re going to see a bunch of user details well organized in an array of objects.
The resulting response from the line “.then(data => console.log(data))” is thus:

When consuming data like this, you always have to take note of the ID data as it is a unique identifier for the individual users. Let’s take the first user with an ID of 1 for example:
name: Leanne Graham
username: Bret
email: Sincere@april.biz
…and so on.
What if we want to print all the names from the api? We use a map function to loop through the list and print only the names, just like you would any array.
fetch("https://jsonplaceholder.typicode.com/users")
    .then((res) => res.json())
    .then((data) => handleSingleData(data));
I’ve modified the previous section of the code to pass the data to a function. This function will include the instructions to pick only the name of each of the users and print them to the console.
const handleSingleData = (data) => {
    data.map((item) => console.log(item.name));
};
This is what your typical get request looks like with Fetch.

I can also decide to get a single user by changing the number after the previous endpoint as indicated in the documentation.
fetch("https://jsonplaceholder.typicode.com/users/1")
    .then((res) => res.json())
    .then((data) => console.log(data));
…and here’s the result.

This is where your knowledge of objects and arrays begin to shine.
Using fetch (POST request)
So far we’ve been able to retrieve data from an api but what if we want to add a new user to the database? A POST request is used to CREATE new data. That is to say it handles operations where new data such as a new registered user for example is sent to the database. So when the form is filled and the submit button is clicked, it triggers a POST request to the API which in turn feeds the database with the new data. It’s like a GET request but in reverse.

For this part I’ve removed the “…/users” and replaced it with “…/posts” at the end of the api endpoint to make it easier to make a POST request without having to deal with sending a lot of data. This is what a get request to the api looks like:
It goes on to a hundred items.
…back to the post request.
The post request looks a little bit different:
 fetch("https://jsonplaceholder.typicode.com/posts ", {
      method: "POST",
      headers: {
        "Content-Type": "application/json; charset=UTF-8",
      },
      body: JSON.stringify({
        // Data from form inputs
      }),
    })
      .then((res) => res.json())
      .then((data) => console.log(data))
      .catch((err) => console.log(err));
Here we’ve added three properties to the fetch API; the method, the body and headers.
Method: The method defines what the api is for, previously it wasn’t included because a GET request was implied automatically by javascript if the method is not defined.
Headers: The header is used to define the type of content being passed to the api, in this case we’ve told the API that we’ll be sending a JSON formatted data in a UTF-8-character set.
Body: The body includes all the data that needs to be sent through the API. The JSON.stringify method converts the object it’s being fed to JSON format as we’ve defined already in the header property. If this isn’t done, we’ll likely get a “BAD REQUEST” error as the api wouldn't understand what’s being fed to it.
The other sections of the code are where it begins to get interesting; let’s create a form that will accept the inputs we need to send to the api – recall that each user has to have a set of fields present for a successful request. Since we only have to give it a title and description, we only need to create two form fields and a submit button.

<div className="form-container">
      <h2>My API</h2>
      <div>
        <form onSubmit={handleSubmit}>
          <div className="field-container">
            <label>Title</label>
            <input
              type="text"
              name="title"
              onChange={handleChange}
              className="border-gradient border-gradient-purple"
            />
          </div>
          <div className="field-container">
            <label>Description</label>
            <textarea
              name="description"
              onChange={handleChange}
              className="border-gradient border-gradient-purple"
            ></textarea>
          </div>
          <button type="submit" className="btn">
            Submit
          </button>
        </form>
      </div>
</div>
Since we’re more focused on API consumption, I’ve made the CSS available below.
body {
  display: flex;
  flex-direction: column;
  align-items: center;
  width: 100vw;
}
:root {
  --grad: linear-gradient(116.98deg, #d322e2 11.54%, #363cc1 66.87%);
}

.border-gradient {
  border: 2px solid;
  border-image-slice: 1;
  border-width: 2px;
  border-radius: 5px;
  height: 40px;
  padding: 2px 4px;
}
.border-gradient-purple {
  border-image-source: var(--grad);
}

.field-container {
  display: flex;
  flex-direction: column;
  margin: 20px 0px;
  width: 50%;
}

.form-container {
  margin-left: 30px;
}

.btn {
  width: 50%;
  height: 40px;
  border: none;
  background: #d322e2 11.54%;
  color: white;
  font-size: 14px;
  text-transform: uppercase;
  font-weight: bold;
}
There are two functions to take note of here:
-
handleChangeand handleSubmit
Just as the name implies, the “handleChange” function is responsible for handling any change that occurs in any of the input fields i.e. when you type something in the input field, this function handles how it should behave.
The “handleSubmit” function is quite similar but handles what should happen when the button in the form is clicked. If you want the form to be cleared when it’s submitted, this is where you add the code. This is also where we add the code responsible for sending the data in our form field to the api.
It’s a good habit to always to give your variables descriptive names as it helps not just you but other developers to quickly figure out what each piece of your code does.
Our concern right now is to be able to send what ever we fill into the form back to the API so let’s start by telling our code what to do when you begin to type into the input fields.
const handleChange = (e) => {
    e.persist();
    setInputs((inputs) => ({
      ...inputs,
      [e.target.name]: e.target.value,
    }));
  };
When an event such as a button click or typing into an input field, an object is passed to the event handler function – in this case we’re using the letter “e” to target that event (it could be any word like "event" or "check"). The event object contains everything that could possibly happen when that event is triggered. In this case we’re appending a “persist()” function before ever using the event object to prevent it from discarding the properties soon after it’s called – this ensures that event properties like “e.target” which we need is available to us when we need it.
The “setInputs” function is then called to update the state of the “inputs” object which is passed to it. After creating a copy of the inputs object by using a spread operator (…inputs), we tell the setInputs function how to organize the data we’re about to send to the API ([e.target.name]: e.target.value,).
Don’t forget to add the “useState” hook to handle the input state.
const [inputs, setInputs] = useState({});
Once we’re able to handle the changes in the form field, we’re back to handling what happens when we click on the submit button.
const handleSubmit = (e) => {
    e.preventDefault();
    console.log(inputs);
};
Just like we did previously, we’re telling the event object to prevent any unpleasant default behaviours before passing our input data to the console. I’ve passed it to the console first to know if my form works before pushing what ever I have to the API this is a safety measure to catch bugs early in your project cycle.

Thankfully we’re able to capture whatever we've typed in our form when we click on the submit button without issues. Let’s pass them to the API now.
    fetch("https://jsonplaceholder.typicode.com/posts", {
      method: "POST",
      headers: {
        "Content-Type": "application/json; charset=UTF-8",
      },
      body: JSON.stringify({
        title: inputs.title,
        description: inputs.description,
      }),
    })
      .then((res) => res.json())
      .then((data) => console.log(data));
All we’ve had to do here is replace the comment we had in the body with the object properties and their values which represent the values in our form fields. Now we have to wrap this in a function and call it in the “handleSubmit” function – this is done to keep the code clean.
const POSTDetails = () => {
    fetch("https://jsonplaceholder.typicode.com/posts", {
      method: "POST",
      headers: {
        "Content-Type": "application/json; charset=UTF-8",
      },
      body: JSON.stringify({
        title: inputs.title,
        description: inputs.description,
      }),
    })
      .then((res) => res.json())
      .then((data) => console.log(data));
  };
…then call it like so:
  const handleSubmit = (e) => {
    e.preventDefault();
    // console.log(inputs);
    POSTDetails();
  };
The entire code looks like this:
import { useState } from "react";

export default function Promises() {
  const [inputs, setInputs] = useState({});

  const POSTDetails = () => {
    fetch("https://jsonplaceholder.typicode.com/posts", {
      method: "POST",
      headers: {
        "Content-Type": "application/json; charset=UTF-8",
      },
      body: JSON.stringify({
        title: inputs.title,
        description: inputs.description,
      }),
    })
      .then((res) => res.json())
      .then((data) => console.log(data));
  };

  const handleChange = (e) => {
    e.persist();
    setInputs((inputs) => ({
      ...inputs,
      [e.target.name]: e.target.value,
    }));
  };

  const handleSubmit = (e) => {
    e.preventDefault();
    // console.log(inputs);
    POSTDetails();
  };

  return (
    <div className="form-container">
      <h2>My API</h2>
      <div>
        <form onSubmit={handleSubmit}>
          <div className="field-container">
            <label>Title</label>
            <input
              type="text"
              name="title"
              onChange={handleChange}
              className="border-gradient border-gradient-purple"
            />
          </div>
          <div className="field-container">
            <label>Description</label>
            <textarea
              name="description"
              onChange={handleChange}
              className="border-gradient border-gradient-purple"
            ></textarea>
          </div>
          <button type="submit" className="btn">
            Submit
          </button>
        </form>
        <button type="submit" onSubmit={GETDetails}>
          submit
        </button>
      </div>
    </div>
  );
}
Congratulations! You made it through
If you made it this far, congratulations! You’re made of steel. We’ve been able to cover a lot of topics so let’s recap briefly.
We now know the history of APIs and how it has evolved with the web. In the course of describing the function of APIs we also understood what they’re used for and how we can maximize it’s use for our business or personal needs.
Furthermore, we took a detour to understand the concept of promises and how they’re being used in asynchronous operations to effectively perform tasks without interfering with the rest of the code when it’s being run.
We finally discussed how we can retrieve and send data using Fetch API – The promise-based API interaction tool built into Javascript.
The information within this article will set you as a developer up for future excellence as it covers the majority of the intricacies involved in working with API in the future.
Useful Links

Top comments (0)