
Now that I've settled into being home more-so than usual, I'm looking for ways to improve my decor.
I read that interior lighting can boost your mood, the same way colors on a web page can. So I decided to purchase some LIFX Mini bulbs--no hub required, and can say after a couple days, it's definitely helped keep me sane during these times.
However, after a bit, my developer itch was kicking in. So in this project, we'll use the fetch web API to first list our lights, and from there, we will send a request to a particular light so that it's color changes.
🗒️ It's worth mentioning that if you don't want to take the coding route, the service IFTTT has many 3rd party integrations that you can take advantage of to enhance your lighting experience.
🚨 If you just want to look at the code and fill in the blanks, there is a codeSandbox down below. Just make sure to update the super-secret-token.js file with your keys if wanting to make it work 😉
Getting an API Key
I was pleased to find that LIFX has an API for their bulbs, and upon signing up, you can access your secret token that we'll need later on.
Admittedly, it took me longer in figuring where to find my token than it did to write the code, so to help out, here's the easy path:
Head over to the cloud portal and sign in with the same username and password that you used to sign in with on your mobile app
Once you're signed it, you should be redirected to a page where you can "Generate New Token" (note that I already have a few tokens created).
Click the "Generate New Token" button and give your token a name.
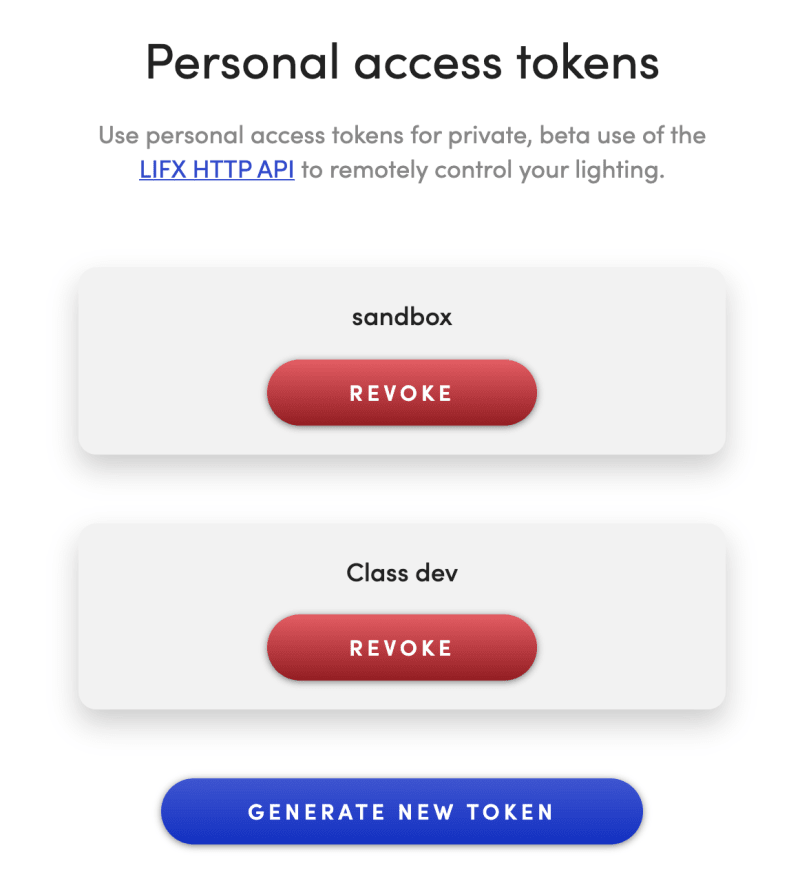
That's it 🎉 Now you should see your secret token.
🗒️ As is mentioned on the site, you'll want to copy that somewhere safe because once you navigate away from the page, you won't be able to access the token again and can only generate a new one. In codeSandbox, the easiest way to do this, is to make your project private or an a minimum, unlisted

Reading the Docs
Now that I had an API Key, I was able to checkout the docs and figure out what endpoints were available to me.
In particular the List Lights and the Set State endpoints are what we'll be using.
Authentication
It's worth reading over the Authentication and Rate Limits sections to understand how the API keeps us secure and prevents spamming. Here are the main points:
- If using
Basicauth, as we are, we'll need to provide our token as the username - Our requests have to have the
Content-Type: application/jsonheader - Our token allows us to make 120 requests every 60 seconds. We can use the
X-RateLimit-Remainingresponse header to see how many request we have left.
Setting Up Our Project
As mentioned above, if you have your secret token, feel free to plug that into the super-secret-token.js file's TOKEN area and click the List Light ids button to get your lights. From there, pick and id, plug it into the other secret value, and it should Just Work™️
For those still with me, let's use the sandbox above and take a tour of the code.
Starting with the index.html file, you'll notice it's fairly boring. It's vanilla JavaScript and we just have a couple of elements with id's assigned so that we can target them in our code. The most appealing part is that we have <input id="color-picker" type="color" />. Giving an input a type attribute of "color" will give us a nice color picker on both desktop and mobile!
Let's get to the star of the show.
Finally Making Our Request With Fetch
In index.js we kick things off by bringing in our tokens, and grabbing a few elements that we created in our index.html file.
Next up we add an event-listener to our button so we can trigger a request whenever a user clicks the List Light ids button.
Now on to our request.
Fetch With Basic Auth
fetch takes in an endpoint as a first argument. Which we are passing as a string
fetch(`https://api.lifx.com/v1/lights/all`
Additionally, fetch can take an object used for configuration as a second argument. This is where we can specify any required headers, as well as set the auth type.
headers: {
  "Content-Type": "application/json",
  Authorization: `Basic ${btoa(TOKEN)}`
}
🔥 Note the use of the
btoafunction. This is the browser's built-in method for converting a normal string to a base64 encoded string. If wanting to convert the other way around, there's alsoatob().
From there, we continue as usual:
- Fetch returns a promise so we call
.thento run code when we get a response from the server - We take the response from the server and parse the data as JSON via
res.json() - We update the DOM to show the list of lights in the subsequent
.thenblock.
Fetch With A Put Verb and Hidden Headers
Things get even more interesting with our "change color" button.
After listening for a click event, we grab the value from the input and log it out. What this reveals is that the value is in fact a hex color: #00ffff for example.
This is great because to change a light's color to something more that just a generic "green", we'll have to pass in a hex code value.
Now within our fetch request, we have a new endpoint. This one ends in id:${LIGHT_ID}/state where the LIGHT_ID as you may have guessed, is one of the lights that we got back from our List Light ids button.
However, let's take a moment to dissect the second argument: the configuration object
{
    method: "put",
    headers: {
      "Content-Type": "application/json",
      Authorization: `Basic ${btoa(TOKEN)}`
    },
    body: JSON.stringify({
      color: colorValue
    })
Here, we say the method is put because we are sending data. The headers are the same as before. Next up the body is the data that we are sending. Servers typically expect JSON data to be passed to them, so we use the built-in JSON.stringify() method to convert our object to that format for us.
🎉All done🎉
That alone is enough to get the color to change! If all went well, you should see something like the below tweet
🔥Extra Credit🔥
Recall, that the API only allows us to send 120 requests per minute. So the question becomes: How can we make sure we don't go over our limit so that our application doesn't break or we get flagged for spamming?
The answer is in the final lines of our code:
  .then(res => {
      console.log(res.headers.get("x-ratelimit-remaining"));
      return res.json();
    })
    .then(data => console.log(data)); // display to user
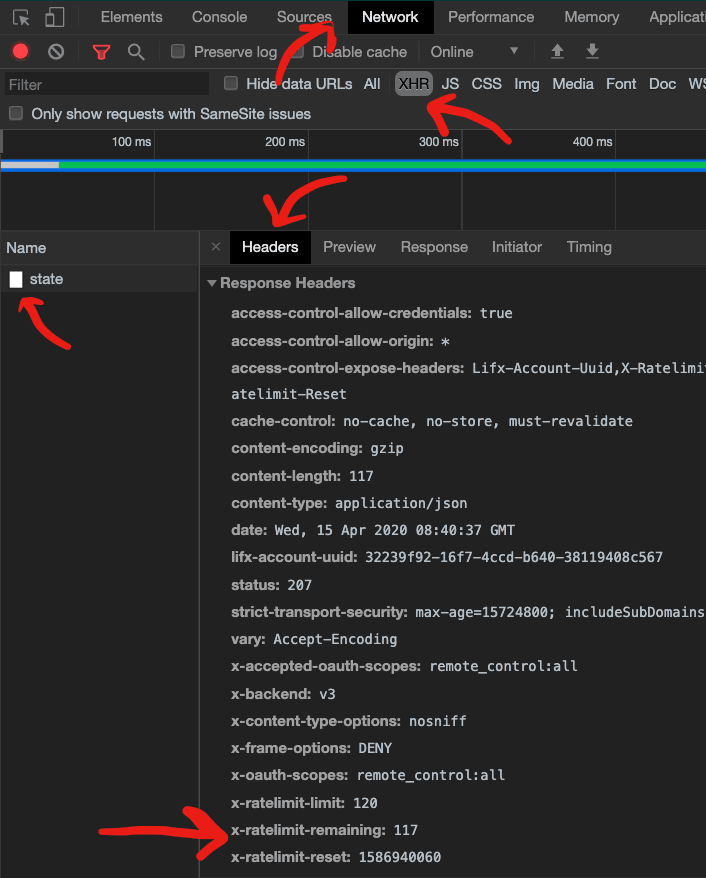
Normally, when using fetch, only a small amount of headers are actually available for us to access. So saying res.headers["x-ratelimit-remaining"] is going to give us undefined. However, using the special res.headers.get() function, we can target the header that lets us know how many requests are remaining.
There are actually plenty of other headers to checkout as well! I included an award-winning screenshot of how to find them:

Top comments (6)
Hello,
I work in the Cloud team at LIFX
Cool article!
Just a couple notes, you can avoid needing the btoa function by telling the server to use the token as a Bearer. So you can say
"Authorization: Bearer ${token}"Also, there's multiple ways of specifying the colour as shown here api.developer.lifx.com/docs/colors
So, for example, if you want your lights to be a cool white you can say
{"color": "kelvin:8000 saturation:0"}and that way you don't need to figure out the hex for that :)Hey! Thanks so much for checking it out!
Yea, it's super nice to be able to use more specific colors it's just that color inputs give a hex value by default.
Would Bearer tokens be a simpler approach? I tried switching it over, but it said the token was no longer valid. I'm assuming because it's a raw token and not one given from an oAuth flow?
Thanks again for checking it out! I actually have 2 more posts coming up with fun projects around these lights, so if there's anything specific you'd like to see covered, my DM's are open on Twitter and I'd love to help out!
I'm not sure why your token wouldn't work as a Bearer token. If you get your token, can you do something like this from the command line?
curl http://api.lifx.co/v1/lights -H"Authorization: Bearer c6805af2e4fa8cd15dc28a8c6e54cc1c371e9efafb87b10536341105f74087a3"(in this example, that's not a real token, but it looks like one :p)
The token you create from cloud.lifx.com never expires. The only way they stop working is if you revoke them from that same page.
I look forward to reading your other articles :)
Thanks so much, I got it to work with a Bearer token!
With Basic auth, it's
token:, but I didn't need the colon for Bearer auth.Thanks again, that definitely remotes some overhead!
Awesome! :)
Some comments may only be visible to logged-in visitors. Sign in to view all comments.