 StatsD is an industry-standard technology stack for monitoring applications and instrumenting any piece of software to deliver custom metrics. The StatsD architecture is based on delivering the metrics via UDP packets from any application to a central statsD server. Although the original StatsD server was written in Node.js, there are many implementations today, with Netdata being one of them.
StatsD makes it easier for you to instrument your applications, delivering value around three main pillars: open-source, control, and modularity. That’s a real windfall for full-stack developers who need to code quickly, troubleshoot application issues on the fly, and often don’t have the necessary background knowledge to use complex monitoring platforms.
First and foremost, StatsD is an open-source standard, meaning that vendor lock-in is simply not possible. With most of the monitoring solutions offering a StatsD server, you know that your instrumentation will play nicely with any solution you might want to use in the future.
The second is that you have absolute control over the data you send, since the StatsD server just listens for metrics. You can choose how, when, or why to send data from any application you build, whether it’s in aggregate or as highly cardinal data points. You also don’t need to spend any time configuring the StatsD server, since it will accept any metrics in any form you choose via your instrumentation.
Finally, there is a complete decoupling of each component of the stack. The client doesn’t care about the implementation of the server, and the server is agnostic about the backend. You can mix and match any combination of client, server, and backend that works best for you, or migrate between them as your needs change.
Historically, it has always been easier to measure and collect metrics about systems and networks than applications. In 2011, Erik Kasten developed StatsD while working at Etsy, to collect metrics from instrumented code. The original implementation, in Node.JS, listened on a UDP port for incoming metrics data, extracted it, and periodically sent batches of metrics to Graphite. Since then, countless applications have StatsD already implemented and can be configured to send their metrics to any StatsD server, while the number of available libraries makes it trivial to use the protocol in any language.
How does StatsD work?
The architecture of StatsD is divided into 3 main pieces: client, server, and backend.
- The client is what creates and delivers metrics. In most cases, this is a StatsD library, added to your application, that pushes metrics at specific points where you add the relevant code.
- The server is a daemon process responsible for listening for metric data as it’s pushed from the client, batching them, and sending them to the backend.
- The backend, which is where metrics data is stored for analysis and visualization.
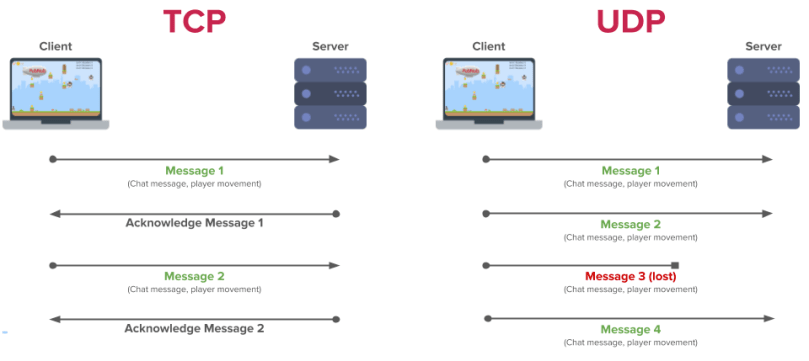
StatsD uses UDP packets because the client/server both reside on the same host, where packet loss is minimal and you can get the maximum throughput with the least amount of overhead. TCP is also an option, in case the client/server implementations reside on different hosts and the deliverability of metrics is a primary concern; in that case, the metrics collection speed will be lower due to the overhead of TCP.
In case you are wondering about the difference between TCP and UDP, this image is most illustrative:
More often than not, an HTTP-based connection is used to send the metrics from the server to the backend, and because the backend is stored for long-term analysis and storage, it often resides in a different host than the server/clients.
StatsD in Netdata
Netdata is a fully featured StatsD server, meaning it collects formatted metrics from any application that you instrumented with your library of choice. Netdata is also its own backend implementation, as it offers instant visualization and long-term storage using the embedded time-series database (TSDB). When you install Netdata, you immediately get a fully functional StatsD implementation running on port 8125.
Since StatsD uses UDP or TCP to send instrumented metrics, either across localhost or between separate nodes, you’re free to deploy your application in whatever way works best for you, and it can still connect to Netdata’s server implementation. As soon as your application exposes metrics and starts sending packets on port 8125, Netdata turns the incoming metrics into charts and visualizes them in a meaningful fashion.
Your applications can be deployed in a variety of ways and still be able to easily surface monitoring data to Netdata. Moreover, Netdata accepts StatsD packets by default, meaning that as soon as your application starts sending data to Netdata, Netdata will create charts and visualize them as accurately as it can. Since there are a myriad of different setups, Netdata offers a robust server implementation that can be configured to organize the metrics in charts that make sense, so you can easily improve the visualization by making some simple modifications.
Because StatsD is a robust, mature technology, developers have built libraries to easily instrument applications in most popular languages.
Python: https://github.com/jsocol/pystatsd
Python Django: https://github.com/WoLpH/django-statsd
Java: https://github.com/tim-group/java-statsd-client
Clojure: https://github.com/pyr/clj-statsd
Nodes/Javascript: https://github.com/sivy/node-statsd
Taking the example from python-statsd, you only need a reachable Netdata Agent (locally or over the internet) and a couple of lines of code. This hello_world example illustrates just how simple it is to send any metric you care about to Netdata and instantly visualize it.
Even with no configuration at all, Netdata automatically creates charts for you. Netdata, being a robust monitoring agent, is also capable of organizing incoming metrics in any way you find most meaningful.
import statsd
c = statsd.StatsClient('localhost', 8125)
c.incr('foo') # Increment the 'foo' counter.
for i in range(100000000):
   c.incr('bar')
   c.incr('foo')
   if i % 3:
       c.decr('bar')
       c.timing('stats.timed', 320) # Record a 320ms 'stats.timed'.
Netdata’s StatsD server is also quite performant, which means you can monitor applications where they run without concerns over bottlenecks or restricting resources:
Netdata StatsD is fast. It can collect more than 1.200.000 metrics per second on modern hardware, more than 200Mbps of sustained statsd traffic, using 1 CPU core
Netdata does this on top of gathering metrics from other data sources. Netdata monitors an application’s full stack, from hardware to operating system to underlying services, organized automatically into meaningful categories. Every available metric is nicely organized automatically into a single dashboard.
Ready to get started?
In the next part of the StatsD series, we are going to illustrate how to configure Netdata to organize the metrics of any application, using K6 as our use-case.
If you can’t wait until then, join our Community Forums where we have kickstarted a discussion around StatsD.
Here are a couple of interesting resources to get you started with StatsD:
StatsD GitHub repository
Scaling StatsD in DoorDash
Netdata StatsD reference documentation

Top comments (0)