A getting started guide using an open source ecommerce Marketplace Template to learn from.
What is platformOS?
platformOS (pOS) is a model-based application development platform.
It's like Firebase and Heroku had a baby, but with a lot more flexibility and power. It's infrastructure agnostic, allowing your solutions to be deployed to AWS, GCP and (soon) Azure with all your DevOps taken care of.
Aimed at front-end developers and site builders, it supports any front-end development framework such as React, Vue.js, Angular, Bootstrap, and others. It supports a flexible and limitless API-driven development approach while providing enterprise grade DevOps-in-a-Box to spin up a hosted site and go live in minutes. You can build any solution including community sites, membership based ecommerce club sites, product marketplaces with complex logistics and payment integration, service marketplaces, advanced auctions sites, QA and forums — even stand-alone SaaS applications. (We already have a G2.com #1 ranked Digital Experience Platform built on platformOS)
This article will help you get started with pOS using our Product and Community Marketplace template — a fully functional marketplace built on pOS with features like user onboarding, product/service listings and ads, add-to-cart and checkout process, including online payment via Stripe.
Following the tutorial, you can deploy this code within minutes to have a list of working features and then be able to start customizing the back- and front-end code (without any limits!). You can preview the demo marketplace solution template at getmarketplace.co.
What you'll need
To get started, you'll need to register on the platformOS Partner Portal, an online interface where you can create, manage and configure your sites (called Instances).
To register on the Partner Portal, go to https://partners.platformos.com/accounts/sign_up, complete the form or use your GitHub or Google account. Once registered, you will get an email verification. Click on the Accept verification link to activate your account.
Setup and configuration
Step 1: Install the pos-cli
The pos-cli is a command line interface that helps you deploy configuration files and assets to your pOS site. You will need a recent version of NPM (Node Package Manager) that comes with Node.js installed on your computer to install the pos-cli.
Once you have Node.js installed, start your command-line tool (for example, Terminal on a Mac, or Git Bash on Windows), and enter:
npm install -g @platformos/pos-cli
If your Node.js is installed for all users you might need to use sudo to install npm packages globally:
sudo npm install -g @platformos/pos-cli
Use the following command to test the pos-cli:
pos-cli -v
If the pos-cli has been installed correctly, running this command displays the version of your pos-cli. If the pos-cli hasn't been installed, running this command gives a command not found error.
Step 2: Create Instance
To be able to deploy your site, you have to create an Instance on the Partner Portal. Instances have a URL, and they represent different development environments, like staging or production. We recommend creating a staging environment for going through the steps in this tutorial.
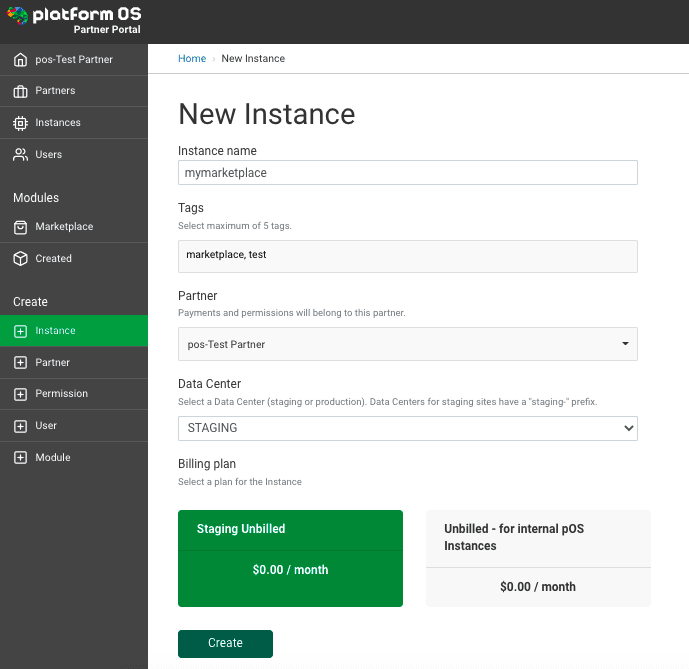
On the Partner Portal, in the menu on the left under Create, select Instance, and fill in the form:
| Field | Description | Example |
|---|---|---|
| Name | The name of your Instance | mymarketplace |
| Tags | Enter up to 5 tags (optional). You can use tags to group your Instances, for example by project or client. | marketplace, test |
| Partner | Select the Partner the Instance will belong to. | MarketplacePartner |
| Data Center | Select an endpoint (staging or production). | STAGING |
Select the Staging/Unbilled Billing Plan that appears, and click on the Create button.
Developing and deploying to a staging Instance is free. Once the Instance is created (in a couple of minutes at most), you'll get an email with a link to your Instance and other useful information.
Step 3: Add Instance to pos-cli
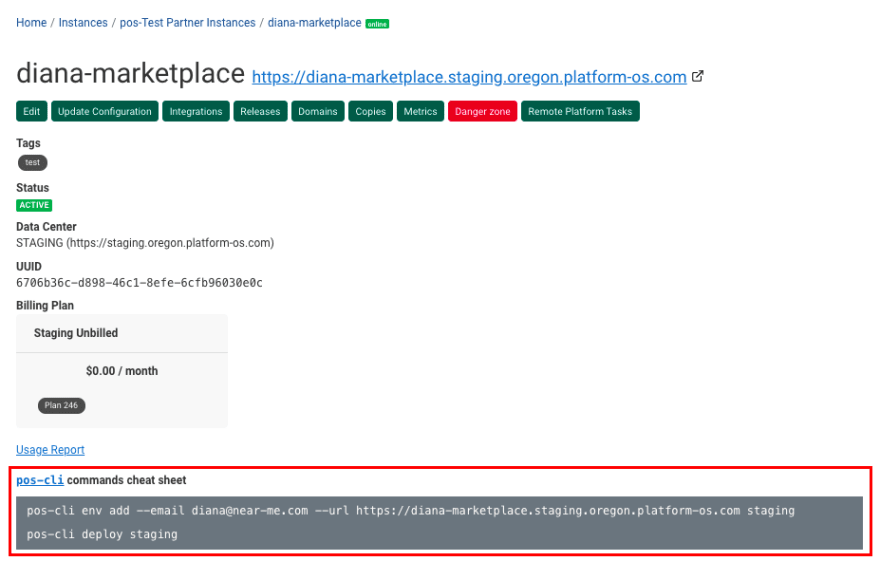
WARNING: Make sure you remember your Partner Portal account email and password --- you will need them to authenticate your environments. If you logged in using Google or Github, go to the Instance details view in Partner Portal where you will find the pos-cli command ready for copy and paste. It shows all the parameters you need, so in this case, you won't need to remember your password.
On your local environment create a new directory and change to it. This is where you will put the codebase for your marketplace.
mkdir marketplace
cd marketplace
Add your Instance to the pos-cli. This will ensure that you can use the pos-cli to download your codebase, and sync or deploy to the Instance.
Use the pos-cli env add command and authenticate with your Partner Portal credentials.
TIP: You can copy this command pre-filled with your email and Instance URL from your Instance page on the Partner Portal.
pos-cli env add [YOUR_ENV_NAME] --email [YOUR_EMAIL] --url [YOUR_INSTANCE_URL]
For example:
pos-cli env add staging --email john.smith@example.com --url https://mymarketplace.staging.oregon.platform-os.com
A message "Environment [your Instance URL] as staging has been added successfully." is displayed.
Step 4: Clone the repository
Create your codebase by cloning our marketplace GitHub repository:
pos-cli init --url <https://github.com/mdyd-dev/product-marketplace-template.git>
Step 5: Build assets
Install the marketplace package and any packages that it depends on then build it using npm commands.
npm install
npm run build
Step 6: Deploy
To be able to display your marketplace on your site, you have to deploy your codebase using the pos-cli deploy command.
pos-cli deploy [YOUR_ENV_NAME]
For example:
pos-cli deploy staging
A progress indicator shows that the deployment is in progress, and once it finishes, a "Deploy succeeded after [time]" is displayed.
Step 7: Set up your marketplace
To access the admin panel of your marketplace:
- Register a user with this email address:
admin@example.com. - Enter the Admin section from the main menu.
- Go to the Marketplace Setup section.
Congratulations, you have successfully created and deployed your first pOS site. Visit your Instance URL to check it out.
Next steps
Visit the pOS documentation to explore all that you can do with pOS. Follow step-by-step Get Started tutorials for beginners, or delve into more advanced topics using the Developer Guide. To meet and learn from fellow developers developing solutions on pOS, join the platformOS Community.


Top comments (0)