
Based on the requirement and design, multiple feature apps are developed by independent teams which I call Micro-apps. These micro-apps are placed in a parent application which I call Container app. This Container app decides which micro-app needs to be shown and when. A container will be a template with an empty body which will have some of the basic features in them such as a header and a footer that can be common across the site. Based on the feature micro-apps will be inserted in this empty body. This kind of architecture can be used in an Enterprise application.

Here I am going to use Angular-Cli to achieve this use-case.
Building Micro-app
For building the micro app using Angular-Cli, I will use the custom-webpack plugin to override bundling configuration. I will also use Angular Elements to load multiple Angular applications on the page.
Angular-Element application
-
Create a new Angular micro-app. For example, here I am using the name
testOne.
ng new testOne -
Now I am going to add @angular/element into the workspace.
cd testOne ng add @angular/elements -
Generate a new component with
app-test-oneselector.
ng g c test-one -
Override bootstrap of AppComponent in App Module. In
ngDoBootstrapmethod, create a custom element.
// app.module.ts import { BrowserModule } from '@angular/platform-browser'; import { NgModule, Injector } from '@angular/core'; import { AppRoutingModule } from './app-routing.module'; import { TestOneComponent } from './test-one/test-one.component'; import { createCustomElement } from '@angular/elements'; @NgModule({ declarations: [TestOneComponent], imports: [BrowserModule, AppRoutingModule], entryComponents: [TestOneComponent], providers: [], bootstrap: [] }) 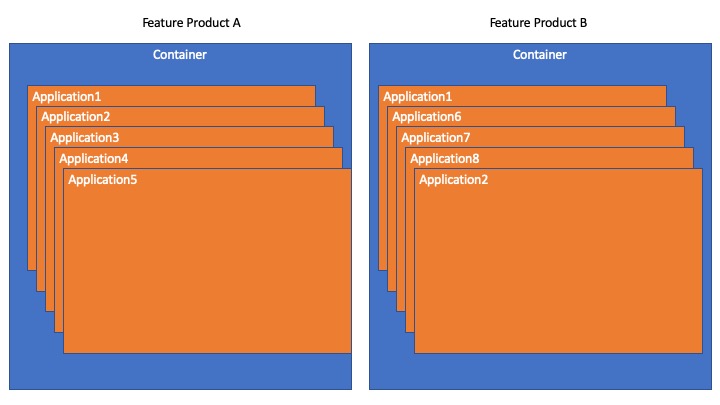 export class AppModule { constructor(private injector: Injector) {} ngDoBootstrap() { const TestOneElement = createCustomElement(TestOneComponent, { injector: this.injector }); if (!customElements.get('app-test-one')) { customElements.define('app-test-one', TestOneElement); } } } Replace
<app-root></app-root>in index.html to<app-test-one></app-test-one>.
Override WebPack Configuration
When Angular-Cli builds a production build using ng build --prod, it does not give a unique global variable to the application. Due to this, multiple Angular elements application will conflict each other and you would see an error something like Failed to execute 'define' on 'CustomElementRegistry'. To avoid this, you would need to assign a variable name to the build generated. We can do this using @angular-builders/custom-webpack:browser and provide webPack properties to override it.
- Add
@angular-builders/custom-webpackplugin.npm i -D @angular-builders/custom-webpack -
Couple of changes to be done in angular.json
- change the builder property to @angular-builders/custom-webpack:browser.
- addcustomWebpackConfigproperty as below.
"architect": { "build": { "builder": "@angular-builders/custom-webpack:browser", "options": { "customWebpackConfig": { "path": "./extra-webpack.config.js", "mergeStrategies": { "externals": "replace" } }, "outputPath": "dist",- Create config file
extra-webpack.config.jsto provide a unique variable name to the bundle generated.
module.exports  = {
    output: {
        jsonpFunction:  'webpackJsonpAPPNAME',
        library:  'APPNAME'
    }
};
So when you run
ng build --prod, it will generatemain.jswith content like below
// considering APPNAME as testOne var testOne=(window.webpackJsonptestOne=window.webpackJsonptestOne||[]). - Create config file
Bundle the script
There are multiple ways to combine script files to one. I am using gulp here.
-
Install gulp and gulp-concat which is a plugin to concat files.
npm i -D gulp gulp-concat -
Create a gulpfile.js and add the below code.
const gulp = require('gulp'); const concat = require('gulp-concat'); gulp.task('concat', function() { return gulp .src([ './dist/runtime-es2015.js', './dist/polyfills-es2015.js', './dist/main-es2015.js' ]) .pipe(concat('APPNAME.js')) .pipe(gulp.dest('./dist')); }); -
Execute gulp command to execute the process of combining files.
gulp concat
Template Example repo - https://github.com/pranesh229/micro-apps-template
Building container app
A container is a regular Angular application which will get hosted in the server and serve the site. The micro-app script files need to be included as a plugin. Below are the steps that need to be followed.
- Copy the micro-app scripts to the assets folder. For eg - test-one.js can be added to the assets folder.
-
Call the element in the below way where it needs to be included in the page. For eg - page1.component.ts needs test-one element inside it, the following script needs to be added in
ngOnInit()method.
export class Page1Component implements OnInit {
    constructor(
        private renderer: Renderer2,
        private el: ElementRef,
        @Inject(DOCUMENT) private document: Document
    ) {}
    ngOnInit() {
        // APP 1
        const appTestOne = this.renderer.createElement('app-test-one');
        this.renderer.appendChild(this.el.nativeElement, appTestOne);
        const s = this.renderer.createElement('script');
        s.type = 'text/javascript';
        s.src = './assets/test-one.js';
        this.renderer.appendChild(this.document.body, s);
    }
}
Now when I serve the site, it will append the script and show the component in the page.
Container Example repo - https://github.com/pranesh229/micro-app-container
Thank you for reading.

Top comments (2)
Hi Pranesh.
This is an interesting article and one that got me thinking! Will your solution allow each micro app to run against its own version of Angular so one could be on version 8.1 and another on 8.2?
I noticed your bundle concatenation script didn’t reference the script.js bundle, how will your solution deal with third party scripts from this bundle?
Your compiled version test-one.js is added to the containers asset folder, have you considered hosting the micro app separately to decouple the relationship as if the micro app changes you have to redeploy the container?
Thanks.
Hi Graham
Thank you for going through the article.
It is recommended keeping all the micro-apps in the same version. Having said that I have not experienced anything breaking while using a micro-app with Angular version 8.1 along with another micro-app with Angular version 8.2.
Any external script which is common across all the micro-apps can be externalized using extra-webpack.config.js. Any other micro-app specific script needs to be bundled along with the micro-app.
The compiled version of the micro-app can be hosted in any external systems or cdns. Here for simplicity, I have kept the scripts inside the assets folder.
Hope my answers help. Let me know if you need any other clarification.
Thanks