Final part of a three-part tutorial
In part two, How to Connect Blockstack to your Backend API, I show you how to create a user object in your API after logging in with Blockstack. In this tutorial, we’ll build a form that sends public information to that API and a separate form that sends secret/sensitive information to Gaia Storage.
Blockstack applications use the Gaia storage system to store data on behalf of a user. When the user logs in to an application, the authentication process gives the application the URL of a Gaia hub, which performs writes on behalf of that user. The Gaia hub authenticates writes to a location by requiring a valid authentication token, generated by a private key authorized to write at that location.
By using Gaia Storage, the decentralized way of storing information:
- Your data is more secure than traditional storage systems, which have one or a few central points of vulnerability.
- Millions of encrypted copies of your data are spread across the world, constantly verifying each other for changes made without your authorization.
- A hacker would need to compromise 51% of the blockchain in order to access your data. This would require more computing power than any known entity possesses.
- You own your own data, your information will be safe and no one can access it, not me, not Blockstack, not even the president.
Prerequisites: Knowledge of setting up your own API. We’ll also be using React.js.
Coming from part two of this three-part tutorial series, this is what App.js looked like:
We’re going to add a form in JSX and some handler methods to use our API. We’ll, do the same for Gaia Storage but in the Blockstack way. Skip to step 6 if you only want to see the final code.
1) We’ll be adding a few placeholders to your app’s state:
2) Within the App class, we’ll add the changeHandler, submitHandler, and submitGaiaHandler functions for the forms (be sure to add the superhero attribute to your backend for the fetch PATCH request):
3) Within the App class, we’ll add a function to retrieve data from Gaia Storage:
4) Call getGaiaUser() function in componentDidMount():
5) In render(), we’ll add the JSX for our new forms:
6) At the end of this process, App.js should look like this:
7) Let’s sprinkle some CSS on this in App.css and make it a little easier on the eyes:
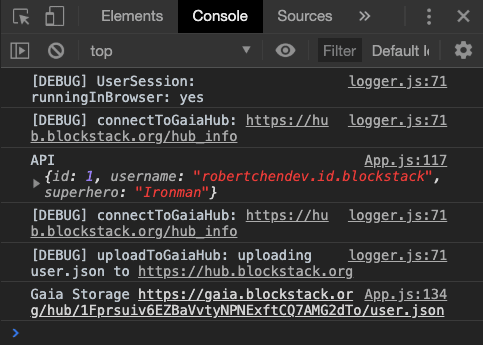
8) Test the two different forms, open console to see the data that is returned upon submitting each form.
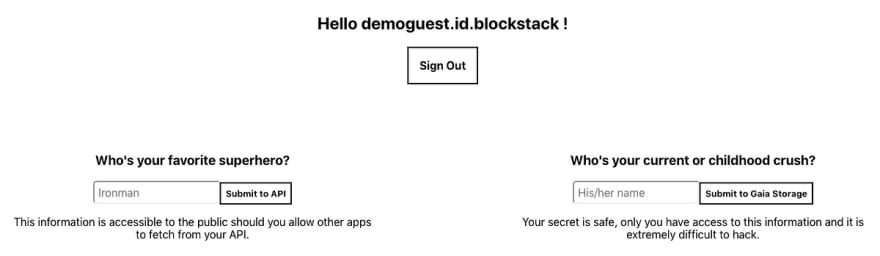
9) You should see encrypted information if you click the link that Gaia Storage returns on App.js:134:

Congratulations for making it to the end of this tutorial! You have now successfully implemented Blockstack authentication, connected Blockstack to a public API, and securely transferred data to Gaia Storage.
There is still lots to learn, but you now have the fundamentals to start building decentralized and hybrid apps. Remember you can always dive into the Blockstack documentation or reach out to the community on Slack if you get stuck.

Thank you for following along through all of the tutorials, reach out if you have any questions. Wish you the best in your blockchain endeavors!
Bring your friends and come learn JavaScript in a fun never before seen way! waddlegame.com

Top comments (0)