DEV Community

Robert Chen
Robert Chen

Posted on • Originally published at Medium on

4

How to Connect Blockstack to your Backend API

Part two of a three-part tutorial

In part one, How To Build Your First Blockchain App on Blockstack, I show you how to set up Blockstack login/signup. In this tutorial, we’ll connect the unique username that visitors create on Blockstack to your back end.

Prerequisites: Knowledge of setting up your own API will be required. We’ll also be using React.js for this tutorial.

While you would want to send private information such as phone numbers and addresses to Gaia Storage (a decentralized storage system), what I’m about to show you is useful for storing public information like comments or posts where you might want that information available on a public API.

Coming from part one of this three-part tutorial series, this is what App.js looked like:

import React, { Component } from "react";
import { appConfig } from "./utils/constants";
import { UserSession } from "blockstack";
class App extends Component {
state = {
userSession: new UserSession({ appConfig })
};
componentDidMount = async () => {
const { userSession } = this.state;
if (!userSession.isUserSignedIn() && userSession.isSignInPending()) {
const userData = await userSession.handlePendingSignIn();
if (!userData.username) {
throw new Error("This app requires a username");
}
window.location = "/";
}
};
handleSignIn = () => {
const { userSession } = this.state;
userSession.redirectToSignIn();
};
handleSignOut = () => {
const { userSession } = this.state;
userSession.signUserOut();
window.location = "/";
};
render() {
const { userSession } = this.state;
return (
<div className="App">
{userSession.isUserSignedIn() ? (
<button className="button" onClick={this.handleSignOut}>
<strong>Sign Out</strong>
</button>
) : (
<button className="button" onClick={this.handleSignIn}>
<strong>Sign In</strong>
</button>
)}
</div>
);
}
}
export default App;
view raw app.js hosted with ❤ by GitHub

We’re going to add two methods that’ll connect Blockstack to your API. Skip to step 6 if you only want to see the final code.

1) We’ll be adding the following placeholders to your app’s state:

state = {
userSession: new UserSession({ appConfig }), // coming from Blockstack
userData: {}, // coming from Blockstack
users: [], // coming from your API
currentUser: {} // coming from your API
};
view raw App.js hosted with ❤ by GitHub

2) Within the App class, we’ll add this function which does the following:

// We're fetching the users array from your API (make sure the path is correct)
// In your app's state, we're storing the userData object that comes from Blockstack when a user signs in
// We're searching for the username from userData in the users array,
// If that username exists in your API, then we store that user object in state
// Otherwise, we create a new user object with the username from userData
getUsers() {
const { userSession } = this.state;
fetch("http://localhost:3000/api/v1/users")
.then(res => res.json())
.then(users => {
if (userSession.isUserSignedIn()) {
const userData = userSession.loadUserData();
this.setState({
userData
});
let currentUser = users.find(
user => user.username === userData.username
);
if (currentUser) {
this.setState({ users, currentUser });
} else {
this.createUser(userData.username);
}
}
});
}
view raw App.js hosted with ❤ by GitHub

3) Within the App class, we’ll add another function that takes the username from Blockstack and creates a new user object in your API:

createUser = username => {
fetch("http://localhost:3000/api/v1/users", {
method: "POST",
headers: {
"Content-Type": "application/json",
Accept: "application/json"
},
body: JSON.stringify({
username
})
})
.then(res => res.json())
.then(user => {
let newArr = [...this.state.users, user];
this.setState({ users: newArr, currentUser: user });
});
};
view raw App.js hosted with ❤ by GitHub

4) Call getUsers() function in componentDidMount(), add this line to the existing code:

this.getUsers();
Enter fullscreen mode Exit fullscreen mode

5) In render(), we’ll add a welcome greeting above the Sign Out button in order to see that all is working correctly:

render() {
const { userSession, currentUser } = this.state;
return (
<div className="App">
{userSession.isUserSignedIn() ? (
<div className="hello">
<h2>Hello {currentUser.username} !</h2>
<button className="button" onClick={this.handleSignOut}>
<strong>Sign Out</strong>
</button>
</div>
) : (
<button className="button" onClick={this.handleSignIn}>
<strong>Sign In</strong>
</button>
)}
</div>
);
}
view raw App.js hosted with ❤ by GitHub

6) At the end of this process, App.js should look like this:

import React, { Component } from "react";
import { appConfig } from "./utils/constants";
import { UserSession } from "blockstack";
class App extends Component {
state = {
userSession: new UserSession({ appConfig }), // coming from Blockstack
userData: {}, // coming from Blockstack
users: [], // coming from your API
currentUser: {} // coming from your API
};
componentDidMount = async () => {
const { userSession } = this.state;
if (!userSession.isUserSignedIn() && userSession.isSignInPending()) {
const userData = await userSession.handlePendingSignIn();
if (!userData.username) {
throw new Error("This app requires a username");
}
window.location = "/";
}
this.getUsers();
};
handleSignIn = () => {
const { userSession } = this.state;
userSession.redirectToSignIn();
};
handleSignOut = () => {
const { userSession } = this.state;
userSession.signUserOut();
window.location = "/";
};
// We're fetching the users array from your API (make sure the path is correct)
// In your app's state, we're storing the userData object that comes from Blockstack when a user signs in
// We're searching for the username from userData in the users array,
// If that username exists in your API, then we store that user object in state
// Otherwise, we create a new user object with the username from userData
getUsers() {
const { userSession } = this.state;
fetch("http://localhost:3000/api/v1/users")
.then(res => res.json())
.then(users => {
if (userSession.isUserSignedIn()) {
const userData = userSession.loadUserData();
this.setState({
userData
});
let currentUser = users.find(
user => user.username === userData.username
);
if (currentUser) {
this.setState({ users, currentUser });
} else {
this.createUser(userData.username);
}
}
});
}
createUser = username => {
fetch("http://localhost:3000/api/v1/users", {
method: "POST",
headers: {
"Content-Type": "application/json",
Accept: "application/json"
},
body: JSON.stringify({
username
})
})
.then(res => res.json())
.then(user => {
let newArr = [...this.state.users, user];
this.setState({ users: newArr, currentUser: user });
});
};
render() {
const { userSession, currentUser } = this.state;
return (
<div className="App">
{userSession.isUserSignedIn() ? (
<div className="hello">
<h2>Hello {currentUser.username} !</h2>
<button className="button" onClick={this.handleSignOut}>
<strong>Sign Out</strong>
</button>
</div>
) : (
<button className="button" onClick={this.handleSignIn}>
<strong>Sign In</strong>
</button>
)}
</div>
);
}
}
export default App;
view raw App.js hosted with ❤ by GitHub

7) Let’s quickly center the greeting div by adding this snippet to App.css:

.hello {
  margin: auto;
}
Enter fullscreen mode Exit fullscreen mode

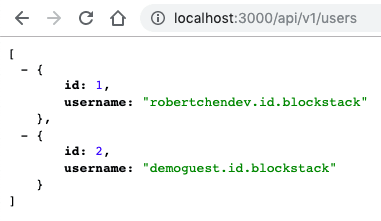
8) Sign in, then verify that the user object is getting created in your back end:

api

9) Sign out and sign back in to verify that the user object does not get duplicated if it already exists.

signed in

You can now connect Blockstack authentication with your own custom back end and build the user object however you’d like. Have fun with it!

In the final part of this tutorial, I’ll show you How to Use Gaia Storage with Blockstack


Bring your friends and come learn JavaScript in a fun never before seen way! waddlegame.com

Top comments (0)