I was fascinated with the concept of Blockchain a decentralized trust based system to transfer and verify the data sent over a network. The concepts it was based on was quite simple so in order to understand the concepts involved I decided to create my own blockchain and soon the concepts turned into the story of easier said than done. So let me walkthrough what exactly a blockchain is and how to create one.
Blockchain 101
First off Blockchain is not Cryptocurrency. Blockchain is the technology behind Cryptocurrencies an analogy would be how Internet is the technology behind Emails. It is the process of maintaining a distributed digital ledger which contains a series of records that are linked together and cannot be corrupted. Well that's a fairly simple definition for a revolutionary technology. It has disrupted a lot fields like medicine, logistics, education and finance (majorly). Let's take a look at the components of a blockchain.
Components of Blockchain
Block: It is a collection of data usually capped at an upper limit either by the size or number of data units.
Chain: It is a collection of blocks that are linked together by an algorithm that uses the information of the previous block.
Node: A system in the blockchain that is used to verify the authenticity of block as well maintain the digital ledger that keeps record of the all the blocks in the chronological order.
And those are only components that make up the blockchain. What truly makes the blockchain secure are the processes that are involved.
Mining a block
Mining is process of generating a new block and adding it to the network and it involves two processes.
Proof of Work Generation:
As mentioned earlier blocks are linked using an algorithm that makes use of the information of the previous block to generate the next block. This algorithm is known as proof of work generally designed in a such a way that output is hard to generate but it's fairly easy to verify the output.Proof of Work Verification:
When one of the nodes in the network successfully generates the block. The rest of nodes in the network must verify the authenticity of the proof and chain. So the nodes verify whether the proof is right and checks the authenticity of the chain. If everything is alright the block is mined and all other nodes update their ledger to include the newly mined block.
Event Flow of Blockchain
Let's look at how the events unfold when you add data to a blockchain
A request to exchange data is received from the sender to one of the nodes in the chain.
The node then broadcasts to other nodes about the incoming data to other nodes and adds it to the current transaction pool.
Once the limit of the block is reached (size or number of units). The nodes start mining the block.
The nodes compete against each other to find a proof of work solution. When one of the nodes succeeds in mining it broadcasts the solution.
The other nodes then verify the output and check whether is valid. Then they verify the blocks of the chain and add the newly mined block.
Creating Your Own Blockchain
So now we have brushed up with the fundamentals let's start creating our own blockchain. I have decided to use Socket.io to have a realtime communication system across the nodes. Let's proceed and create the models.
Models
Transaction Model:
class Transaction {
  constructor(sender, receiver, amount) {
    this.sender = sender;
    this.receiver = receiver;
    this.amount = amount;
    this.timestamp = Date.now();
  }

  /* Stringfying and Parser functions */
}

module.exports = Transaction;
This model pretty straight forward we have certain data as sender, receiver, amount and timestamp.
Block Model:
const crypto = require('crypto');

const Transaction = require('./transaction');

class Block {
  constructor(index, previousBlockHash, previousProof, transactions) {
    this.index = index;
    this.proof = previousProof;
    this.previousBlockHash = previousBlockHash;
    this.transactions = transactions;
    this.timestamp = Date.now();
  }

  hashValue() {
    const { index, proof, transactions, timestamp } = this;
    const blockString= `${index}-${proof}-${JSON.stringify(transactions)}-${timestamp}`;
    const hashFunction = crypto.createHash('sha256');
    hashFunction.update(blockString);
    return hashFunction.digest('hex');
  }

  setProof(proof) {
    this.proof = proof;
  }

  getProof() {
    return this.proof;
  }

  getIndex() {
    return this.index;
  }

  getPreviousBlockHash() {
    return this.previousBlockHash;
  }

  /* Stringify and Parsing functions */
}

module.exports = Block;
The important aspect of the Block is the hashValue() and previousBlockHash. The hashValue() is responsible for creating the hash value of the block. It generates a string expression of the block and that is sent to the NodeJS crypto module's createHash() function and hash is created using the specified sha256 algorithm. The generated hash is then stored the next block in previousBlockHash.
Chain Model:
const Block = require('./block');

const actions = require('../constants');

const { generateProof, isProofValid } = require('../utils/proof');

class Blockchain {
  constructor(blocks, io) {
    this.blocks = blocks || [new Block(0, 1, 0, [])];
    this.currentTransactions = [];
    this.nodes = [];
    this.io = io;
  }

  addNode(node) {
    this.nodes.push(node);
  }

  mineBlock(block) {
    this.blocks.push(block);
    console.log('Mined Successfully');
    this.io.emit(actions.END_MINING, this.toArray());
  }

  async newTransaction(transaction) {
    this.currentTransactions.push(transaction);
    if (this.currentTransactions.length === 2) {
      console.info('Starting mining block...');
      const previousBlock = this.lastBlock();
      process.env.BREAK = false;
      const block = new Block(previousBlock.getIndex() + 1, previousBlock.hashValue(), previousBlock.getProof(), this.currentTransactions);
      const { proof, dontMine } = await generateProof(previousBlock.getProof());
      block.setProof(proof);
      this.currentTransactions = [];
      if (dontMine !== 'true') {
        this.mineBlock(block);
      }
    }
  }

  lastBlock() {
    return this.blocks[this.blocks.length - 1];
  }

  getLength() {
    return this.blocks.length;
  }

  checkValidity() {
    const { blocks } = this;
    let previousBlock = blocks[0];
    for (let index = 1; index < blocks.length; index++) {
      const currentBlock = blocks[index];
      if (currentBlock.getPreviousBlockHash() !== previousBlock.hashValue()) {
        return false;
      }
      if (!isProofValid(previousBlock.getProof(), currentBlock.getProof())) {
        return false;
      }
      previousBlock = currentBlock;
    }
    return true;
  }

  /* Stringify and Parsing functions */
}

module.exports = Blockchain;
The chain has 2 major components currentTransactions and blocks. The currentTransactions contains a list of transactions that are yet to mined to a block. The blocks contains the list of all the blocks in the chain ordered according to time they were mined. The above chain also has the block size as 2 transactions.
In the constructor we are setting the blocks to initially have a single block with index as 0 previousBlockHash as 1 and proof as 0. This is also known as the initial block. But we have a list of blocks passed to the chain we just the blocks with value it received.
The addNode() functions is responsible for connecting the current node with other nodes of the blockchain network. The mineBlock() function adds the mined block to chain and signals other blocks to end the mining.
The most important methods are newTransaction() and checkValidity(). The newTransaction() method is called when the node receives a transaction request. We push the transaction to the currentTransactions pool. If the size of the currentTransaction pool is 2 we start to mine the block. We first get the latest block of the current chain. We create a block out of the latest block's hashValue, index and the currentTransactions pool. Then we generate the solution for the proof of work by passing the latest block's proof to generateProof() method (we will look into this implementation later). Once the solution is arrived we set the newly created block's proof. We then reset the currentTransaction pool and check whether this block can be mined using dontMine flag. If it can be mined we go ahead the mine the block.
The checkValidity() method checks the validity of the chain starting from the initial block. We get the currentBlock and previousBlock, we check whether the current block's previousHash to be same as previous block's hashValue. If they don't match we reject. We then check the validity of proof between the current and previous blocks. If they don't match either we reject the chain. We then check the currentBlock to be the previousBlock. We do this till the end of the chain and then return true if no discrepancies are found.
The above mentioned verification of the blocks is what makes the blockchain impossible to break and alter. If an attacker has to change the currentBlocks data he has to change the previousBlocks data as our hash calculation is based upon the data. If the data changes hash changes and therefore he has to do this till the initial block. Another secure aspect comes from the proof generation. If the attacker changes the tampers with the block the proof solution changes so again the attacker has to generate proof all the way from initial to the tampered block which can take a huge amount of time as the calculation of proof isn't very simple and easy.
Proof of Work Generation and Verification
const crypto = require('crypto');


const generateProof = (previousProof) => new Promise((resolve) => {
  setImmediate(async () => {
    let proof = Math.random() * 10000000001;
    const dontMine = process.env.BREAK;
    if (isProofValid(previousProof, proof) || dontMine === 'true') {
      resolve({ proof, dontMine });
    } else  {
      resolve(await generateProof(previousProof));
    }
  });
});

const isProofValid = (previousProof, currentProof) => {
  const difference = currentProof - previousProof;
  const proofString = `difference-${difference}`;
  const hashFunction = crypto.createHash('sha256');
  hashFunction.update(proofString);
  const hexString = hashFunction.digest('hex');
  if (hexString.includes('000000')) {
    return true;
  }
  return false;
};

exports.generateProof = generateProof;
exports.isProofValid = isProofValid;
This is the most time-consuming and the crucial part in any blockchain mining. Proof of Work is a solution for a problem that is harder to solve but easier to verify. An example would be generating two large prime numbers that when multiplied is divisible by 5. Finding the 2 large prime numbers is a daunting task we have to go through millions of combinations to land on one of the possible solutions. But verifying that whether product of the 2 large prime numbers is divisible by 5 or now is easy.
We have wrapper the generation algorithm inside a setImmediate function and wrapper it further under a Promise. Okay now you must be wondering why wrapping it under setImmediate. The reason is I have an environment variable that signals the end of the mining process. I set that variable to true if any other node in the network has finished mining a block. If I wrap the generation algorithm in a while loop it blocks the Event Loop and never checks the status of the environment variable until it has finished arriving at a solution. setImmediate allows it to bypass that as it waits until current process has finished executing before generating for the next time. This allows another module in my program to go and change the status of the environment variable. It also allows me to bypass the call stack limit when calling a recursive function.
Our proof of work problem is simple the hash value of the difference between current and previous proofs must contain six consecutive zeroes. We start with a random number and multiply it by a huge number. Then we verify whether proof satisfies the condition and also we verify whether end of mining has been set. If it satisfies we resolve the value else we try again. We repeat this process till we get a proof.
Server App
Great we have the model and generation setup all we need is a working server to orchestrate the action and interact with the blockchain.
const app = require('express')();
const bodyParser = require('body-parser');
const httpServer = require('http').Server(app);
const axios = require('axios');
const io = require('socket.io')(httpServer);
const client = require('socket.io-client');

const BlockChain = require('./models/chain');
const SocketActions  = require('./constants');

const socketListeners = require('./socketListeners');

const { PORT } = process.env;

const blockChain = new BlockChain(null, io);

app.use(bodyParser.json());

app.post('/nodes', (req, res) => {
  const { host, port } = req.body;
  const { callback } = req.query;
  const node = `http://${host}:${port}`;
  const socketNode = socketListeners(client(node), blockChain);
  blockChain.addNode(socketNode, blockChain);
  if (callback === 'true') {
    console.info(`Added node ${node} back`);
    res.json({ status: 'Added node Back' }).end();
  } else {
    axios.post(`${node}/nodes?callback=true`, {
      host: req.hostname,
      port: PORT,
    });
    console.info(`Added node ${node}`);
    res.json({ status: 'Added node' }).end();
  }
});

app.post('/transaction', (req, res) => {
  const { sender, receiver, amount } = req.body;
  io.emit(SocketActions.ADD_TRANSACTION, sender, receiver, amount);
  res.json({ message: 'transaction success' }).end();
});

app.get('/chain', (req, res) => {
  res.json(blockChain.toArray()).end();
});

io.on('connection', (socket) => {
  console.info(`Socket connected, ID: ${socket.id}`);
  socket.on('disconnect', () => {
    console.log(`Socket disconnected, ID: ${socket.id}`);
  });
});

blockChain.addNode(socketListeners(client(`http://localhost:${PORT}`), blockChain));

httpServer.listen(PORT, () => console.info(`Express server running on ${PORT}...`));
The server consists of an express and socket app that are bound to a http server running on a specific port. The /nodes endpoint allows us to connect to another node's socket app and sends the information for the other node to connect back. We also bind socket listeners to the socket connections created. The /transaction endpoint receives a transaction request and broadcasts the transaction information to other nodes. The /chain endpoint lists the details of the blockchain. There is also socket connection listener that actively logs the ID and monitors the connection status between nodes. Finally we make the server listen on a specific port.
Socket Listeners
The server app merely acts a facade to the socket listeners and only facilitates the connections between nodes. The socket listeners are responsible for triggering the events such as adding transactions to the blockchain, mining a new block and signalling successful mining status of a node to other nodes in the blockchain network.
const SocketActions = require('./constants');

const Transaction = require('./models/transaction');
const Blockchain = require('./models/chain');

const socketListeners = (socket, chain) => {
  socket.on(SocketActions.ADD_TRANSACTION, (sender, receiver, amount) => {
    const transaction = new Transaction(sender, receiver, amount);
    chain.newTransaction(transaction);
    console.info(`Added transaction: ${JSON.stringify(transaction.getDetails(), null, '\t')}`);
  });

  socket.on(SocketActions.END_MINING, (newChain) => {
    console.log('End Mining encountered');
    process.env.BREAK = true;
    const blockChain = new Blockchain();
    blockChain.parseChain(newChain);
    if (blockChain.checkValidity() && blockChain.getLength() >= chain.getLength()) {
      chain.blocks = blockChain.blocks;
    }
  });

  return socket;
};

module.exports = socketListeners;
The sockets listens to two events ADD_TRANSACTION and END_MINING events emitted by other nodes. The ADD_TRANSACTION listener actively listens to an incoming transaction event triggered by any node on the network. Adds it to the blockchain by calling the chain's newTransaction method.
The END_MINING event is triggered when one of the nodes successfully mine the block. It sets the BREAK flag to true which tells the other nodes on the network to stop mining and start verifying the solution. We parse the stringified chain to back to proper blockchain and call the checkValidity() method of the parsed chain. We also check whether the length of the parsed chain is greater than the current chain's length. If it is a success we go ahead and replace with the new chain else we just reject and hold on to our old chain.
And so we have the code of the chain set up let's run it and see the output.
Run It...
I used PM2 to spawn to instances of the app running on different ports. So once the two instances are up and running I trigger /nodes endpoint from one of the nodes to connect to another and the output is:

As the output states the two nodes have successfully established a websocket connection between them.
Then I trigger /transaction endpoint from one of the nodes. It then signals the other node about the incoming transaction and both of them add it to their transaction pool.

Then once again I trigger /transaction, since our block size is 2 the mining process starts on both the nodes. When one of the nodes successfully mines the block it signals the end of mining and starts the verification process and once the verification process is done the new chain is replaced across the whole network.

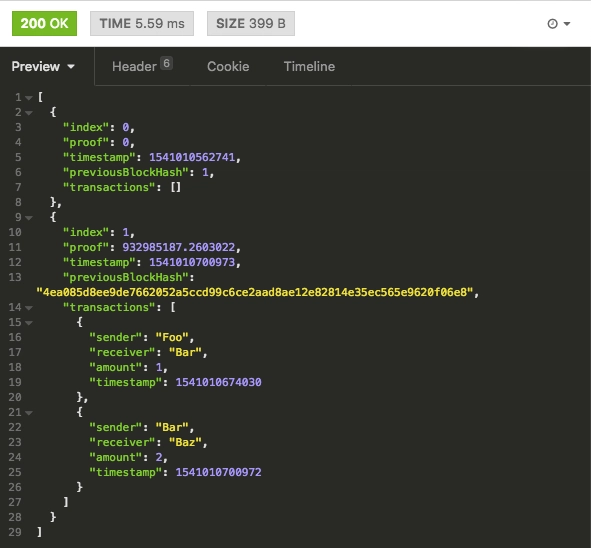
Then when I hit the /chain endpoint I receive the list of blocks in the chain.
And that's it we have created our own blockchain using NodeJS and Socket.io
Conclusion
What we have created is a simple blockchain. The whole purpose of this post is to summarize the fundamental processes that govern and power a blockchain by actually implementing them. There are concepts like forking of a blockchain that I haven't covered but do recommend to give it a read. There are few other process involved in a blockchain transaction that I haven't covered as a part of this post because there are other articles and posts that go in depth about the blockchain architecture. I have also committed my code to GitHub so you can clone the repository and play around by adding new processes ;).
Finally, when you want to learn about something try to learn the concepts and implement them on your own this will help you gain much deeper understanding and knowledge about the technology involved.

Latest comments (19)
How can I make the chain persist, it disappears after closing connection?
amigos una pregunta como ejecuto el proyecto lo clone del repositorio pero no entiendo como compilarlo
Hi! I really like this work. I have a question. If I trigger the /transaction why I should trigger it twice before this starts to mine?
I really like this blog post. It explains in a simple manner very complex concepts. Thanks¡¡¡
This is very interesting work indeed! I have what i hope is a simple question and not too newbie-like: would it be possible to use blockchain with nodejs to have an exchange of public keys (like SSH keys) between two or more servers. In this case, the transactions would be minimal but the chain would need to be immutable. Is that possible or would you have any tips on how we could do it please?
Yes I believe it's possible the data just has to be the public key although I am not sure as to why we need a secure exchange for public SSH keys.
Thank you Adarsh! You raise a great point! I dont believe we will need a secure exchange of public keys because the SSH protocol itself encrypts the files. However, once the public keys are copied over, they would be unhashed using the private keys and all we need is for blockchain to 1. enable links to be added and 2. keep the existing links otherwise immutable.
I was wondering how that might be possible? Any thoughts would be greatly appreciated and the preference is to use the nodejs blockchain modules to the extent possible.
I am not sure about it probably you might've to do some research. :)
how can we trigger a transaction
I use the
/transactionendpoint to trigger itplease!!
can you show me how can i use freecamp to test this blockchain
Not sure about that sorry
hey I a m new to development. Can you tell what technological stack you are using.
Predominantly JavaScript
Great article Adarsh
This example works like a charm
I have tried this GitHub repo and tested socket with firecamp.app
image attached
Wow this is great. Thanks for sharing this site it's really now if possible someone can extend this and implement this with an UI to visualize this realtime.
i will record a video for that :)
Great and well explained post! I agree with you about doing your own implementation in the goal to learn about a technology.
If you give code, don't forget to add air to it, it improve readability :)
Thanks. This code was written as side project to learn more about blockchain and websockets technology so I didn't pay much heed to code optimisation and readability. Will surely keep this in mind on my upcoming side projects.