
Hey, today I'll be showing us how easy it is to create a Decentralised Application.
Now, this is simply for educational purposes but with this article, you'd see how a dapp works and why it's amazing and innovative.
What are we Building?
We'll be building a simple guessing game using Solidity but on the blockchain. Sounds cool right? Let's get to it.
What do we need?
An account at Alchemy, sign up for free here.
A metamask wallet, (download only from the official link).
Solidity and Hardhat (We'll talk about those later).
Initializing our project
It's assumed you're a bit familiar with node.js and have it installed already so on your terminal, run:
npm init
Installing and Initializing Hardhat
That should spin up a package.json file so it can keep track of our dependencies. Next, we're going to install hardhat.
npm install --save-dev hardhat
Hardhat is a development environment to compile, deploy, test, and debug your Ethereum software and Polygon happens to be a layer 2 solution for Ethereum. It helps developers when building smart contracts and dApps locally before deploying to the live chain.
After installation is done, run this to create a new hardhat project
npx hardhat
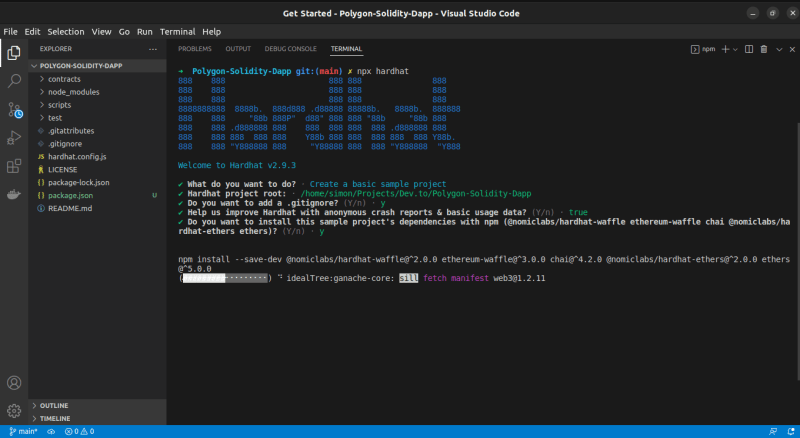
You should see this on your terminal, just press enter as the default settings are okay for this tutorial.
Storing our Keys Securing
We're almost done with setting things up, we need a way to securely store our Keys so run
npm install dotenv
When it's done with the installation, create a file called .env, we'll store our keys there in a moment.
WARNING: If you are using a version control system like git to manage your project, please DO NOT track the .env file. Add .env to your .gitignore file so that you don't accidentally publish your secrets to the world.
Setting up Alchemy
Alchemy is a blockchain developer platform that allows us to communicate with the Polygon chain without having to set up our own nodes so be sure to sign up with the link.
After registering for an account, you can generate API keys by creating an app.

You can now easily copy your API KEYS and store them in the .env file by adding this to it
API_URL = "https://polygon-mumbai.g.alchemy.com/v2/your-api-key"

Metamask Configuration
Once you've created an account, follow these steps to set up the Polygon network on your wallet.
Select “Settings” from the drop-down menu on the top right corner of your Metamask wallet.
Select “Networks” from the menu to the left.
Connect your wallet to the Mumbai Testnet using the following parameters.
Network Name: Polygon Mumbai Testnet
New RPC URL: https://polygon-mumbai.g.alchemy.com/v2/your-api-key
ChainID: 80001
Symbol: MATIC
Block Explorer URL: https://mumbai.polygonscan.com/
Getting Test Tokens
Next, you'll need some fake MATIC for testing, you can get some at Polygon Mumbai Testnet. Select "Mumbai", choose "MATIC Token", and enter your Polygon wallet address, then click “Submit.” It may take some time to receive your fake Eth due to network traffic.
Export and Copy your metamask wallet private key and include it in your .env file too.
PRIVATE_KEY = "your-metamask-private-key"
Your .env file should look like this, read more on environment variable files here.

The Guess Game
Navigate to the contracts directory and create a new solidity file, run:
cd contracts && touch Guess_Game.sol
Now open up the Guess_Game.sol and paste this in, be sure to read the comments to understand how it works.
//SPDX-License-Identifier: Unlicense
pragma solidity ^0.8.0;

import "../node_modules/hardhat/console.sol";

// Check out the official documentation to learn more about every concept here: https://docs.soliditylang.org/en/v0.8.13/index.html
contract Guess_Game {

    //  Declared state variables whose values are permanently stored in contract storage.
    uint random_number;
    bool game_completion;
    address winner;

    // This is a Struct that defines value for the user interacting with the smart contract
    struct player {
        uint guess;
        uint trials;
        bool registered;
    }

    // Created a mapping of an address to the player Struct
    mapping (address => player) player_structs;

    // Created a dynamic array of player addresses
    address[] internal players_addresses;


    // Defining the Contructor which is a block of code that runs the instant the contract is deployed
    constructor() {

        // Depending on the timestamp of the current block, the keccak function will generate a random number and we're keeping it between 1 and 100
        random_number = uint(keccak256(abi.encodePacked(block.timestamp))) % 100;

        // When the contract is deployed, we initialize this variable as false since no one has won yet
        game_completion = false;
    }

    // Generates a new struct with msg.sender which just the user's wallet address and appends it to the array
    function set_Player() internal {
        player_structs[msg.sender].guess = 0;
        player_structs[msg.sender].trials = 5;
        player_structs[msg.sender].registered = true;

        players_addresses.push(msg.sender);
    }

    // A function for verifying if a user has been tried to guess before and is registered
    function get_Player(address _player) internal view returns(bool) {
        return player_structs[_player].registered;
    }

    // This function is visible to the user, it reads the user's input and calls the game function
    function Guess(uint _Guess) public {
        if (game_completion) {
            console.log("Game has been completed and the winning address is ", winner);
        }

        // Checks to see if player has been assigned a struct
        if (get_Player(msg.sender) != false) {
            set_Player();
        }

        // Passes in the input and stores it for that particular player
        player_structs[msg.sender].guess = _Guess;

        Game();
    }

    // The Game Logic, this internal function is called whenever a guess is made
    function Game() internal {
        uint guess = player_structs[msg.sender].guess;
        uint attempts = player_structs[msg.sender].trials;

        if (attempts > 0) {
            if (guess > random_number) {
                console.log("Your guess was too big, Guess again");
            }

            else if (guess < random_number) {
                console.log("Your guess was too small, Guess again");
            }

            else if (guess == random_number && game_completion) {
                console.log("You got the number but the game has already been won");
            }

            else if (guess == random_number && !game_completion) {
                console.log("Congrats! You won the guess game first");
                winner = msg.sender;
                game_completion = true;
            }
        }

        else {
            console.log("You're out of attempts");
        }
    }
}
Connect Metamask & Alchemy to your project
We’ve created a Metamask wallet, and Alchemy account, and written our smart contract, now it’s time to connect the three.
Our keys for the wallet and the Alchemy account are already stored so it's time to update our hardhat.config.js file to be able to initiate the connection.
Go to your root directory and update your hardhat.config.js file to look like this:
/**
* @type import('hardhat/config').HardhatUserConfig
*/

require('dotenv').config();
require("@nomiclabs/hardhat-ethers");

const { API_URL, PRIVATE_KEY } = process.env;

module.exports = {
  solidity: "0.8.9",
  defaultNetwork: "polygon_mumbai",
  networks: {
    hardhat: {},
    polygon_mumbai: {
      url: API_URL,
      accounts: [`0x${PRIVATE_KEY}`]
    }
  },
}
Compile our contract
To make sure everything is working so far, let’s compile our contract. The compile task is one of the built-in hardhat tasks.
From the command line run:
npx hardhat compile
Deploy our Contract
Our contract is written and our configuration file is good to go too, it’s time to write our contract deploy script so we can deploy the contract.
Navigate to the scripts/ folder and create a new file called deploy.js and add the following to it:
async function main() {
    const Guess_Game = await ethers.getContractFactory("Guess_Game");

    // Start deployment, returning a promise that resolves to a contract object
    const guess_game = await Guess_Game.deploy();
    console.log("Contract deployed to address:", guess_game.address);
   }

   main()
    .then(() => process.exit(0))
    .catch(error => {
    console.error(error);
    process.exit(1);
    });
Be sure to check out the hardhat docs to understand what each line does.
Deployment Time
Now it's finally time to deploy, Navigate to the command line and run:
npx hardhat run scripts/deploy.js --network polygon_mumbai
You should then see something like:
Contract deployed to address: 0x56D94982E71867c007c57659d5a2b199E581b502
Copy this address; let's check it out, go to the Polygon Mumbai explorer and search for our contract address we should be able to see that it has been deployed successfully.

Congrats! You just deployed a smart contract to the Polygon chain. 🎉
To understand what’s going on under the hood, navigate to the Explorer tab in our Alchemy dashboard “The Guessing Game”.

In Subsequent articles, we'll create a user interface for this dapp, Here's the Github repo to the above code.
Thanks for sticking to the end, feedback is always appreciated.


Top comments (0)