Introduction
Azure Kubernetes Service (AKS) cluster is a managed container orchestration platform provided by Microsoft Azure. It enables the deployment, scaling, and management of containerized applications using Kubernetes.
Kubernetes is an open-source container orchestration system that helps you manage and automate the deployment, scaling, and management of containerized applications.
AKS clusters simplify the deployment and management of applications by abstracting away the underlying infrastructure complexities. They offer benefits such as automatic scaling, load balancing, and high availability. AKS clusters provide a reliable and scalable environment for running containerized applications on Azure.
Azure CLI (Command-Line Interface) is a powerful command-line tool for managing Azure resources. It provides a convenient and efficient way to interact with Azure services, including the creation and management of AKS clusters. Azure CLI offers a consistent experience across platforms and can be easily scripted, allowing for automation and streamlined workflows.
Pre-requisites
Before diving into creating an AKS cluster and deploying applications, ensure you have the following prerequisites in place:
- An Azure subscription: Sign up for an Azure account if you don't have one.
- Azure CLI installed: Install Azure CLI on your local machine.
- Kubectl installed
- Working knowledge of Kubernetes.
- Authenticate Azure CLI with your Azure account by running the command below and following the prompts:
az login
Setting up an AKS Cluster
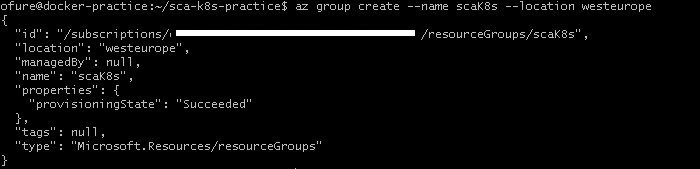
Step 1. Create a resource group. A resource group is a logical container that holds related Azure resources.
az group create --name <resource-group-name> --location <azure-region>
Step 2. Create the AKS cluster
az aks create --resource-group <resource-group-name> \
--name <aks-cluster-name> \
--node-count 2 \
--generate-ssh-keys
-
--resource-group: Specifies the name of the resource group where the AKS cluster will be created. Replace with the desired name of the resource group. -
--name: Specifies the name of the AKS cluster to be created. Replace with the desired name of the AKS cluster. -
--node-count: Specifies the number of nodes (virtual machines) that should be provisioned in the AKS cluster. In this example, we have set the node count to 2, but you can adjust it based on your application requirements. -
--generate-ssh-keys: Generates SSH public and private keys to be used for accessing the cluster nodes. This parameter simplifies the process of managing SSH keys. Azure CLI will automatically generate the keys and configure them for you.


Step 3. Get cluster credentials
az aks get-credentials --name <aks-cluster-name> --resource-group <resource-group-name
By executing this command, Azure CLI retrieves the necessary credentials, including the Kubernetes cluster endpoint and authentication token, and configures the Kubernetes context on your local machine. This allows you to interact with the AKS cluster using Kubernetes command-line tools (kubectl) or any other Kubernetes client.
![]()
You can run kubectl get nodes to see the nodes in your cluster.
Step 4. Clone the azure voting app github repo here.
The repo already has the Kubernetes deployment and service files needed to deploy the application.
Step 5. Deploy the application.
A Kubernetes manifest file containing all the deployments and services is in the azure-vote-all-in-one-redis.yml file. To deploy this manifest, run this command:
kubectl apply -f azure-vote-all-in-one-redis.yml

Step 6. Visit your deployed site
The azure voting frontend has a service type of LoadBalancer, in order to visit your newly deployed site run the following command to get the external IP address of the LoadBalancer:
kubectl get service --watch
The --watch flag is added because the external IP address takes a little while before it is added to the LoadBalancer so instead of running the command multiple times, just add the watch flag to watch for any changes.

Copy the external IP and paste in your web browser to see the azure voting app website.

Step 7. Clean up your resources
It is important to clean up resources when you no longer have use for them to avoid incurring charges. To delete your resources, simply delete the resource group with the command below:
az group delete --name <resource-group-name>
Conclusion
Throughout this article, we covered key steps for creating an AKS cluster and deploying applications using Azure CLI. We created a resource group, an AKS cluster, and deployed the Azure voting application to our cluster.
By leveraging Azure CLI and the power of AKS clusters, you can efficiently deploy and manage your applications on Azure, taking advantage of the scalability and flexibility of Kubernetes. Happy exploring and deploying your applications on Azure

Top comments (5)
Awesome write up. Maybe consider adding tags to your articles so to have more reach. Tags like (#devops #azure #kubernetes), should suffice.
Thank you
You're welcome.
Well done
Thank you