
The first move towards releasing software is the build stage. This practical guide will show you the general principles of build automation and reference implementations using Semaphore. Optimizing your build stage will accelerate your development workflow and cut down costs.
What happens in a build stage
In continuous integration (CI), this is where we build the application for the first time. The build stage is the first stretch of a CI/CD pipeline, and it automates steps like downloading dependencies, installing tools, and compiling.
Besides building code, build automation includes using tools to check that the code is safe and follows best practices. The build stage usually ends in the artifact generation step, where we create a production-ready package. Once this is done, the testing stage can begin.

The build stage starts from code commit and runs from the beginning up to the test stage
We’ll be covering testing in-depth in future articles (subscribe to the newsletter so you don’t miss them). Today, we’ll focus on build automation.
Build automation verifies that the application, at a given code commit, can qualify for further testing. We can divide it into three parts:
- Compilation: the first step builds the application.
- Linting: checks the code for programmatic and stylistic errors.
- Code analysis: using automated source-checking tools, we control the code’s quality.
- Artifact generation: the last step packages the application for release or deployment.
Step 1: Compilation
Step one of the build stage compiles the application. On compiled languages, it means that we can generate a working binary, whereas on interpreted languages, we confirm that we have the required dependencies and tools to successfully build the application.
The result can be a binary file, a code tarball, an installable package, a website, a container image — the main thing is that we have something that we can run and test.
Step 2: Analyzing Your Code
Programming requires discipline. We must solve hard problems while following good practices and abiding by a common coding style. Automated analysis tools help you keep out gnarly code at bay. In general terms, there are three classes of code analysis tools:
- Linting: linters improve code quality by pointing problematic and hard-to-maintain bits. Linters use a set of rules to enforce a unified standard that improves readability for the team.
- Quality: this class of tools uses metrics to find places where code can be improved. The collected metrics include the number of lines, documentation coverage, and complexity level.
- Security: security analysis tools scan the code, flag parts that may cause vulnerabilities, and check that dependencies don’t have known security issues.
Since no one wants to ship unsafe or buggy code, we must design a CI pipeline that stops when errors are found. When the CI pipeline runs the right code analysis tools, developers who review code can focus on more valuable questions such as “Is this code solving the right problem?” or “Does this code increase our technical debt?“.
Step 3: Preparing your Application for Release
The released package will include everything needed to run or install the application, including:
- Application code.
- Installation scripts.
- Dependencies and libraries.
- Application metadata.
- Documentation.
- License information.
The final package can be published on a website, in a package database such as npmjs.com, in a container registry, or can be directly deployed into a QA or production environment.
Useful Semaphore commands for build automation
A CI/CD pipeline consists of blocks and jobs. In Semaphore, jobs are where your commands and code run, so it’s here where we define the commands for each step in the build stage. While setting up build automation, you’ll find the following Semaphore commands useful:
- checkout: clones and CDs into the Git repository. It usually belongs near the top of the job.
- sem-version: activates a specific version of a language. Run it to ensure the CI environment uses the same version you’re coding with.
- cache: stores your downloaded libraries, intermediate, and compiled files. The cache is a short-lived space used to pass files between jobs and workflows.
-
artifact: the
artifactcommand lets store files on a more permanent basis. You can access these directly from the website. Semaphore provides three levels for artifacts:- job: used to store logs and other debugging details.
- workflow: used to persist files between jobs.
- project: used to store the final project output.
How to implement a build stage with Semaphore
Shall we see a few practical examples of build automation in a CI pipeline? Let’s roll up our sleeves and write some code.
But first, a note about how I’m writing the commands:
- Commands starting with
$are meant to run in your local development machine. - Commands without the dollar sign are for you to copy into your CI jobs.
👉 Jump to the example that interests you the most:
- A build stage for Java Applications
- A build stage for JavaScript applications
- A build stage for Python Applications
- Creating Docker images in the build stage
Example 1: A build stage for Java applications
Java is a compiled language, so the build stage must compile the source into JVM bytecode. Here’s a starter pipeline:

A Java build stage. Linting and code analysis run in parallel in the same block.
Compilation block
The leading popular build tools in Java are Apache Maven and Gradle, both are included in Semaphore’s machines. Let’s go with Maven; it handles dependencies and compiles the source with a single command: mvn compile. Use these commands in your CI job to build the application:
sem-version java 11
checkout
cache restore
mvn compile
cache store
The cache command will detect the compiled output in the target directory and store it for future use. Ideally, you should set the environment variable MAVEN_OPTS to -Dmaven.repo.local=.m2, so downloaded dependencies are also cached.
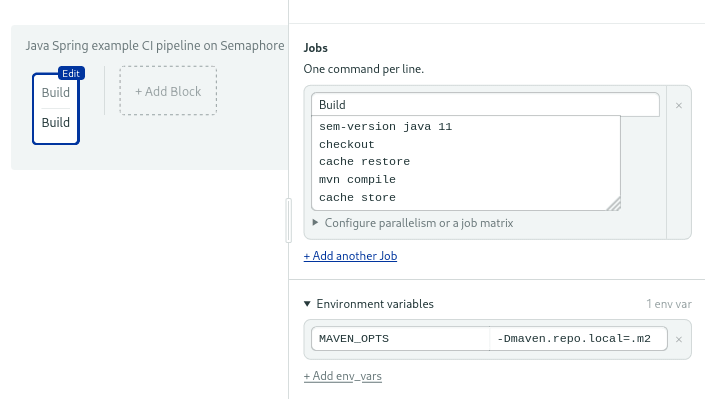
Setting up environment variables in the build block.
Linting with style
Java developers use powerful IDEs that lint code in realtime. Powerful as they are, they are not enough. Quality checks must also be part of the CI pipeline. We can use checkstyle to add a linting job.
These commands download checkstyle and run it on a file called MyFile.java:
sem-version java 11
wget https://github.com/checkstyle/checkstyle/releases/download/checkstyle-8.41/checkstyle-8.41-all.jar
java -jar checkstyle-8.41-all.jar -c /sun_checks.xml MyFile.java
Or, if you are using Maven, there’s a plugin for automatic linting. To enable it, add the maven.checkstyle.plugin to properties in your pom.xml.
<properties>
    <maven.checkstyle.plugin.version>3.1.2</maven.checkstyle.plugin.version>
</properties>
Then configure the plugin to fail on error. Add the following snippet to the build section in your pom.xml:
<build>
    <plugins>
        <plugin>
            <groupId>org.apache.maven.plugins</groupId>
            <artifactId>maven-checkstyle-plugin</artifactId>
            <version>${maven.checkstyle.plugin.version}</version>
            <configuration>
                <failsOnError>true</failsOnError>
                <failOnViolation>true</failOnViolation>
            </configuration>
        </plugin>
    </plugins>
</build>
Now you can run checkstyle with:
sem-version java 11
checkout
mvn checkstyle:checkstyle
Finding Mistakes with PMD
Another nice checker to use in your CI environment is PMD. PMD works with Java, JavaScript, and Oracle’s SQL. You can scan code with the default rules for Java with the following:
sem-version java 11
checkout
wget https://github.com/pmd/pmd/releases/download/pmd_releases%2F6.32.0/pmd-bin-6.32.0.zip
unzip pmd-bin-6.32.0.zip
./pmd-bin-6.32.0/bin/run.sh pmd -d . -R rulesets/java/quickstart.xml -f text
Security analysis with Infer
Infer was created by Facebook to find code that can lead to runtime errors, things such as race conditions and resource leaks. Infer works with Java and Android. Facebook has open-sourced this tool and uses it to fix their mobile client and the main Facebook app.
To run Infer on your CI, download the binary and build the application. Infer will output a report on the infer-out folder, which you can store for later analysis. The following command will make the pipeline stop when issues are found:
checkout
cache restore
mvn clean
curl -sSL "https://github.com/facebook/infer/releases/download/v1.0.0/infer-linux64-v1.0.0.tar.xz" | tar -xJ
./infer-linux64-v1.0.0/bin/infer run -- mvn package
artifact push job --expire-in 1w infer-out
./infer-linux64-v1.0.0/bin/infer analyze --fail-on-issue
Finding bugs with Find Security Bugs
Find Security Bugs uses a security database to detect almost 140 different vulnerability types in Java web applications.
To use this tool, add this snippet to the plugin section in your pom.xml:
<plugin>
     <groupId>com.github.spotbugs</groupId>
     <artifactId>spotbugs-maven-plugin</artifactId>
     <version>4.0.4</version>
     <configuration>
         <effort>Max</effort>
         <threshold>Low</threshold>
         <failOnError>true</failOnError>
         <includeFilterFile>${session.executionRootDirectory}/spotbugs-security-include.xml</includeFilterFile>
         <excludeFilterFile>${session.executionRootDirectory}/spotbugs-security-exclude.xml</excludeFilterFile>
         <plugins>
             <plugin>
                 <groupId>com.h3xstream.findsecbugs</groupId>
                 <artifactId>findsecbugs-plugin</artifactId>
                 <version>1.10.1</version>
             </plugin>
         </plugins>
     </configuration>
</plugin>
Then, create two files: spotbugs-include.xml and spotbugs-exclude.xml. The contents of the first one are:
<FindBugsFilter>
     <Match>
         <Bug category="SECURITY"/>
     </Match>
</FindBugsFilter>
You can exclude rules in the exclude file:
<FindBugsFilter></FindBugsFilter>
Commit the changes into your repository. Then, create a job that generates the report and pushes it to the artifact store:
checkout
cache restore
mvn spotbugs:spotbugs
artifact push job target/spotbugsXml.xml  --expire-in 1w
mvn spotbugs:check
Building a JAR
We can generate a JAR file with: mvn package. Since we already tested the application, we can skip tests.
sem-version java 11
checkout
cache restore
mvn package
cache store
The output JAR is uploaded to the artifact store, where it can be downloaded or used in continuous delivery and deployment pipelines.
👉 For a complete example of setting up a CI/CD pipeline for Java applications, see CI/CD for Spring Boot Microservices.
Example 2: A build stage for JavaScript applications
JavaScript code doesn’t need compiling. The build stage will only download dependencies, then lint the code, and finally, build a package.

JavaScript build stage
Filling up node_modules
We can install JavaScript modules with npm:
checkout
npm ci
The npm ci command creates a clean copy of the node_modules folder. Unfortunately, as a result we can’t use the cache at this stage. npm ci is the cleanest and safest way of installing modules.
But if you want or need to use the cache, you’ll need to run npm install instead of npm ci:
sem-version node 14.16
checkout
cache restore
npm install
cache store
If the project includes a .nvmrc config file, you can replace sem-version with nvm use:
checkout
nvm use
cache restore
npm install
cache store
The CI machine includes yarn as well:
sem-version node 14.16
checkout
cache restore
yarn install
cache store
Linting with ESLint and JSHint
JavaScript has come a long way since the Netscape years. It grew from a language whipped up in less than ten days into the closest thing we have to a lingua franca — almost all devices have JavaScript support.
As you can imagine, the language changed a lot over time, and not all its parts are good. Using a linter will help us stay away from the bad parts of JavaScript. In my experience, the ESlint and JSHint linters integrate very well into the CI environment. Any of these can be installed with npm install --save-dev.
For ESLint, you’ll need to create a configuration with:
$ npx eslintrc --init
Next, add it to the script section of package.json:
"scripts": {
     "lint": "eslint '**/*.js' --ignore-pattern node_modules",
     ...
 }
After committing the changes, use the following to run the linter:
sem-version node 14.16
checkout
npm run lint
Security audits: npm and AuditJS
Security audits are built-in npm. You can check your dependencies with npm audit. Note, however, that you must set a threshold level in order for the command to fail on error:
sem-version node 14.16
checkout
cache restore
npm audit --audit-level=high
If you find security issues, try running npm audit fix to attempt automatic resolution.
An alternative to npm audit is AuditJS. This tool uses the OSS index of vulnerabilities, which feeds from many security databases, so results are more accurate.
You can add AuditJS to your project with:
$ npm install --save-dev auditjs
Then use the following command to run the test:
sem-version node 14.16
checkout
npx auditjs ossi
One nice feature AuditJS has is that it allows us to whitelist security issues. This is great, for instance, when we want to ignore a vulnerability because we know it doesn’t affect us.
For that, create a JSON file detailing the vulnerability ID and a reason for ignoring it:
{
  "ignore": [
    {
        "id": "78a61524-80c5-4371-b6d1-6b32af349043",
        "reason": "Vulnerability doesn't affect our code"
    }
  ]
}
Then run AuditJS with the whitelist enabled:
sem-version node 14.16
checkout
auditjs ossi --whitelist my-whitelist.json
Creating Node packages
Use npm pack to create a tarball you can distribute, or use npm publish to upload the module to npmjs.com.
checkout
tarfile=$(npm pack)
artifact push project --force "$tarfile"
👉 For a complete example of setting up a CI/CD pipeline for a JavaScript application, see How To Build and Deploy a Node.js Application To Kubernetes or Continuous Integration with Deno.
Example 3: A build stage for Python applications
We don’t need to run any compile commands in Python. As a result, the build job, like JavaScript’s, will only download and cache dependencies.

Python build stage
Installing modules
In this example, we run pip to install the project dependencies in the .pip_cache folder:
sem-version python 3.9
checkout
cache restore
pip download --cache-dir .pip-cache -r requirements.txt
cache store
Linting with Pylint
Python developers are used to following strict coding standards. One good way of checking for good style is Pylint. Pylint ruleset includes checks for unused modules, variable name formats, and line length. It strictly adheres to Python’s PEP 8 style guide.
Like most linters, Pylint can be integrated into the IDE. But, in this case, we’ll use it in the pipeline to check commit quality. To show lint errors in a single package or file use:
sem-version python 3.9
checkout
pylint -E [MODULE|PYTHON_FILE]
You can scan every Python file in the repository with the following command:
sem-version python 3.9
checkout
git ls-files | grep -E '.py$' | xargs pylint -E
Complexity analysis with Xenon
One thing PEP 8 style guide cannot capture is cyclomatic complexity, a measure of how many independent paths there are in the codebase. To calculate it, you can use a tool like Xenon.
To get started with Xenon, add it to your Python project with:
$ pip install xenon
$ pip freeze > requirements.txt
Xenon uses a ranking system that goes from A to F, where A is the lowest complexity level. In the job, you can supply the minimum level permitted before failing.
sem-version python 3.9
checkout
cache restore
xenon --max-absolute C --max-modules B --max-average A
The example will make the job fail if the average complexity is lower than A, the complexity in the modules goes lower than B, or the complexity of a block is lower than C.
Packing for distribution
Python’s package format allows you to upload modules to the official PyPI index or distribute it on your website.
To create a package, use the following commands:
sem-version python 3.9
python -m pip install --upgrade build
checkout
python -m build
artifact push project --force dist
👉 For a complete Python pipeline see Python Continuous Integration and Deployment From Scratch.
Example 4: Creating Docker images in the build stage
Docker is a container platform that standardizes build automation by letting us package any software regardless of the language. By building a Docker image, we get a portable application we can run on any machine, as long as it has a container runtime installed. It also allows us to run the application at scale on orchestration platforms like Docker Swarm or Kubernetes.
Semaphore includes everything you need to build a Docker image. You only need to supply a Dockerfile with the build instructions.
The easiest way of writing a Dockerfile is by starting from a base image. Semaphore provides images for popular languages in the Semaphore Container Registry. For example, this Dockerfile is for packaging a Python application:
# use image in Semaphore container registry
FROM registry.semaphoreci.com/python:3.9

# copy source files
ADD . ./opt/
WORKDIR /opt/

# install dependencies
RUN pip install --upgrade pip
RUN pip install -r requirements.txt

# start application
CMD ["python","app.py"]
Use these commands in the CI job to build the image:
checkout
docker build -t my-image .
It works, but the image is lost as soon as the job completes. We must upload it into a registry in order to keep it. And for that, you have to supply login information for an image registry with a secret.
To create a secret, click on your account badge on the top right corner and then Settings.
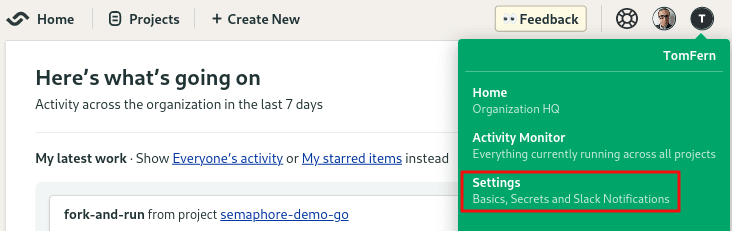
Where to find Settings menu.
Then click on Secrets > New Secret.
Create a secret called dockerhub with your Docker Hub username and password:
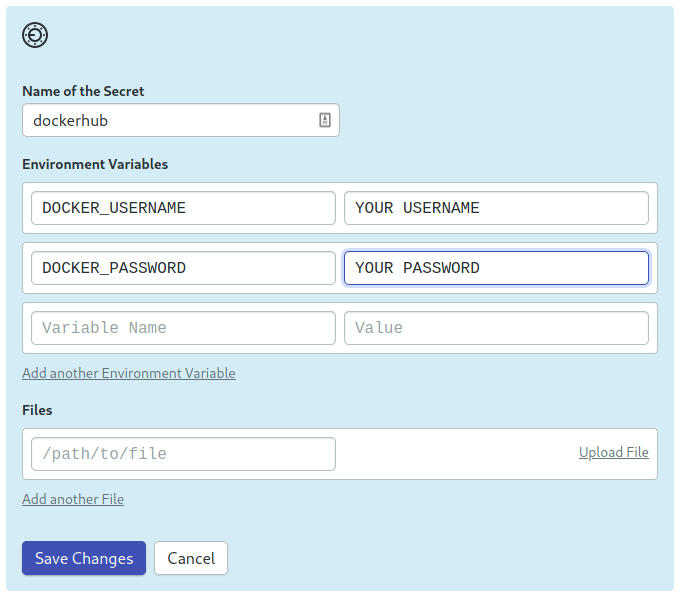
Create a secret to store Docker Hub credentials
Now you can access the username and password in the job:
echo "${DOCKER_PASSWORD}" | docker login -u "${DOCKER_USERNAME}" --password-stdin
Next, you can pull the last image to speed up the build process:
docker pull $DOCKER_USERNAME/awesome-application:latest || true
Finally, build and push the image:
docker build -t $DOCKER_USERNAME/awesome-application:latest --cache-from=$DOCKER_USERNAME/awesome-application:latest .
docker push $DOCKER_USERNAME/awesome-application:latest
The complete job commands are:
echo "${DOCKER_PASSWORD}" | docker login -u "${DOCKER_USERNAME}" --password-stdin
docker pull $DOCKER_USERNAME/awesome-application:latest || true
docker build -t $DOCKER_USERNAME/awesome-application:latest --cache-from=$DOCKER_USERNAME/awesome-application:latest .
docker push $DOCKER_USERNAME/awesome-application:latest
Don’t forget to activate the secret in your job:
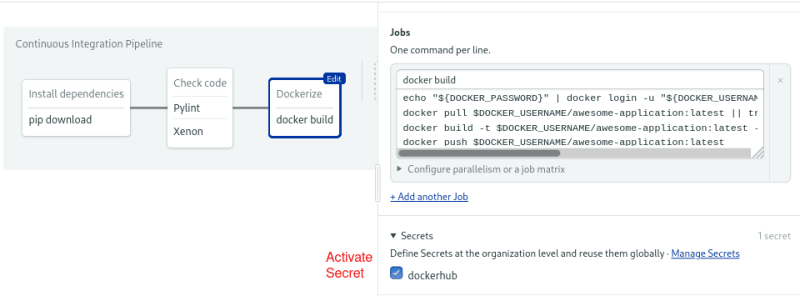
Activate the secret in the block
What we have seen are the basic building blocks for a Docker image. The process is mostly the same for any language. The only thing that changes are the contents of the Dockerfile. We have a few in-depth tutorials and example Dockerfiles for you to peruse below:
- Dockerizing Java Applications
- Dockerizing JavaScript and Node
- Dockerizing Python Applications
- Dockerizing Ruby on Rails
- Dockerizing PHP Applications
- Dockerizing Elixir Applications
What’s Next
We learned what build automation is and saw a few examples. The principles always remain the same, regardless of the language or framework used.
The principle used in all examples is that the build stage runs in a pipeline. By running fast code checks right after compilation— and before the automated test suite—you optimize your continuous integration process for fast feedback.
I hope these recommendations help you optimize your build process. Happy building!

Top comments (0)