
Cover photo by Brina Blum on Unsplash
If you're a software developer, there is a pretty high chance that you have used GitHub to host your code repositories. I'm sure you'll agree that it's an amazing place to host and showcase your projects💜. I'm also sure that you'll agree that visiting the website to review pull requests, create an issue or release a, well, release is sometimes very frustrating - simply because it calls for so much context switching between your editor/terminal to your browser😖.
That's just not how things should work! 😤
Well, (thankfully) it seems like the unicorns at GitHub recognized this problem and have released the official GitHub CLI v1.0.0
In this blog post, I'll walk through my daily tasks as a developer and how I'm completely shifting my GitHub workflow to the cli🤩.
What do I use GitHub for?
Let's go over the tasks you and I would use GitHub for, while working on a project:
- Create issues
- Assign issues
- Create a PR that closes an issue
- Review/merge a PR someone else has assigned to you
- Create a release for your package
Let's now bring all these tasks to our terminal so we don't have to log onto GitHub through the browser every time.
Let's move to the CLI 🚀
First things first, let's download the cli on our local machine. I'm using a macbook pro so I'll follow the instructions for it, but you can find the instructions for your OS here
# Install with Homebrew
brew install gh
Once the download is complete, it's time to log into your account from the cli🔑. There are two ways of doing this. Either using a browser login, or by using a personal access token. I'll be showing the browser login, but the process it fairly simple for the personal access token too.
Run the following in your terminal:
gh auth login
This will fire up an interactive program in your terminal that will ask you for your username and authenticate you using your browser
Follow the steps shown in the below recording
You're all set to start using the gh-cli now 😁
Let's create our first repo on GitHub in which we'll perform all the other tasks. To do this, navigate to any git repo on your machine, in my case it is the gh-cli-demo repo, and run the below command
Make sure you add atleast one commit on your master branch and push that to github
gh repo create
You will be greeted by a set of questions like below. Choose the appropriate responses and you'll be set. (You can verify the repo creation by navigating to the link mentioned at the end of the interaction)

We are ready to start working on our project now. Let's create an issue that we'll use to track our progress📝 (In this case, our "dummy" issue will be addressed to adding a readme.md file for documentation)
gh issue create --title "Add documentation!!" --body "create a read me file describing what this repo is about" --assignee shubhamzanwar
In this case, we've used the title, body and the assignee flags. For the whole set, you can check out this page from the cli documentation

Well, we've created the issue and it is assigned to us. Let's get cracking with it and create a readme file. We'll then raise a PR to merge our documentation into the master branch🚀. This part is probably already familiar to you. we use the good old git for this.
git checkout -b documentation
echo "Demo repo to learn github cli" > readme.md
git add readme.md
git commit -m "adding documentation"
git push origin documentation
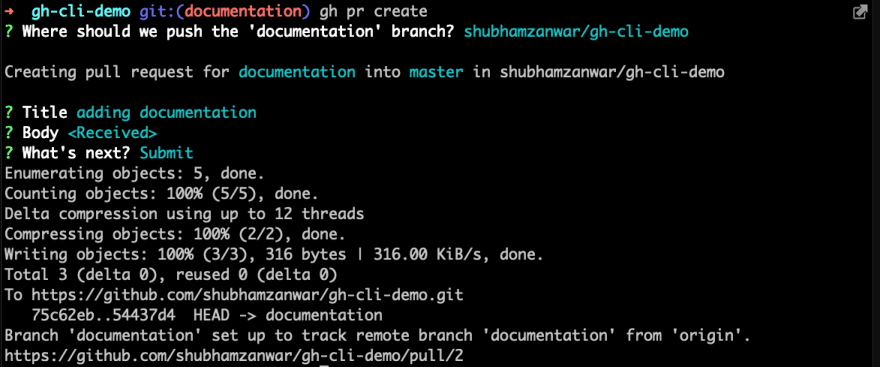
At this point, our documentation changes are in the documentation branch. We ned to merge this with master. So let's create a PR that also references issue #1. Run the below command to create this PR from your terminal.
gh pr create
This will prompt you for the PR title and the body and you can mention whatever is apt.
If you want to use GitHub automation, you can type "closes #1" in the body of this PR. That way, github will automatically close the issue #1 when this PR gets merged😎
Since we have created a PR, let's also play the role of out teammate and review/merge this PR. To do this, we can checkout to the PR locally, go through the code and then decide if we want to merge this or not.
gh pr checkout 2
Review the code now (well, in this case, it's your own code😂). Since everything is good, let's go ahead and merge this PR.
In case you have comments/changes to request, you still have to use the browser. Hope github comes up with a cli solution for this too in later updates of
gh🤞🏽
gh pr merge 2
This again, opens up a prompt asking whether we want to squash/merge/rebase. Feel free to choose this according to your preference.

Yay! you've successfully merged your code into the master branch both locally and on remote without leaving your terminal. Cool, right? 🤘🏽
As a final step, let's create a new master release for our repo. (This is usually used by libraries, but since we're trying everything out for our dummy repo, why not?😉)
gh release create v1.0.0
This will ask you a few set of questions about the title, release notes, etc. You can fill this up according to your release spec. In this case, I've left the release notes blank.

There you go!🎉 You've successfully learned how to create a repo, create issues, raise and merge PRs, close issues and create releases - all from your terminal, thanks to GitHub cli.
This tool (obviously) contains a lot more features and more flags/options for each feature. You can check out the documentation here
Hope you found this blog-post interesting. You can connect with me on twitter or github
Cheers ☕️

Oldest comments (0)