
Getting into full-stack development requires that we're able to work with server-side code and databases. If you're working in JavaScript you'll be using Node most likely and a popular NoSQL database MongoDB.
This article will assume you've got the basics of each already. The main topic here is how we get Node and Mongo to talk to each other.
Step 1: Visit MongoDB's website
You should either sign in or register as a new user. Simple first steps we're already gaining momentum.

Step 2: Create and Connect to a Cluster
If you do not have a Cluster yet on the site you will need to create one. It's been a while since I had zero Clusters so I'm not positive but I think it will automatically prompt you to create one.
If not, no worries, you'll see in the picture below somewhere on your screen there should be a green button that says 'Create a New Cluster'. My advice, as I've not toyed with any of the settings nor want to pay for a Cluster, just keep the default settings and make sure to create a free Cluster.

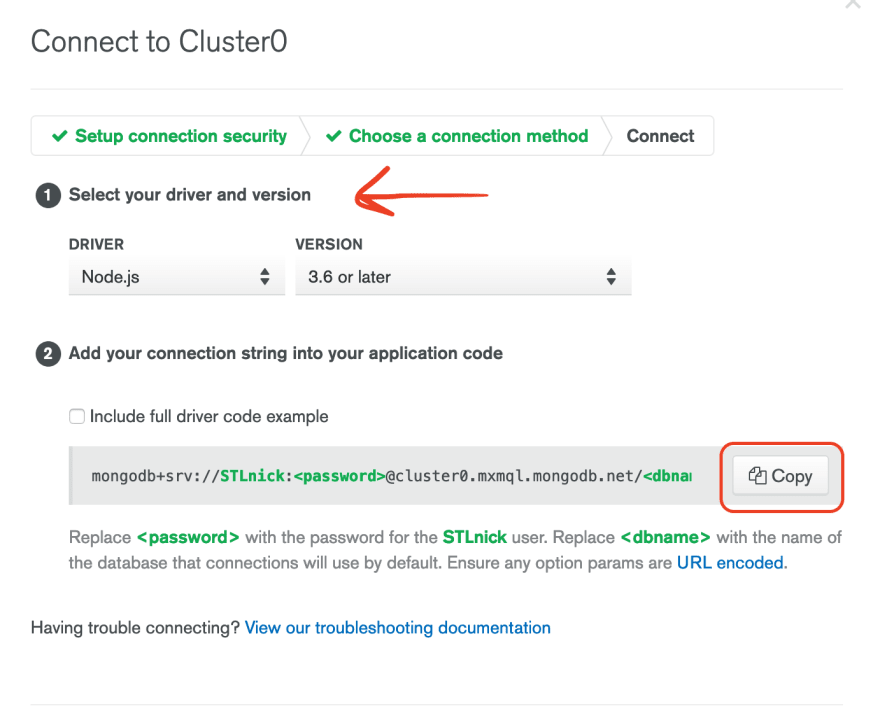
Now that you have a Cluster, or if you had one already, your screen should like like the picture above. Next you'll need to click the little CONNECT button below your Cluster name. And it will show you this screen below.
Click on the middle option that says Connect your Application.

Alright we're almost done on the website. Ensure you do Step 1 of this Connect Popup - Select your driver (which is probably Node if you're reading this) and make sure the Version is appropriate. Since we're on Node 14 I would assume you're all safe in keeping the 3.6 or later option selected.
Then just click the Copy button to copy that long string which is how your application will actually gain access to your database. You will need to replace <password> with your actual password and <database> with your actual database name. Potentially, you may have to replace <username> but normally it auto-inserts that for me before I even copy the string.
Step 3: Setup a MongoClient
Now we must go into your application code. Wherever your server code lives is now going to need a Client to create the connection between Node and Mongo. Here's a simple representation of my project directories and where the code I'm going to show lives.
-client-> (front-end code)
-server
  |__db
  |  |_client.js
  |  |_index.js
  |
  |__server.js
  |__.env
First up let's look at client.js because that's the first part we need to establish our connection.
import dotenv from 'dotenv';
import { MongoClient } from 'mongodb';

dotenv.config();

const client = new MongoClient(
  process.env.MONGODB_URI,
  {
    useUnifiedTopology: true,
  },
);

// Close the connection after the server is shut down
(async () => {
  await client.connect();

  // 'CTRL + C' -> 'SIGINT' means signal interrupt i.e. server shut down
  process.on('SIGINT', () => {
    client.close().then(() => {
      console.info('SIGINT received: DB connection is closing');

      // Avoid plugging up ports - ensures all processes are stopped
      process.exit(0);
    });
  });
})();

export default client;
Alright there's a bit going on there so let's look at it in chunks.
So first off we have some imports. The dotenv import is only to store the copied string from the last step and use it. That long string we copied from Mongo's website on our Cluster is stored in the .env you saw in my directory structure. The dotenv.config() simply allows me to use those environment variables I've declared in .env in this file here.
The process.env.MONGODB_URI could be replaced by the actual string we copied. So if you don't want to setup a .env you don't have to.
Now the MongoClient import is fairly self-explanatory on what it's role is - it's how we will establish the connection. The const client = part is where we declare a new MongoClient and pass some arguments.
First is our connection string (again you could just paste the string here if you wanted)
An object to pass additional options - here we just pass
useUnifiedTopology: true
import dotenv from 'dotenv';
import { MongoClient } from 'mongodb';

dotenv.config();

const client = new MongoClient(
  process.env.MONGODB_URI,
  {
    useUnifiedTopology: true,
  },
);
To be honest, I'm not 100% on why useUnifiedTopology: true helps us. Here's Mongo's Reference Page on it. I read through and in the most basic sense it seems like a step towards making future updates easier. I could totally be wrong on that though.
Let me know in the comments what your understanding of useUnifiedTopology is!
Alright, next chunk of code.
Obviously we export the client we've created so lets just get that bit out of the way.
Now the bulk of this code is that Asynchronous IIFE. It's purpose is to establish our connection and then when our server shuts down to close that connection. The comments in there already should help clarify certain parts.
We connect by awaiting the method available to us from our MongoClient object =>
connect(). Pretty simple.Then once we get the
SIGINTfrom the server we close that database connection. Because our parents taught us to clean up after ourselves and it's not just for our rooms!
// Close the connection after the server is shut down
(async () => {
  await client.connect();

  // 'CTRL + C' -> 'SIGINT' means signal interrupt i.e. server shut down
  process.on('SIGINT', () => {
    client.close().then(() => {
      console.info('SIGINT received: DB connection is closing');

      // Avoid plugging up ports - ensures all processes are stopped
      process.exit(0);
    });
  });
})();

export default client;
Step 4: Use your client
Now how do we use this client that has connected for us? Here's one method out of my db/index.js.
import client from './client';

// GOOD
export const addNewUser = async (newUser) => {
  try {
    return await client.db('throwaway').collection('users').insertOne(newUser);
  } catch (err) {
    throw new Error(err);
  }
};
- Import our client from our file
- Then simply use it as such in the try/catch block
client.db(<NAME OF YOUR DATABASE>).collection(<NAME OF YOUR COLLECTION>).<METHOD YOU NEED>
Some notes here: newUser is an object passed in from the client-side request. And since it is an object already I can pass it directly into the insertOne method.
Moving Forward
In my experience MongoDB can be pretty particular about how things are formatted, or passed in especially to those CRUD methods like insertOne(), find(0), findOneAndUpdate().
This is important to making sure the data you're trying to read, write, delete, or update is actually having their operation complete properly.
Get Some Practice
I recommend instead of worrying about coming up with a project that will need data and coming up with how that data should look - just use MongoDB's sample data.
Once you create a cluster you can essentially download some sample Collections.
Do that, spin up a quick project structure like an index.html, barebones CSS and the server-side code you've seen in this article. The play around with how to pass data in correctly, get your client-side requests to the server-side (which is a whole different article), even just define a const in your server code and pass it to the DB method and see if it updates.
Time on task will help more than most things!

Top comments (0)