In this post we'll examine what you need to do to implement Azure AD B2C authentication with your Xamarin.Forms apps. We did this live on our stream so if you prefer to watch the on demand video, you can watch it here or YouTube below:
If you feel that Xamarin.iOS and Xamarin.Android is something we should do, go ahead and let us know in the comments or tweet us at @christosmatskas and/or @AzureAndChill :)
Prerequisites
- Azure Subscription (get a FREE subscription here)
- An Azure AD B2C tenant (spin one using this doc)
- Visual Studio or Visual Studio for Mac (we'll use VS4Mac in this instance)
- Xamarin with Android and iOS dependencies so that you can build and debug locally (install Xamarin)
Create your App Registration
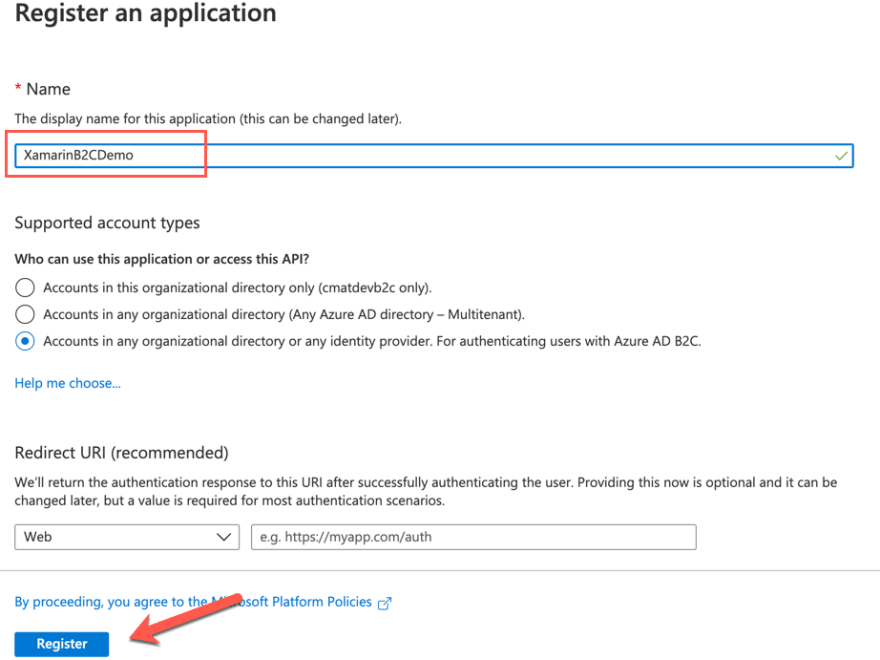
To be able to authenticate and manage users in our Xamarin app we need to create an app registration in our AAD B2C. This will define how users sign in and sign up to our app and provide the appropriate settings for our app. Let's navigate to the B2C portal and create a new App Registration

We need to give it a meaningful name and press Register
Next, we open the app registration and navigate to the Authentication tab to add a new platform

Since we are doing a mobile app, we choose Mobile and then we make sure to check the Redirect URI for MSAL as per the images below:


Note that the Redirect URI will be specific to your app.
Configure the User Flow
User flows are used by B2C to define how we want our users to interact with our authentication platform. They determine which social providers to use (if any), how to sign up for the first time and how to enable our users to manager their accounts. I like to use the default flows as they tend to meet my needs 90% of the time but it's nice to know that you can go totally crazy and create custom flows to serve edge cases.
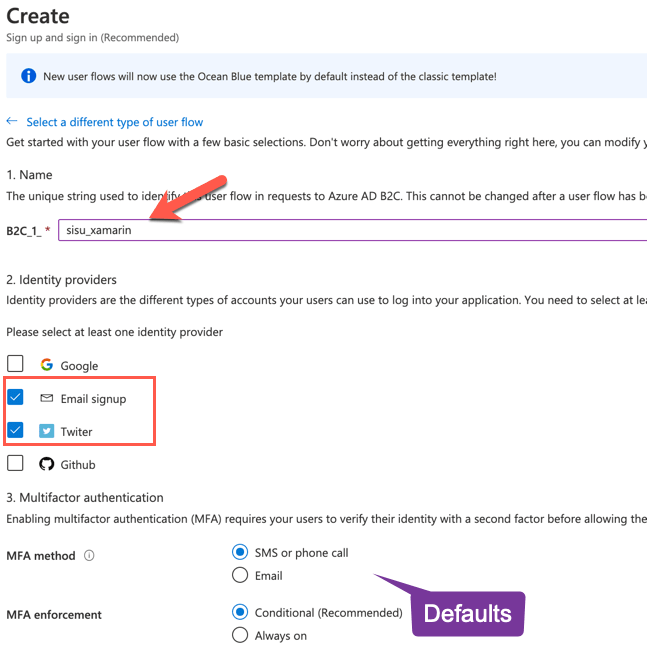
In this instance, we're using a default Sign In Sign Up flow. To do this, we need to navigate back to the root of our B2C tenant and open the User flows tab and click on the New user flow button

From the available flows we want to select the Sign up and sign in flow and make sure to go with the Recommended settings before pressing the Create button.

We need to provide a tenant-unique (unique name for our B2C tenant) name and then configure the identity providers. The default is username and password but we can add other social media identity providers like Google, Twitter or Github as we see fit. We can also add any other custom OIDC identity provider so we are not confined to the predefined ones - joy!
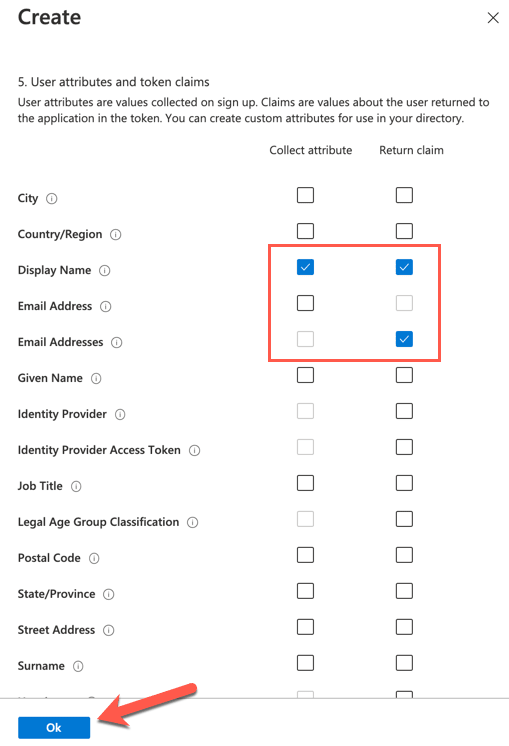
At the bottom of the page, we need to configure the attributes that we want to collect and return during sign up and sign in. For this, we need to press Show more... and choose the right attributes to collect and return as claims and press Ok to persist our changes.
We are now good to press Create to save our new user flow.
At this point, we need to collect some information that we will use in our Xamarin app to configure MSAL (the auth library)
From the app registration, we need:
- The application (client) Id: 0b3eee66-0000-0000-0000-d9318c4f589d
- The tenant name:
youB2CTenantName - The tenant Id:
yourB2CTenantName.onmicrosoft.com - The Redirect URI: msal0b3eee66-0000-0000-0000-d9318c4f589d://auth
- The use flow name:
b2c_1_sisu_xamarin(lowercase better)
At this point we're done with the B2C configuration and portal and we can start writing some code! One down, one to go
Add AAD B2C authentication in Xamarin.Forms
For this post I'll be starting with a fresh, vanilla Xamarin.Forms project. In VS4Mac, I create a brand new, empty Xamarin.Forms project using the File -> New Project option

Then I give it a meaningful name and I make sure that both iOS and Android are selected:
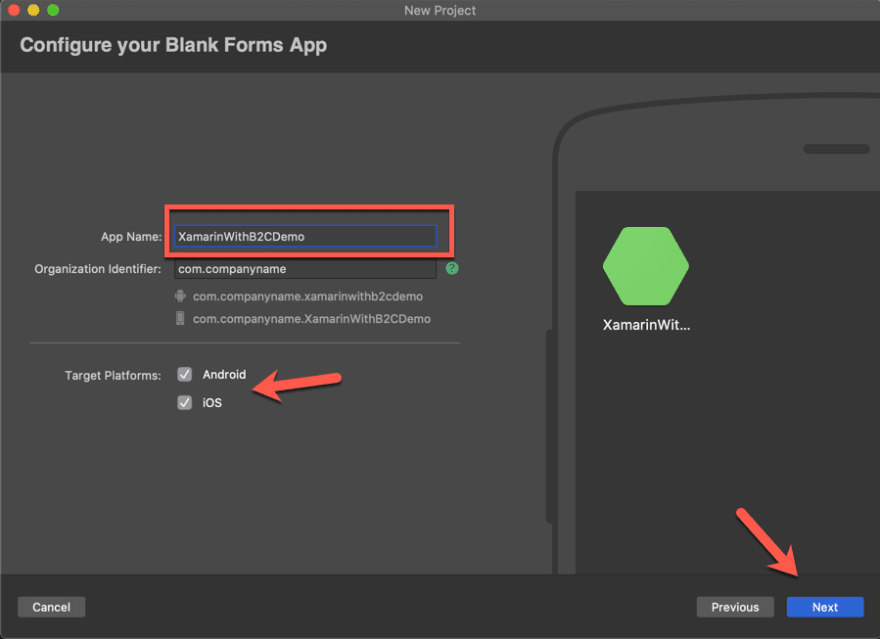
I also made sure that the solution files look right and that git files are added (this is the default behavior anyway but good to check) before pushing the Create button

With the solution created, we can start by adding the MSAL library via NuGet. The library will need to be added on all 3 projects, the class library, the iOS and Android

The easiest way is to search for Microsoft.Identity.Client and select it in order to be added it to our solution.
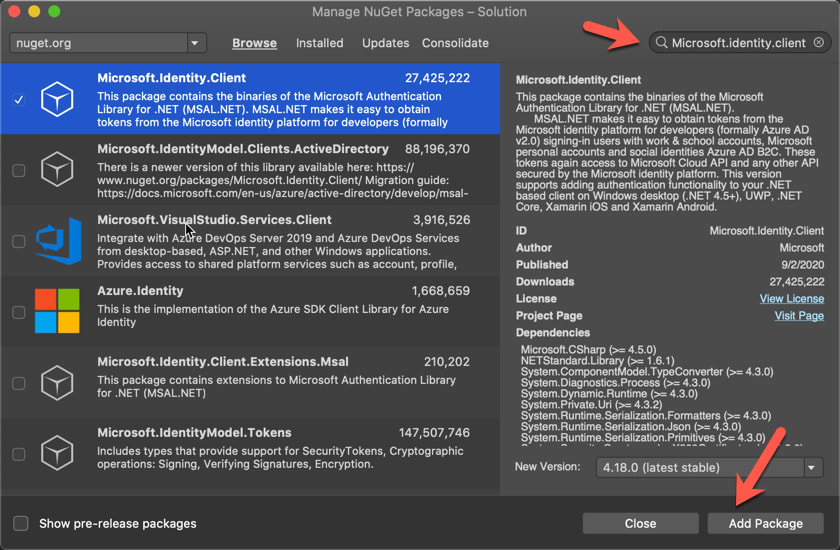
Accept the dependencies to complete the installation

OK! So now we are ready to start coding...
First, we need to add a new Constants.cs class to hold all our configuration settings. Add the following code:
public static class Constants
{
    public static readonly string TenantName = "YourTenantName";
    public static readonly string TenantId = "YourTenantName.onmicrosoft.com";
    public static readonly string ClientId = "834a4112-0000-0000-0000-860f082f0c8a";
    public static readonly string SignInPolicy = "b2c_1_sisu_xamarin";
    public static readonly string IosKeychainSecurityGroups = "com.<yourcompany>.<groupname>"; // e.g com.contoso.aadb2cauthentication
    public static readonly string[] Scopes = new string[] { "openid", "offline_access" };
    public static readonly string AuthorityBase = $"https://{TenantName}.b2clogin.com/tfp/{TenantId}/";
    public static readonly string AuthoritySignIn = $"{AuthorityBase}{SignInPolicy}";
}
We now need to add some code in the App.xaml.cs to configure the authentication as per the code below:
using Microsoft.Identity.Client;
using Xamarin.Forms;

namespace XamarinDemoWithB2C
{
    public partial class App : Application
    {
        public static IPublicClientApplication AuthenticationClient { get; private set; }

        public static object UIParent { get; set; } = null;

        public App()
        {
            InitializeComponent();

            AuthenticationClient = PublicClientApplicationBuilder.Create(Constants.ClientId)
               .WithIosKeychainSecurityGroup(Constants.IosKeychainSecurityGroups)
               .WithB2CAuthority(Constants.AuthoritySignIn)
               .WithRedirectUri($"msal{Constants.ClientId}://auth")
               .Build();

            MainPage = new NavigationPage(new LoginPage());
        }

        protected override void OnStart()
        {
        }

        protected override void OnSleep()
        {
        }

        protected override void OnResume()
        {
        }
    }
}
The AuthenticationClient is what we will call in other pages to authenticate users. We also expose a UIParent property which needs to be populated with the a content page when we work with Android. For the iOS app it can be null.
At this point the code will not compile as we reference a LoginPage that doesn't exist yet. Let's add this. The LoginPage should be a ContentPage that contains the following XAML
<ContentPage.Content>
    <StackLayout Margin="30,40,30,0" HorizontalOptions="Center" VerticalOptions="Center" >
    <Button x:Name="SignInBtn" Text="Sign in" Clicked="OnSignInClicked"/>
    </StackLayout>
</ContentPage.Content>
As you can see, we only have a Sign in button - pretty bare but functional if you ask me.
We now need to configure the SignIn functionality in the code behind, i.e LoginPage.xaml.cs as per below:
using System;
using System.Linq;
using Microsoft.Identity.Client;
using Xamarin.Forms;

namespace XamarinDemoWithB2C
{
    public partial class LoginPage : ContentPage
    {
        public LoginPage()
        {
            InitializeComponent();
        }

        protected override async void OnAppearing()
        {
            try
            {
                // Look for existing account
                var accounts = await App.AuthenticationClient.GetAccountsAsync();

                if (accounts.Count() >= 1)
                {
                    AuthenticationResult result = await App.AuthenticationClient
                        .AcquireTokenSilent(Constants.Scopes, accounts.FirstOrDefault())
                        .ExecuteAsync();

                    await Navigation.PushAsync(new LoginResultPage(result));
                }
            }
            catch
            {
                // Do nothing - the user isn't logged in
            }
            base.OnAppearing();
        }

        async void OnSignInClicked(object sender, EventArgs e)
        {
            AuthenticationResult result;

            try
            {
                result = await App.AuthenticationClient
                    .AcquireTokenInteractive(Constants.Scopes)
                    .WithPrompt(Prompt.ForceLogin)
                    .WithParentActivityOrWindow(App.UIParent)
                    .ExecuteAsync();

                await Navigation.PushAsync(new LoginResultPage(result));
            }
            catch(MsalClientException)
            {

            }
        }
    }
}
The code does 2 things.
- First, during the
OnAppearingwe check if there are is an existing account in the MSAL cache and we attempt to acquire the id token silently. If this fails, we do nothing as we need the user to interact with the page via the Sign In button - We then wire up the
SignIn_Clickedevent to interactively authenticate users.
In both cases, if the authentication is successful, we navigate users to the LoginResultPage where we want to display some basic information derived from the ID token claims.
The final piece of the puzzle is the LoginResultPage. Let's create this one so that we can display some information from the ID token. In a normal application, this wouldn't be part of the flow. Typically, we retrieve the user information and we then let users continue with rest of the app. However, since this sample is focused only on authentication, the flow is somewhat limited.
Open the LoginResultPage.xaml and add the following XAML to display the information we need and provide a Sign Out button:
<ContentPage.Content>
    <StackLayout Margin="0,30,30,0" HorizontalOptions="Center" VerticalOptions="Center">
        <Label x:Name="welcome"/>
        <Label x:Name="issuer"/>
        <Label x:Name="subject"/>
        <Label x:Name="audience"/>
        <Label x:Name="email"/>

        <StackLayout Margin="40,30,40,0" HorizontalOptions="Center" VerticalOptions="Center">
            <Button x:Name="SignOutBtn" Text="Sign out" Clicked="SignOutBtn_Clicked"/>
        </StackLayout>
    </StackLayout>
</ContentPage.Content>
In the code behind, add the following code to crack open the ID token and also implement the sign out functionality:
using System.IdentityModel.Tokens.Jwt;
using System.Linq;
using Microsoft.Identity.Client;
using Xamarin.Forms;

namespace XamarinDemoWithB2C
{
    public partial class LoginResultPage : ContentPage
    {
        private AuthenticationResult authenticationResult;

        public LoginResultPage(AuthenticationResult authResult)
        {
            authenticationResult = authResult;
            InitializeComponent();
        }

        protected override void OnAppearing()
        {
            GetClaims();
            base.OnAppearing();
        }
        private void GetClaims()
        {
            var token = authenticationResult.IdToken;
            if (token != null)
            {
                var handler = new JwtSecurityTokenHandler();
                var data = handler.ReadJwtToken(authenticationResult.IdToken);
                var claims = data.Claims.ToList();
                if (data != null)
                {
                    this.welcome.Text = $"Welcome {data.Claims.FirstOrDefault(x => x.Type.Equals("name")).Value}";
                    this.issuer.Text = $"Issuer: { data.Claims.FirstOrDefault(x => x.Type.Equals("iss")).Value}";
                    this.subject.Text = $"Subject: {data.Claims.FirstOrDefault(x => x.Type.Equals("sub")).Value}";
                    this.audience.Text = $"Audience: {data.Claims.FirstOrDefault(x => x.Type.Equals("aud")).Value}";
                    this.email.Text = $"Email: {data.Claims.FirstOrDefault(x => x.Type.Equals("emails")).Value}";
                }
            }
        }

        async void SignOutBtn_Clicked(System.Object sender, System.EventArgs e)
        {
            await App.AuthenticationClient.RemoveAsync(authenticationResult.Account);
            await Navigation.PushAsync(new LoginPage());
        }
    }
}
To be able to work with JWT we need to add an extra NuGet package. Open the NuGet package manager, search and add the `System.IdentityModels.Token.Jwt package.
iOS specific configuration
There are a couple of extra configurations that we need to in order for the application to work. In the iOS project, open the AppDelegate.cs class and add the following code
public override bool OpenUrl(UIApplication app, NSUrl url, NSDictionary options)

{

 AuthenticationContinuationHelper.SetAuthenticationContinuationEventArgs(url);

    return base.OpenUrl(app, url, options);

}
Android specific configuration
For Android to work, there is some more work we need to do. First, open the AndroidManifest.xml and update it to look like this
<?xml version="1.0" encoding="utf-8"?>

<manifest xmlns:android="http://schemas.android.com/apk/res/android" android:versionCode="1" android:versionName="1.0" package="com.companyname.xamarindemowithb2c">

    <uses-sdk android:minSdkVersion="21" android:targetSdkVersion="28" />

    <application android:label="XamarinDemoWithB2C.Android" android:theme="@style/MainTheme">

        <activity android:name="microsoft.identity.client.BrowserTabActivity">

            <intent-filter>

         <action android:name="android.intent.action.VIEW" />

         <category android:name="android.intent.category.DEFAULT" />

         <category android:name="android.intent.category.BROWSABLE" />

                <!-- example -->

                <!-- <data android:scheme="msalaaaaaaaa-bbbb-cccc-dddd-eeeeeeeeeeee" android:host="auth" /> -->

         <data android:scheme="msal<YourClientId>" android:host="auth" />

        </intent-filter>

        </activity>"

    </application>

    <uses-permission android:name="android.permission.ACCESS_NETWORK_STATE" />

</manifest>
Finally, we need to update the MainActivity.cs to make it look like this:
`
using System;
using Android.App;
using Android.Content.PM;
using Android.Runtime;
using Android.Views;
using Android.Widget;
using Android.OS;
using Microsoft.Identity.Client;
using Android.Content;
namespace XamarinDemoWithB2C.Droid
{
[Activity(Label = "XamarinDemoWithB2C", Icon = "@mipmap/icon", Theme = "@style/MainTheme", MainLauncher = true, ConfigurationChanges = ConfigChanges.ScreenSize | ConfigChanges.Orientation | ConfigChanges.UiMode | ConfigChanges.ScreenLayout | ConfigChanges.SmallestScreenSize)]
public class MainActivity : global::Xamarin.Forms.Platform.Android.FormsAppCompatActivity
{
protected override void OnCreate(Bundle savedInstanceState)
{
TabLayoutResource = Resource.Layout.Tabbar;
ToolbarResource = Resource.Layout.Toolbar;
        base.OnCreate(savedInstanceState);

        Xamarin.Essentials.Platform.Init(this, savedInstanceState);
        global::Xamarin.Forms.Forms.Init(this, savedInstanceState);
        LoadApplication(new App());
        App.UIParent = this;
    }

    public override void OnRequestPermissionsResult(int requestCode, string[] permissions, [GeneratedEnum] Android.Content.PM.Permission[] grantResults)
    {
        Xamarin.Essentials.Platform.OnRequestPermissionsResult(requestCode, permissions, grantResults);

        base.OnRequestPermissionsResult(requestCode, permissions, grantResults);
    }

    protected override void OnActivityResult(int requestCode, Result resultCode, Intent data)
    {
        base.OnActivityResult(requestCode, resultCode, data);
        AuthenticationContinuationHelper.SetAuthenticationContinuationEventArgs(requestCode, resultCode, data);
    }
}
}
`
Notably, we added a new method OnActivityResult() to handle the authentication redirect and on the OnCreate we added this line of code App.UIParent = this; as we need to ensure that this property gets populated when we do our authentication.
Putting it all together
We can now build and run the project using the local emulator or a phone. If everything has been wired correctly you should be able to navigate to the app and authenticate as per the example below:

If you just want to clone the app and run it on your end, check out the GitHub repo
Come code with us
We love streaming and we usually stream live twice a week on Twitch! But what we love more is to collaborate with developers and tackle real world scenarios. As such, if you're interested to code with us, if have questions/challenges that you want us to help you with or simply a suggestion on what to stream, then we would love for you to reach out. Join us live on the 425Show, follow and bookmark us:
7am - 10am PT / 2pm - 5pm UTC
7am - 9am PT / 2pm - 4pm UTC [Community Hours]
Be sure to send your questions to us here, on Twitter (Christos, JP) or email: iddevsoc@service.microsoft.com!

Top comments (0)