
This tutorial series is now also available as an online video course. You can watch the first hour on YouTube or get the complete course on Udemy. Or you just keep on reading. Enjoy! :)
Role-Based Authentication in .NET Core 3.1
Introduction
You have asked for it, so here it is: Role-based authentication.
In this chapter, you will learn how to add a role to a User, read that role, and use it to change the behavior of a service and extend the [Authorize] attribute.
To be more specific, we will change the behavior of the GetAllCharacters() method.
Currently, users can only see the characters they have created, but if a user has got the Admin role, this user will be able to see all the characters of every user.
To realize that, we first add a new property to the User class, run another migration, add a new Claim to the JSON web token, and then read that new Claim to decide what the user is allowed to see.
Let’s start.
New User Property: Role & A New Migration
First of all the User gets a new property called Role which is a string.
Additionally, we add an attribute to that property, and this attribute is called [Required].
To make this work, we need the System.ComponentModel.DataAnnotations using directive.
public class User
{
    public int Id { get; set; }
    public string Username { get; set; }
    public byte[] PasswordHash { get; set; }
    public byte[] PasswordSalt { get; set; }
    public List<Character> Characters { get; set; }
    [Required]
    public string Role { get; set; }
}
With the [Required] attribute, we tell Entity Framework that this property is not nullable. So we have to set a value for a role. Since this property is a string, the default value is simply an empty string.
Let’s change that and set the default value to “Player”. We do that in the DataContext class in the OnModelCreating() method.
For the User entity, we set the default value of the property Role with the method HasDefaultValue().
protected override void OnModelCreating(ModelBuilder modelBuilder)
{
    modelBuilder.Entity<CharacterSkill>()
        .HasKey(cs => new { cs.CharacterId, cs.SkillId });

    modelBuilder.Entity<User>()
        .Property(user => user.Role).HasDefaultValue("Player");
}
Now, when we run another migration, all the users that already exist get the “Player” role and every new user will get this role as well.
Let’s add another migration with dotnet ef migrations add Role.
As you can see in the Up() method of this new migration, a new column is added which is not nullable and with the default value “Player”. Great.
protected override void Up(MigrationBuilder migrationBuilder)
{
    migrationBuilder.AddColumn<string>(
        name: "Role",
        table: "Users",
        nullable: false,
        defaultValue: "Player");
}
Let’s update the database with dotnet ef database update.
When this is done, we can see the new column and the “Player” role for every user in the database.
And when we register a new user with Postman, even the new user gets this role.

Perfect. This works so far. Now we have to add this role to the user’s token.
Extend the JSON Web Token with another Claim
Adding this role to the user’s token is actually quite simple. It’s just a new Claim we have to add.
So in the AuthRepository in the CreateToken() method, we add a new Claim to the claims list.
The type is ClaimTypes.Role and the value is the new Role property of the user object.
private string CreateToken(User user)
{
    List<Claim> claims = new List<Claim>
    {
        new Claim(ClaimTypes.NameIdentifier, user.Id.ToString()),
        new Claim(ClaimTypes.Name, user.Username),
        new Claim(ClaimTypes.Role, user.Role)
    };
// ...
That’s it.
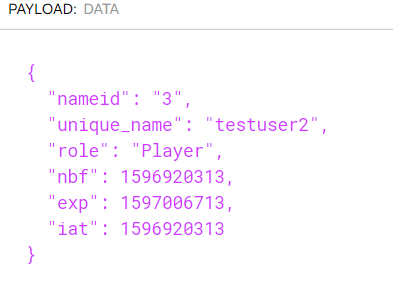
But let’s see if this really worked.
We log a user in, copy the resulting token, and then use the debugger of jwt.io in the browser.
We can paste the token, and indeed we see the new claim. The role of the user is “Player”.
Nice. Let’s finish this new feature now, by changing the behavior of a service and restricting access to a specific role.
Restrict Controller Access & Change Service Behavior
The goal is to change the behavior of the GetAllCharacters() method in the CharacterService.
Before we do that, I want to show you how you can control access to a method or a whole class.
In the CharacterController, we’re already using the [Authorize] attribute. So, only authenticated users can access this controller.
To restrict access even further, we can simply add “Roles” to that attribute, for instance, the “Player” role.
[Authorize(Roles = "Player")]
[ApiController]
[Route("[controller]")]
public class CharacterController : ControllerBase
{
  // ...
Now, this wouldn’t change anything for our authenticated testuser, so let’s give this user the role “Admin” in the database manually.

We have to log in the user again with Postman to get the new token and then we use this token to get all of the user’s characters.
But as you can see, this is not possible. We get a 403 Forbidden.
So let’s add the role “Admin” now to the [Authorize] attribute. We can do that by simply adding a comma and the second role.
[Authorize(Roles = "Player,Admin")]
When we now want to see the user’s characters, it does work.
But let’s really make use of an “Administrator” role.
Simple “Players” can only see the characters they have created. An admin should see all the characters.
So let’s move to the CharacterService and add a little method called GetUserRole() similar to the method GetUserId().
Only this time the return type is a string and we want the value of the claim type Role.
private string GetUserRole() => _httpContextAccessor.HttpContext.User.FindFirstValue(ClaimTypes.Role);
Alright. And now in the GetAllCharacters() method we check if the user role is equal to “Admin” and if so, we return all characters, and if not, we use the old line where we filter the characters by the User.Id.
List<Character> dbCharacters =
    GetUserRole().Equals("Admin") ?
    await _context.Characters.ToListAsync() :
    await _context.Characters.Where(c => c.User.Id == GetUserId()).ToListAsync();
When we test that again with Postman, we even get the characters of the other users. Exactly what we want.
So, this works fine, and that’s how you add role-based authentication.
As always, you can get the source code in the corresponding GitHub repository and if you have any further feature requests or questions, don’t hesitate to contact me.
See you next time!
Image created by cornecoba on freepik.com.
But wait, there’s more!
- Let’s connect on Twitter, YouTube, LinkedIn or here on dev.to.
- Get the 5 Software Developer’s Career Hacks for free.
- Enjoy more valuable articles for your developer life and career on patrickgod.com.

Latest comments (4)
This post was amazing and helped me a lot.
I have no words to express my gratitude.
Love the tutorials. I'm picking up some nice ways to handle things and make my code cleaner!
This is slightly tricky. This is no longer authentication but rather authorization.
I'd argue it's a good idea to put any authorization details into JWT especially in cases where you have a dedicated identity service which provides identity to different services and each service could interpret role differently. Have done it - burned-out.
Anyway, that's a good introduction!
Thank you very much! :)