Introduction
To access service bus entities (queues, topics, subscriptions, and filters) there are two ways to authenticate: one is using the Shared Access Signatures (SAS) and the other is using Azure Active Directory (Azure AD).
This post is going to talk about using Azure Active Directory (Azure AD) to authenticate and authorize Azure Service Bus. Specifically, with the AD, we would be leveraging a service principal to send and receive messages from the service bus topic.
Prerequisites
- Visual Studio 2022
- An Azure Subscription
- A Service bus with one topic and subscription
Why do we need to use AD Authentication rather than SAS token?
A key advantage of using Azure AD with Service Bus is that your credentials no longer need to be stored in your code. Instead, you can request an OAuth 2.0 access token from the Microsoft identity platform. Azure AD authenticates the security principal (a user, a group, or a service principal) running the application. If authentication succeeds, Azure AD returns the access token to the application, and the application can then use the access token to authorize requests to Azure Service Bus.
Before we move ahead, it is important to understand that using a service principal is different than using a managed identity. A service principal in Azure Active Directory (AD) is a form of security identity. Admins assign an Azure service principal to an object, such as an automated tool, application, or VM. Then, they use role-based access controls to manage that object's access to Azure resources, rather than use security credentials within scripts.
A common challenge for developers is the management of secrets, credentials, certificates, and keys used to secure communication between services. AD Authentication eliminates the need for developers to manage these credentials.
While developers can securely store the secrets in Azure Key Vault, services need a way to access Azure Key Vault. With the service principal, you can use RBAC to access the azure resources without the need to store connection strings or SAS tokens. Please note that the service principal is different than the managed identities.
Azure service principals vs. Managed identities
Service principals are just one form of security identity in Azure -- another is managed identities. They provide an identity to applications that access Azure resources. Both service principles and managed identities enable fine-grained, programmatic access to Azure infrastructure without having to put passwords into scripts.
Managed identities can be system-assigned or user-assigned. With system-assigned managed identities, admins create the identity as a part of a specific Azure resource, such as a VM. That identity shares a lifecycle with its associated resource. Meaning, when admins delete the resource, they also delete the identity. User-assigned identities, on the other hand, are not tied to a specific resource. They have their own lifecycle and can be shared across resources.
The key difference between Azure service principals and managed identities is that, with the latter, admins do not have to manage credentials, including passwords.
Create a service principal in the Azure portal
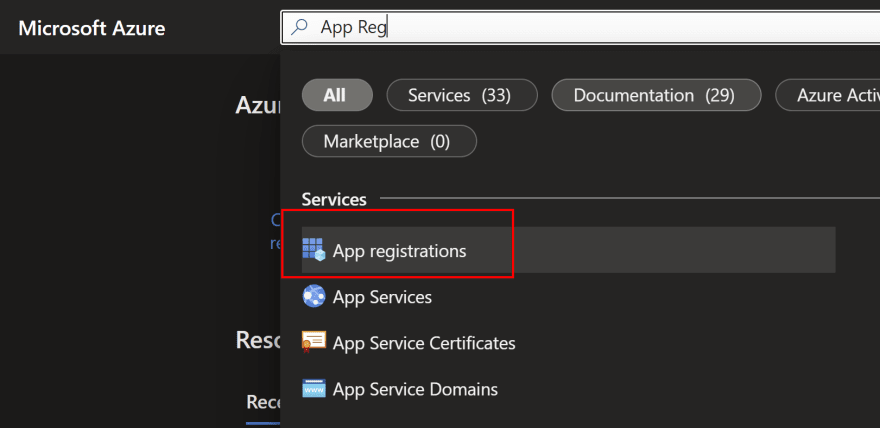
To create a service principal, search for 'App registrations' in the azure portal and click on the icon as shown in the image below
- Click on '+ new Registration' and fill out the details on the new registration page

Once the registration is done, you will be navigated to the overview page. Note down the 'Application id' and the 'Tenant id' as highlighted below. This will be used to authenticate the service bus client.

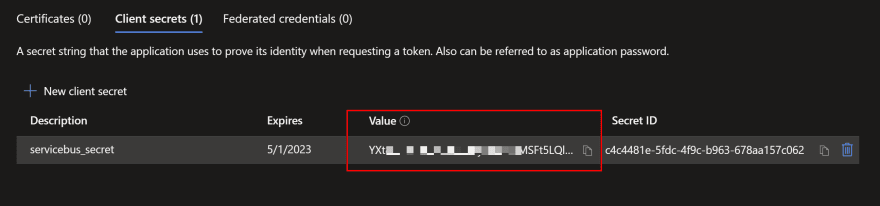
Along with the application ID and tenant ID, we would also need the client secret, which can be created from the 'Certificates & secrets' options in the Manage panel on the left side.

Once the secret is created, please do not forget to copy the value and store it securely somewhere. This value is displayed only once.
Granting IAM role to service bus to the service principal
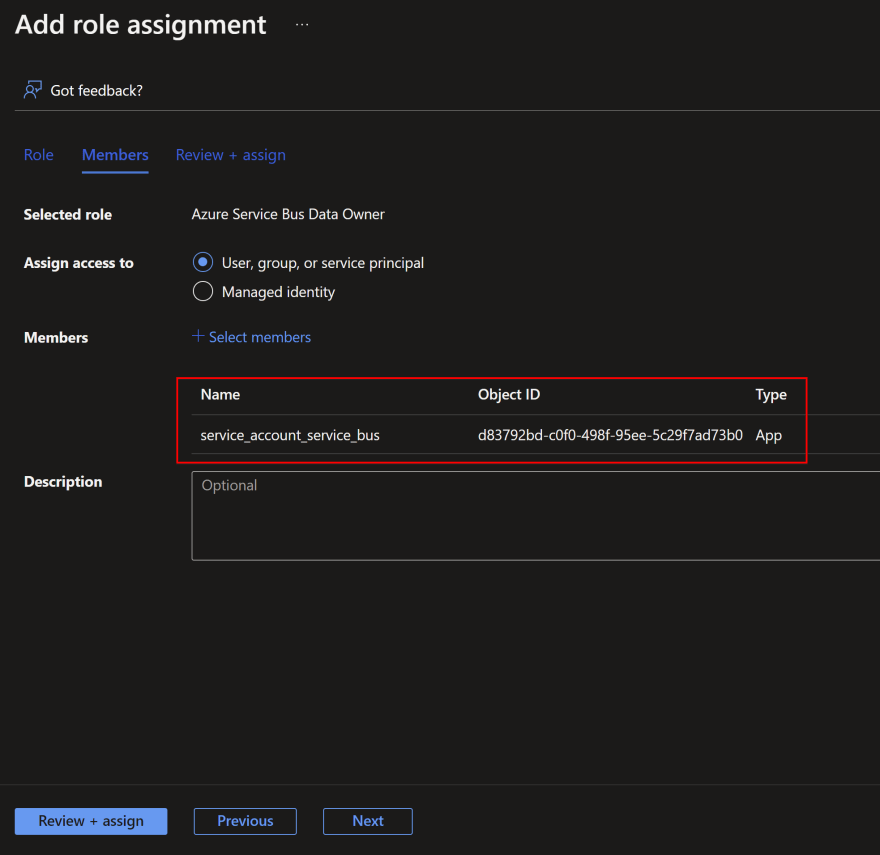
Navigate to the service bus and click on 'Access Control (IAM)' then click on 'Add role assignment'

Next, select the appropriate role you want to assign to your service account. Here, I am selecting the 'Azure Service Bus Data Owner' role.

Next, select the service principal name and Click on 'Review and Assign'.
At this stage, you are done with having a service principal with an owner role on the service bus to send and receive messages from the queues or the topics. You can now use this service principal with the .NET SDK to acquire an access token to the service bus to do the necessary job as per the role assigned.
Now let's go ahead and create a simple console app to send messages to the service bus topic which would be authenticated with the service principal.
Create a .NET console app to send messages to service bus topic
I am going to create a .NET console application to send the message to the service bus topic.

After you create the application, install the nuget package with the command below.
Select Tools > NuGet Package Manager > Package Manager Console from the menu and run the following command.
Install-Package Azure.Messaging.ServiceBus
In the Program.cs, replace the code with the below. Please remember to replace the TenantId, ApplicationID, and Client Secret with the values you have saved previously.
using Azure.Messaging.ServiceBus;
using Azure.Identity;
using Azure.Core;

// the client that owns the connection and can be used to create senders and receivers
ServiceBusClient client;

// the sender used to publish messages to the topic
ServiceBusSender sender;

var clientOptions = new ServiceBusClientOptions
{
    TransportType = ServiceBusTransportType.AmqpWebSockets
};

TokenCredential credential = new ClientSecretCredential(
   tenantId: "f6d3*******12a",
   clientId: "1aa*******9185f",
   clientSecret: "k3p8***********0dzcs~");

client = new ServiceBusClient("servicebusimriel.servicebus.windows.net", credential);

sender = client.CreateSender("first-topic");

for (int i = 0; i < 100; i++)
{
    Thread.Sleep(1000);
    await sender.SendMessageAsync(new ServiceBusMessage($"Message {i}"));
    Console.WriteLine($"message {i} has been published to the topic.");
}

Console.WriteLine("Press any key to end the application");
Console.ReadKey();
Start the application. You will see that it starts publishing messages to the service bus topic successfully.

BINGO!
No need to store the connection strings and SAS tokens in your application code while you can use identity authentication to serve the purpose. We achieved this with the help of the service principal. In the next article, we will see how we can use managed identities to authenticate to various Azure services. With the managed identities, you will no longer need to store the client ID and Secret like you did with a service account.
That's even better, right!!
I hope you have enjoyed this article. Your valuable feedback, questions, or comments about this article are always welcome.

Top comments (0)