Quarkus helps you get started with both messaging and WebSockets really quickly. But what happens when you want to marry the two technologies together?
Before we start though the source code used in this articel can be found here:
https://github.com/cloudy-engineering/quarkus-chat-api
https://github.com/cloudy-engineering/angular-chat-ui
Getting started with Quarkus WebSockets is as simple as this:
$ mvn io.quarkus:quarkus-maven-plugin:1.7.0.Final:create \
    -DprojectGroupId=org.acme \
    -DprojectArtifactId=websockets-quickstart \
    -Dextensions="undertow-websockets"
$ cd websockets-quickstart
This will create your typical maven based source code structure with the following highlights:
-
quarkus-undertow-websocketsdependency added -
quarkus-resteasydependency add by default
Getting your first integration up and running is actually quite easy.
- Create a new class representing the WebSocket Endpoint
- Implement the standard WebSocket lifecycle methods (
onOpen,onError,onMessage,onClose) - Create a UI to integrate with your WebSocket endpoint
Implementing the Functionality
Rather than implementing an interface or extending a base class, Quarkus WebSockets uses annotations to implement the lifecycle:
@ServerEndpoint("/chat/{username}")
public class SocketEndpoint {

    private final Logger log = LoggerFactory.getLogger(SocketEndpoint.class);

    @OnOpen
    public void onOpen(Session session, @PathParam("username") String username) {
        log.debug("{} has just connected", username);
    }

    @OnError
    public void onError(Session session, @PathParam("username") String username, Throwable throwable) {
        log.error("{} encountered an error", username);
    }

    @OnMessage
    public void onMessage(String message, @PathParam("username") String username) {
        log.debug("{} has just sent us a message: {}", username, message);
    }

    @OnClose
    public void onClose(Session session, @PathParam("username") String username) {
        log.debug("{} has now disconnected", username);
    }
}
The thing to remember with the server-side component is the Session. This is the way you communicate with the end user. For the sake of this article we are going to use the AsyncRemote and send an object back to the user.
@ServerEndpoint("/chat/{username}")
@ApplicationScoped
public class SocketEndpoint {

    @OnOpen
    public void onOpen(Session session, @PathParam("username") String username) {
        log.debug("{} has just connected", username);
        session.getAsyncRemote().sendText(String.format("Welcome to the show %s", username));
    }

...
}
When you connect via the front end, the onOpen method will be instantiated. Here you can set up the user's interaction and send back a message confirming any actions. Here we will just send back a reply.
Logging and a CORS
Before we continue we are going to configure logging to ensure we can see our debug messages.
In the src/main/resources/application.properties file add the following entries:
quarkus.log.category."com.brightfield.streams".level=ALL
We should also enable CORS so we will also need:
quarkus.http.cors.enabled=true
quarkus.http.cors.origins=http://localhost:4200
quarkus.http.cors.methods=get,post,put,head,options
And since I have so many apps running on port 8080 I’m going to change the port to 8011:
quarkus.http.port=8011
Let's create a unit test to test this out:
ServerEndpointTest.java
package com.brightfield.streams;

import io.quarkus.test.common.http.TestHTTPResource;
import io.quarkus.test.junit.QuarkusTest;
import org.junit.jupiter.api.Assertions;
import org.junit.jupiter.api.Test;
import org.slf4j.Logger;
import org.slf4j.LoggerFactory;

import javax.websocket.*;
import java.net.URI;
import java.util.concurrent.LinkedBlockingDeque;
import java.util.concurrent.TimeUnit;

@QuarkusTest
public class SocketEndpointTest {

    private static final LinkedBlockingDeque<String> MESSAGES = new LinkedBlockingDeque<>();

    @TestHTTPResource("/chat/testuser")
    URI uri;

    @Test
    public void testWebSocketChat() throws Exception {
        try (Session session = ContainerProvider.getWebSocketContainer().connectToServer(Client.class, uri)) {
            Assertions.assertEquals("Connecting to central control...", MESSAGES.poll(10, TimeUnit.SECONDS));
            Assertions.assertEquals("Welcome to the show testuser", MESSAGES.poll(10, TimeUnit.SECONDS));
        }
    }

    @ClientEndpoint
    public static class Client {
        private final Logger log = LoggerFactory.getLogger(Client.class);

        @OnOpen
        public void open(final Session session) {
            log.debug("Connecting to server");
            String toSend = "Connecting to central control...";
            session.getAsyncRemote().sendText(toSend);
        }

        @OnMessage
        void message(final String message) {
            log.debug("Incoming message: {}", message);
            MESSAGES.add(message);
        }
    }
}
So, what have we done here?
First we set up a queue to store messages that are going through the pipeline. When ever we send a message or receive it on the client side we want to queue up the messages to validate the order they arrive.
In this case the first message will be the message sent when the Client.class first connects: "Welcome to the show "
When the client connects we are going to send our first message: "Connection to central control...". This will be our second message in the sequence.
If you compile and run the code you should see our test passing with the debug much like this:
INFO  [io.und.web.jsr] (main) UT026004: Adding annotated client endpoint class com.brightfield.streams.SocketEndpointTest$Client
INFO  [io.und.web.jsr] (main) UT026003: Adding annotated server endpoint class com.brightfield.streams.SocketEndpoint for path /chat/{username}
INFO  [io.quarkus] (main) Quarkus 1.7.2.Final on JVM started in 1.791s. Listening on: http://0.0.0.0:8081
INFO  [io.quarkus] (main) Profile test activated.
INFO  [io.quarkus] (main) Installed features: [cdi, resteasy, servlet, undertow-websockets]
DEBUG [com.bri.str.SocketEndpointTest$Client] (main) Connecting to server
DEBUG [com.bri.str.SocketEndpoint] (vert.x-eventloop-thread-2) testuser has just connected
DEBUG [com.bri.str.SocketEndpoint] (vert.x-eventloop-thread-2) testuser has just sent us a message: Connecting to central control...
DEBUG [com.bri.str.SocketEndpointTest$Client] (nioEventLoopGroup-2-1) Incoming message: Welcome to the show testuser
If we consider the sequence of events:
- Client connects to the Server
- Server sends a welcome message: "Welcome to the show testuser"
- Client sends message to the server: "Connecting to central control..."
- Client receives message: "Welcome to the show testuser"
Our test tracks the server side interaction and the client side interaction.
Creating the UI
Let's look at creating a UI in Angular 10 to get a better picture.
Start by creating your Angular app:
$ ng new chat-ui
? Would you like to add Angular routing? Yes
? Which stylesheet format would you like to use? CSS
...
Installing packages...
✔ Packages installed successfully.
    Successfully initialized git.
Next we want to make sure we have Reactive Forms lodes in the app.module.ts:
@NgModule({
...
  imports: [
    BrowserModule,
    AppRoutingModule,
    BrowserAnimationsModule,
    ReactiveFormsModule,
  ],

});
We want to create 2 classes:
- Service that manages the WebSocket state
- Component that displays our interactions
$ ng g s _services/socket
CREATE src/app/_services/socket.service.spec.ts (357 bytes)
CREATE src/app/_services/socket.service.ts (135 bytes)
$ ng g c chat
CREATE src/app/chat/chat.component.css (0 bytes)
CREATE src/app/chat/chat.component.html (19 bytes)
CREATE src/app/chat/chat.component.spec.ts (612 bytes)
CREATE src/app/chat/chat.component.ts (267 bytes)
UPDATE src/app/app.module.ts (388 bytes)
For the sake of best practices, let's first configure an environment variable for the Quarkus application endpoint:
src/environments/environment.ts
export const environment = {
  production: false,
  socket_endpoint: 'ws://localhost:8011'
};
Implementing our service
To connect and interact with the server-side components we are going to utilise some built-in rxjs classes:
import { webSocket, WebSocketSubject } from 'rxjs/webSocket';
RXJS and WebSockets
RXJS makes it just as easy to connect to a ServerEndpoint as it is to implement.
The WebSocketSubject represents the state of the communication between the client and server. Just like a BehaviorSubject we are going to push messages and subscribe to the response over the WebSocketSubject.
The webSocket class represents our factory to create WebSocketSubject connection to the server. We will pass in the URL to our service and it will return the WebSocketSubject for us to push and subscribe to.
There are 3 parts of the lifecycle we need to implement:
- Connect (onOpen)
- Close/Destroy (onClose)
- Send (onMessage)
chat.service.ts
import { Injectable } from '@angular/core';
import { webSocket, WebSocketSubject } from 'rxjs/webSocket';
import { Observable } from 'rxjs';
import { environment as env } from '../../environments/environment';

@Injectable({
  providedIn: 'root'
})
export class SocketService {

  connection$: WebSocketSubject<any>;

  constructor() { }

  connect(): Observable<any> {
    this.connection$ = webSocket({
      url: `${env.socket_endpoint}/chat/angularuser`,
      deserializer: ({data}) => data,
      serializer: ({data}) => data,
    });
    return this.connection$;
  }
...
}
When creating a WebSocket connection with RXJS, the default serialization/deserialization is JSON.parse. Since we are using plain test on our server side component, we will override the serde without parsing the data.
Later we will see how we call the connect() method and make the initial connection that we can send and receive messages over.
In order to send a message, we need to queue up the message much like any Observable you may have had experience with:
import { Injectable } from '@angular/core';
import { webSocket, WebSocketSubject } from 'rxjs/webSocket';
import { Observable } from 'rxjs';
import { environment as env } from '../../environments/environment';

@Injectable({
  providedIn: 'root'
})
export class SocketService {

  connection$: WebSocketSubject<any>;

  constructor() { }

  connect(): Observable<any> {
    this.connection$ = webSocket(`${env.socket_endpoint}/angularuser`);
    return this.connection$;
  }

  send(data: any): void {
    if (this.connection$) {
      this.connection$.next(data);
    } else {
      console.log('Did not send data, unable to open connection');
    }
  }

}
While our connection$ pipe is open, we use the next() method to send our object to the server. If we have lost connectivity we will, for now, just log a message.
One last thing, if we ever disconnect from the server, we want to ensure we close the connection and trigger the backend event @OnClose, so let's implement a closeConnection() method and call it in an onDestroy() event:
chat.service.ts
import { Injectable } from '@angular/core';
import { webSocket, WebSocketSubject } from 'rxjs/webSocket';
import { Observable } from 'rxjs';
import { environment as env } from '../../environments/environment';

@Injectable({
  providedIn: 'root'
})
export class SocketService {

  connection$: WebSocketSubject<any>;

  constructor() { }

  connect(): Observable<any> {
    this.connection$ = webSocket(`${env.socket_endpoint}/angularuser`);
    return this.connection$;
  }

  send(data: any): void {
    if (this.connection$) {
      this.connection$.next(data);
    } else {
      console.log('Did not send data, unable to open connection');
    }
  }

  closeConnection(): void {
    if (this.connection$) {
      this.connection$.complete();
      this.connection$= null;
    }
  }

  ngOnDestroy() {
    this.closeConnection();
  }

}
Creating our Angular Component
As you can see we have a very straight forward implementation that uses standard Observable patterns. In order to use this service you need to create a component that will initiate the connection and send the data over the websocket connection:
import { Component, OnInit } from '@angular/core';
import { SocketService } from '../_services/socket.service';
import { Subject } from 'rxjs';
import { takeUntil } from 'rxjs/operators';
import { FormControl } from '@angular/forms';

@Component({
  selector: 'app-chat',
  templateUrl: './chat.component.html',
  styleUrls: ['./chat.component.css']
})
export class ChatComponent implements OnInit {

  messages: string[] = [];
  msgControl = new FormControl('');
  destroyed$ = new Subject();

  constructor(private chatService: SocketService) { }

  ngOnInit(): void {
    const chatSub$ = this.chatService.connect().pipe(
      takeUntil(this.destroyed$),
    );

    chatSub$.subscribe(message => this.messages.push(message));
  }

  sendMessage(): void {
    this.chatService.send(this.msgControl.value);
    this.msgControl.setValue('');
  }

  ngOnDestroy(): void {
    this.destroyed$.next();
  }

}
chat.component.html
<ul>
  <li *ngFor="let message of messages">{{ message }}</li>
</ul>
<input placeholder="Send a message..." [formControl]="msgControl">
<button (click)="sendMessage()">Send</button>
Let's also quickly add a route for our new component:
app-routing.module.ts
import { NgModule } from '@angular/core';
import { Routes, RouterModule } from '@angular/router';
import { ChatComponent } from './chat/chat.component';

const routes: Routes = [
  { path: 'chat', component: ChatComponent }
];

@NgModule({
  imports: [RouterModule.forRoot(routes)],
  exports: [RouterModule]
})
export class AppRoutingModule { }
As you can see in our component we are going to call the methods of the SocketService and run the lifecycle of the websocket connection. The user interface is a simple form control that has a list of messages that come back.
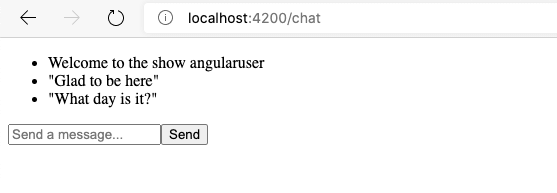
Start up the service and the angular user interface and you should be able to access the configured route at http://localhost:4200/chat

When you access the page you should see our initial message "Welcome to the show angularuser" and an input box.
If we check out the logs we should see the initial connection being made:
__  ____  __  _____   ___  __ ____  ______
 --/ __ \/ / / / _ | / _ \/ //_/ / / / __/
 -/ /_/ / /_/ / __ |/ , _/ ,< / /_/ /\ \
--\___\_\____/_/ |_/_/|_/_/|_|\____/___/
WARN  [io.qua.kub.dep.KubernetesProcessor] (build-15) No registry was set for the container image, so 'ImagePullPolicy' is being force-set to 'IfNotPresent'.
INFO  [io.und.web.jsr] (Quarkus Main Thread) UT026003: Adding annotated server endpoint class com.brightfield.streams.SocketEndpoint for path /chat/{username}
INFO  [io.quarkus] (Quarkus Main Thread) chat-service 1.0-SNAPSHOT on JVM (powered by Quarkus 1.7.2.Final) started in 3.055s. Listening on: http://0.0.0.0:8011
INFO  [io.quarkus] (Quarkus Main Thread) Profile dev activated. Live Coding activated.
INFO  [io.quarkus] (Quarkus Main Thread) Installed features: [cdi, kubernetes, resteasy, servlet, undertow-websockets]
DEBUG [com.bri.str.SocketEndpoint] (vert.x-eventloop-thread-18) angularuser has just connected
If you enter a message and hit Send, you should see the message being logged server-side:
__  ____  __  _____   ___  __ ____  ______
 --/ __ \/ / / / _ | / _ \/ //_/ / / / __/
 -/ /_/ / /_/ / __ |/ , _/ ,< / /_/ /\ \
--\___\_\____/_/ |_/_/|_/_/|_|\____/___/
WARN  [io.qua.kub.dep.KubernetesProcessor] (build-15) No registry was set for the container image, so 'ImagePullPolicy' is being force-set to 'IfNotPresent'.
INFO  [io.und.web.jsr] (Quarkus Main Thread) UT026003: Adding annotated server endpoint class com.brightfield.streams.SocketEndpoint for path /chat/{username}
INFO  [io.quarkus] (Quarkus Main Thread) chat-service 1.0-SNAPSHOT on JVM (powered by Quarkus 1.7.2.Final) started in 3.055s. Listening on: http://0.0.0.0:8011
INFO  [io.quarkus] (Quarkus Main Thread) Profile dev activated. Live Coding activated.
INFO  [io.quarkus] (Quarkus Main Thread) Installed features: [cdi, kubernetes, resteasy, servlet, undertow-websockets]
DEBUG [com.bri.str.SocketEndpoint] (vert.x-eventloop-thread-18) angularuser has just connected
DEBUG [com.bri.str.SocketEndpoint] (vert.x-eventloop-thread-18) angularuser has just sent us a message: "Good morning"
DEBUG [com.bri.str.SocketEndpoint] (vert.x-eventloop-thread-8) angularuser has just connected
So far so good, but we want this to be more interactive. For the sake of this article, let's just echo back what the user sends:
@ServerEndpoint("/chat/{username}")
public class SocketEndpoint {

    private final Logger log = LoggerFactory.getLogger(SocketEndpoint.class);
    private Map<String, Session> socketSessions = new HashMap<>();

    @OnOpen
    public void onOpen(Session session, @PathParam("username") String username) {
        log.debug("{} has just connected", username);
        session.getAsyncRemote().sendText(String.format("Welcome to the show %s", username));
        socketSessions.put(username, session);
    }

    @OnError
    public void onError(Session session, @PathParam("username") String username, Throwable throwable) {
        log.error("{} encountered an error", username);
    }

    @OnMessage
    public void onMessage(String message, @PathParam("username") String username) {
        log.debug("{} has just sent us a message: {}", username, message);
        Session session = socketSessions.get(username);
        session.getAsyncRemote().sendText(message);
    }

    public void onClose(Session session, @PathParam("username") String username) {
        log.debug("{} has now disconnected", username);
    }
}
In the update to the code, when the user connects, we are going to keep a reference of the Session in a HashMap indexed on the username. When a message comes in, we will lookup the session and then send the message back.
DEBUG [com.bri.str.SocketEndpoint] (vert.x-eventloop-thread-12) angularuser has just connected
DEBUG [com.bri.str.SocketEndpoint] (vert.x-eventloop-thread-12) angularuser has just sent us a message: "Glad to be here"
DEBUG [com.bri.str.SocketEndpoint] (vert.x-eventloop-thread-12) angularuser has just sent us a message: "What day is it?"
In the next article I will demonstrate how to wire up Kafka to the WebSocket sessions and broadcast messages coming in from the Kafka queues.

Top comments (0)