
Composability is the general ability to reuse the components of a system to develop applications. For example Legos are the building blocks for many type of different structures that can be created.
In web3 world text based NFTs which are just list of words which are akin to Lego blocks that allow the community to build applications around these composable parts.
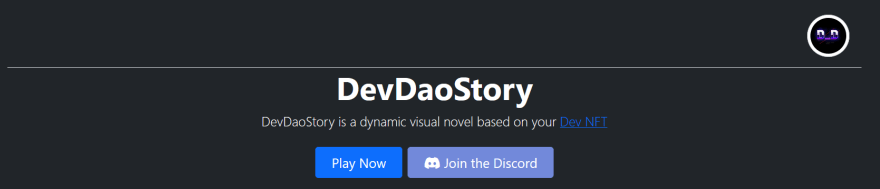
This post will walk through how I built DevDaoStory a dynamic visual novel based on the DevDao NFT your wallet holds. I will highlight how I built the following sections
- Front End using server side rendering
- Utilizing OpenSea API for Identity
- Generating a unique game with the Ren'py Engine
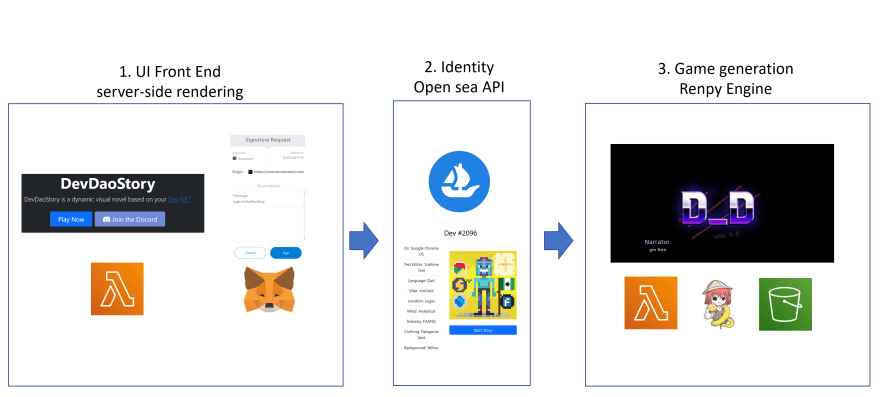
Front end
The user interface is a website built using HTML, Bootstrap, JavaScript, jinja2 and JQuery. I find it simplest to build using primitives instead of being locked into a framework like React for simple interfaces.
Since I'm leveraging jinja2 for server side rending, the application is hosted on AWS Lambda and API Gateway which provides one million events for free to use each month which provides a cost-effective way to host the application.
There are only two pages for this app, the home page and the select your Dev page. Here is a snippet of code for rendering Devs in the user's wallet.
{% for dev in devs %}
<div class="col-md-5 offset-md-1">

    <div class="card mb-3" style="max-width: 540px;">
        <h3 class="card-title mt-3 mx-auto dark-text">Dev #{{dev['id']}}</h3>
        <div class="row g-0">
            <div class="col-md-5">
                <div class="card-body">

                    <ul class="list-group list-group-flush">
                        <li class="list-group-item">Os: {{dev['os']}}</li>
                        <li class="list-group-item">Text Editor: {{dev['textEditor']}}</li>
                        <li class="list-group-item">Language: {{dev['language']}}</li>
                        <li class="list-group-item">Vibe: {{dev['vibe']}}</li>
                        <li class="list-group-item">Location: {{dev['location']}}</li>
                        <li class="list-group-item">Mind: {{dev['mind']}}</li>
                        <li class="list-group-item">Industry: {{dev['industry']}}</li>
                        <li class="list-group-item">Clothing: {{dev['clothing']}}</li>
                        <li class="list-group-item">Background: {{dev['background']}}</li>

                    </ul>
                </div>
            </div>
...
The next section will focus on how to build mechanisms to get identity details from a user.
Identity
In order to know what Devs, a user has connect to their wallet I utilized the ethers.js library to provide a way for users to sign a "Login" message with their MetaMask Wallet.
async function connectWallet() {

    if (window.ethereum) {
        try {
            const accounts = await window.ethereum.request({ method: 'eth_requestAccounts' });
            console.log("accounts")
            console.log(accounts)

            walletProvider = new ethers.providers.Web3Provider(window.ethereum)
            walletSigner = walletProvider.getSigner();
            const base_message = "Login to DevDaoStory"
            const signature = await walletSigner.signMessage(base_message)
            console.log(signature)

            login_info = {}
            login_info["address"] = accounts[0]
            login_info["signature"] = signature
            login_info["message"] = base_message

            var login_info_string = JSON.stringify(login_info)
This code provides users a way to allow the application to read their public key, so their Devs can be verified.

Once the User accepts a POST request is sent to the server to gather the details of the user
            $.ajax({
                type: "POST",
                url: "/web3_login",
                dataType: "json",
                data: login_info_string,
                contentType: "application/json",
                success: function(data) {
                    console.log("login finished")
                    console.log(data)
                    ...

                },
                error: function(xhr, textStatus, thrownError, data) {
                    alert("Error: " + thrownError);
                    $("body").css("opacity", "1");
                    $("#load_spinner").toggle();

                }
            })
The message can be verified leveraging the web3 python module.
from web3 import Web3
from eth_account.messages import encode_defunct


def verify_signature(address, signature, message, w3):
    """
    Purpose:
        Verify user signed the message
    Args:
        address - address of user
        signature - the signature from user
        message - message to check
    Returns:
        boolean - True if verify, false if not
    """
    encoded_message = encode_defunct(text=message)
    pub_key = w3.eth.account.recover_message(encoded_message, signature=signature)

    logging.info(pub_key)

    # make sure same case
    if w3.toChecksumAddress(pub_key.lower()) == w3.toChecksumAddress(address.lower()):
        return True
    else:
        return False


...

@application.route("/web3_login", methods=["POST"])
def web3_login():
    """
    Purpose:
        login
    Args:
        N/A
    Returns:
        login object
    """

    jsonResp = {}
    data = request.data

    try:
        login_info = json.loads(data.decode("utf-8"))

        logging.info(login_info)

        address = w3.toChecksumAddress(str(login_info["address"]).lower())
        message = str(login_info["message"])
        signature = str(login_info["signature"])
        valid = web3_utils.verify_signature(address, signature, message, w3)
...
For more information on setting up your python web3 environment check out the docs
OpenSea API
Once the message has been verified we can now use the OpenSea API to get the Devs for the user.
def get_opensea_assets(userAddress: str, contract: str):
    """
    Purpose:
        Get assets from opensea
    Args:s
        userAddress: user to get
        contract: contract to get
    Returns:
        json_obj - Opensea assets
    """

    API_KEY = os.environ["OPENSEA_API"]

    HEADERS = {"x-api-key": API_KEY, "Accept": "application/json"}

    url = "https://api.opensea.io/api/v1/assets"

    querystring = {
        "owner": userAddress,
        "order_direction": "desc",
        "offset": "0",
        "limit": "20",
        "asset_contract_address": contract,
    }

    json_obj = requests.get(url, params=querystring, headers=HEADERS).json()

    return json_obj["assets"]

assets = web3_utils.get_opensea_assets(address, DEVS_CONTRACT)
The API call will get all the information about the item, including the tokenid. By building upon the pixel-avatars project we can now get an image, and the data that defines your Dev, so it can be rendered on the front end.

The next section will focus on how the actual game was built, now that all the setup is complete.
Ren'py Game Generation
Ren'Py is an open-source visual novel engine used by thousands of creators from around the world. It provides a scripting language that allow users to build interactive stories with words, images, and sounds.
For Ren'py to work for DevDaoStory I created a custom docker image with a modified version of Ren'py to compile only the web version of the game. I also leverage AWS Lambda to provide an endpoint to run the docker image with the necessary data to generate the story.
Once the game is compiled, it is uploaded to an S3 bucket for users to play. Here is sample code highlight the process
def main():
"""
Purpose:
Main driver
Args:
N/A
Returns:
N/A
"""
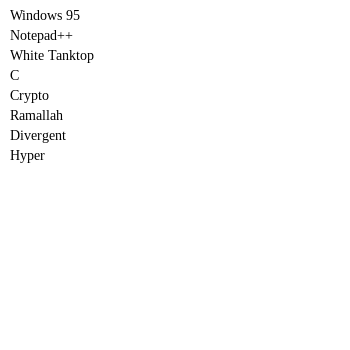
test_dev = {
"id": "2",
"os": "Windows 95",
"textEditor": "Emacs",
"clothing": "Pink Hoodie",
"language": "C",
"industry": "Traveling Consultant",
"location": "London",
"mind": "Concrete",
"vibe": "Optimist",
"background": "Blue",
}
wallet = "0x00000000000"
logging.info("Building Dynamic Game")
gen_game_script(test_dev, wallet)
build_renpy_game("/tmp/stories/devdaostory/")
upload_to_s3_bucket("dev2")
logging.info("Done and done")
Once the game is uploaded to s3, the UI renders an iframe with the game so users can begin the story with their Dev.

Conclusion
DevDaoStory was fun to build, and provides a use case for building an application for a community leveraging NFTs. The game is also playable without a Dev in your wallet to ensure other builders can be inspired by the story. You can play here: https://www.devdaostory.com/
If you want to make your own story, or update the existing one, you can checkout the github repo.
Follow Banjo on Twitter at @banjtheman and @developer_dao for more useful tips and tricks about building web3 applications.

Top comments (3)
Are you able to point me in the direction of documentation that will help with hosting Ren'Py games using AWS S3? I'm interested in using that for a project as well as learning more about iframes and wasm. Thank you for the interesting write up on your project!
I was able to leverage the renpyweb module to build a web distribution of the game.
From there you can simply upload all the files into an s3 bucket
And this code show how I used an iframe to embed the game on a website
Thank you so much! I'll update you on how it goes.