
Introduction
In this post, we will walk through how to configure HTTPS in a Spring Boot application using self-signed certificates to encrypt connections and add transport layer security.
What You'll Need
- Docker
- Domain Name
- AWS EC2 Instance
- Java
- Spring Boot
- Code Editor
- Terminal Access
What You Should Know
- Basic Docker commands like run, build, etc.
- How to create an A record in DNS.
- Spring Boot basics - creating a project, running with Gradle/Maven etc.
- Basic Linux commands like cd, ls, vim etc to navigate the terminal.
- How to launch an EC2 instance on AWS and connect via SSH.
Generate Certificates
Why do we need certificates?
Certificates allow secure HTTPS connections. They contain public keys that encrypt data sent between a server and clients. This protects the data from spying. Certificates also validate that you are connected to the right server.
What we need to generate certificates?
To generate certificates, you need:
- A Docker installed server like an AWS EC2 instance
- The server's IP address connected to a domain name using DNS
- An 'A record' added to DNS to map the domain to the server's IP
How to generate certificates?
- Connect to server using ssh.
- Create a Docker volume called certs
docker volume create certs. We need volume to store certificates. - Run this command below to get certificate and store it to volume certs.
docker run -d \
--name certbot \
-v certs:/etc/letsencrypt \
-v certs-data:/var/lib/letsencrypt \
-p 80:80 \
-p 443:443 \
certbot/certbot \
certonly --standalone --preferred-challenges http --email youremail@gmail.com -d yourdomain.com --agree-tos
Replace youremail@gmail.com and yourdomain.com with your real email and domain before running certbot!
The Docker container will exit after generating the certificate. Check the container logs to see where the certificate files were saved.
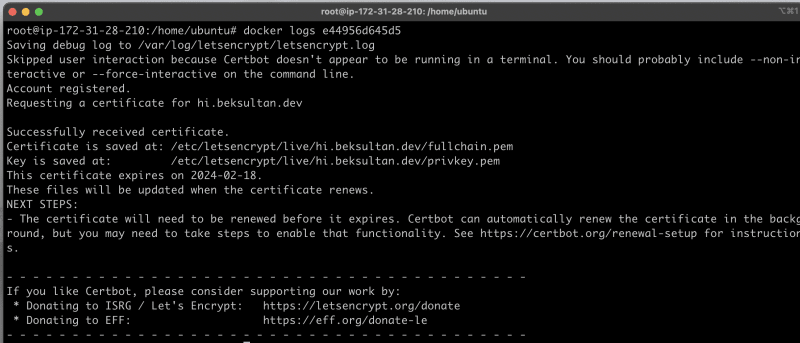
Perfect we generated certificates and stored to docker volume certs and when we run our Spring Boot App it'll take certificates from volume.
Configure Spring Boot for HTTPS
Create a Spring Boot App
- Generate Spring Boot app using this link start.spring.io
- Add simple @GetMapping to check is our app working.
@SpringBootApplication
@RestController
public class SpringBootHttpsApplication {

    public static void main(String[] args) {
        SpringApplication.run(SpringBootHttpsApplication.class, args);
    }

    @GetMapping("/hello")
    public String hello() {
        return "Hello World! 🚀";
    }
}
- Now go to application.properties and configure ssl.
server.ssl.enabled=true
server.ssl.certificate=${FULLCHAINPEM}
server.ssl.certificate-private-key=${PRIVKEYPEM}
If you're using .yml then use this configuration.
server:
  ssl:
    enabled: true
    certificate: ${FULLCHAINPEM}
    certificate-private-key: ${PRIVKEYPEM}
Containerizing Spring Boot App
To containerize your Spring Boot app, you need to create a Dockerfile. The Dockerfile tells Docker how to package your app.
I used Gradle as package manager and my Dockerfile looks like below.
FROM openjdk:20 as build
WORKDIR /app
COPY . ./
RUN microdnf install findutils
RUN ./gradlew build -x test

FROM openjdk:20-jdk-slim
WORKDIR /app
COPY --from=build /app/build/libs/spring-boot-https-0.0.1.jar .
CMD ["java", "-jar", "spring-boot-https-0.0.1.jar"]
Build Docker Image and Push to Dockerhub
To build Docker Image, you need to execute this command
docker build -t spring-boot-https:1 .
When building Docker images on macOS to run on Linux, there can be platform compatibility issues. The image needs to target linux/amd64 to work properly on Ubuntu.
To build a compatible image, use the Docker buildx command:
docker buildx build --platform linux/amd64 -t spring-boot-https:1 .
After building docker image push your image to your dockerhub using these commands
docker tag spring-boot-https:1 <Dockerhub Username>/spring-boot-https:1

docker push <Dockerhub Username>/spring-boot-https:1
We used Dockerhub for Demo. You can use other registry like AWS ECR etc.
After pushing image to Dockerhub we could use it on any server.
Run Spring Boot App on Server
To run the Dockerized Spring Boot app, we can use Docker Compose. This defines how to run the container with a yaml config file.
compose.yml
services:
  spring-boot-https:
    container_name: spring-boot-https
    image: beksultancs/spring-boot-https:1
    restart: unless-stopped
    ports:
      - "443:443"
    volumes:
      - certs:/certs
    environment:
      - SERVER_PORT=443
      - FULLCHAINPEM=/certs/live/hi.beksultan.dev/fullchain.pem
      - PRIVKEYPEM=/certs/live/hi.beksultan.dev/privkey.pem
volumes:
  certs:
    external: true
Now we need transfer compose.yml to server or we can create this file in server. If you wanted to create compose.yml locally and transfer to server you can use scp command.
scp -I <PrivateKey> compose.yml <Username>:<Host>:~/
Or you can create file on server using vim or nano and copy paste it.
Final step we should run our compose.yml using command
docker compose -f compose.yml up -d
That's all! Our app should run on our domain with https https://yourdomain/hello

If you don't want to use docker compose, then u just need to execute this command on server
docker run -d \
  --name spring-boot-https \
  -p 443:443 \
  -v certs:/certs \
  -e SERVER_PORT=443 \
  -e FULLCHAINPEM=/certs/live/hi.beksultan.dev/fullchain.pem \
  -e PRIVKEYPEM=/certs/live/hi.beksultan.dev/privkey.pem \
  beksultancs/spring-boot-https:1
And that's it! We have configured a Spring Boot application to use HTTPS with a self-signed certificate. The steps we covered were:
- Generating a self-signed certificate using Certbot
- Adding the certificate files to a Docker volume
- Configuring the Spring Boot application properties for SSL
- Containerizing the app with a Dockerfile
- Running the Docker image on a server using docker-compose
With these steps, your Spring Boot app can now serve content over HTTPS securely. The self-signed certificate allows encrypting connections without needing a certificate from a CA.
I hope this tutorial was helpful! Let me know in the comments if you have any other questions on configuring Spring Boot for HTTPS. I'm planning to write a follow up post on how to add HTTPS to a React app with Nginx as a reverse proxy. So stay tuned!

Top comments (0)