Objective: In this article, you will know Component,
Templates, Directives, Services, Dependency Injection
Pre-requisite Prior to completing this article, you should have already installed all pre-requisite tooling including: Visual Studio Code, Node Package Manager (NPM), Node, Angular CLI.
Component
- Create a component
- Register it in a module
- Add an element in an HTML markup
Step 1: After creating project, open the VS Code Editor Terminal and run ng serve
Step 2: Create a new Component courses.component.ts. This is the convention that be used angular building application. If the component have multiple word then separate them course-form.component.ts . Now creating a plain class
class CoursesComponent {

}
Once again look at naming convention. Here first letter of every word should be Capital and also by convention use the suffix Component in the name of class.
So far this is a plain class. Not a component. Now convert to component we need to add some metadata that angular understand. We use a decorator. Firstly we need a decorator on the top.
So Import -
import { Component } from @angular/core
This is the core library of the angular. Import the Component decorator. And need to apply.
Now look at the syntax.
@Component()
Like a function. This is called decorator function.
@Component({

})
Pass an object. Have one or more properties tell angular how angular works. Ex:
@Component({
  selector: 'app-courses',
  templateUrl: './courses.component.html',
  styleUrls: ['./courses.component.scss']
})
My selector for this component app-courses. This is a basic component in Angular. My first step is done.
The second step is to register this component in a Module.
The currently the application have only one module app.moudle.
app.module.ts file
import { BrowserModule } from '@angular/platform-browser';
import { NgModule } from '@angular/core';

import { AppComponent } from './app.component';
import { CoursesComponent } from './courses/courses.component';

@NgModule({
  declarations: [
    AppComponent,
      CoursesComponent
   ],
  imports: [
    BrowserModule
  ],
  providers: [],
  bootstrap: [AppComponent]
})
export class AppModule { }
Once again we have three import file. Nothing special here.
Under bottom have typescript class. export class AppModule { } default AppModule
Know this is decorator function which another decorator function called @NgModule.
@NgModule({
  declarations: [
    AppComponent,
    CoursesComponent
   ],
  imports: [
    BrowserModule
  ],
  providers: [],
  bootstrap: [AppComponent]
})
And know this class is decorated another decorator function @NgModule. Plan typescript class AppModule convert as a Module Angular Point of View.
Don't worry about all this properties here like declarations imports providers bootstrap.
Focus on declarations. Here add all Component part of this module.
By default when we generate a application we have one component called AppComponent.
Now we can add CoursesComponent and import top on that file.
import { CoursesComponent } from './courses/courses.component';
Don't have .ts . No need.
Here second step is done.
Now the third step.
@Component({
  selector: 'app-courses',
  templateUrl: './courses.component.html',
  styleUrls: ['./courses.component.scss']
})
This is the selector for this component which means anywhere we have an element like app-courses angular have render the template courses.component.html inside this element(app-courses). This is the external template for appComponent. Let's have a look.
app.component.html file
<h2>Angular Demo</h2>
<app-courses></app-courses>
So when angular see the element it's going to render the template of our courses component.
Output
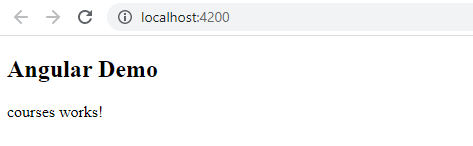
So this is how angular application works.
Note: Short command for creating angular component in Terminal
ng g c courses
Templates
We don't have any data or any logic. Define a field title
title = "List of courses"
Now display this title in our template dynamically. Angular have special syntax double curly braces {{}}. Use this render something in our template dynamically.
So here put {{title}}. This expression will be value added. Added into DOM.
app.component.ts file
import { Component } from '@angular/core';

@Component({
  selector: 'app-root',
  templateUrl: './app.component.html',
  styleUrls: ['./app.component.css']
})
export class AppComponent {

  title = 'Angular practice title';
  courses = ['course1', 'course2', 'course3']

  getTitle(){
    return this.title;
  }

}
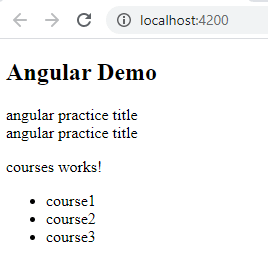
app.component.html file
<h2>Angular Demo</h2>
<div>{{title}}</div>
Output

This expression will be placed into the DOM. If we will change the value of title then angular automatically update the DOM. This is the beauty of Angular Framework. So this is the concept of data binding.
So binding and view to a field in this component. Whenever the value changes then view automatically notified of data.
Here we can also call a method in this class to get some value.
Another example:
<h2>Angular Demo</h2>
<div>{{getTitle()}}</div>
So special syntax here is call it Interpolation.
Output
Directives
app.component.ts file
import { Component } from '@angular/core';

@Component({
  selector: 'app-root',
  templateUrl: './app.component.html',
  styleUrls: ['./app.component.css']
})
export class AppComponent {

  title = 'Angular practice title';
  courses = ['course1', 'course2', 'course3']

  getTitle(){
    return this.title;
  }

}
It's a simple object like courses. Now want to display this HTML Template.
app.component.html file
<div>
    <ul>
        <li *ngFor="let course of courses">{{course}}</li>
    </ul>
</div>
Repeat this li for each course. Now for that need to use one of the angular building block called directives . We use directives to manipulate the DOM. Remove and existing DOM element, change to class name DOM element or style and so.
So here you can use the special directive callded ngFor . Use it like an attribute HTML. So set it "" string. So here we gone write some expression. We should use prefix asterisk *. This is special syntax in Angular. So whenever we using a directive that modify is structure the DOM.
<li *ngFor="let course of courses">{{course}}</li>
What does it mean. With the let keyword defining e variable. So the name of the variable is course. This is like a loop variable in JavaScript. So it going to iterate the courses field and each iteration this course variable will hold the value one course at a time.
Now inside this list item want to display course. So once again use interpolation and add course variable here {{course}}
Let's look at the result.
Services
Now we have that list of courses. But in a real world application most of the time we get this course from the server. Here courses is hard coded. We need to call in HTTP end point get the list of courses.
Here are two options.
- Logic for calling an HTTP service

but there are couple of problems with this approach. The first problem is that in future when we write the UNIT Test for this class we don't want to be dependent on live HTTP end point. Because this is may be harder to execute those UNIT Test.
app.component.ts file
import { Component } from '@angular/core';

@Component({
  selector: 'app-root',
  templateUrl: './app.component.html',
  styleUrls: ['./app.component.css']
})
export class AppComponent {

  courses;

}
courses.service.ts file
export class CoursesService{

    geCourses(){
        return ['course1', 'course2', 'course3'];
    }

}
Now imagine here in this method we have that logic for consuming a HTTP service. With this implementation we can reuse this class, we can reuse this logic in multiple places in our application.
Dependency Injection
Now we have a service. We need use this service. Get the list the courses from the server. Need to use this service in this component. first we need to add constructor. Here initial courses object. So here create initiate a service.
courses.component.ts file
import { CoursesService } from '../courses.service';

export class CoursesComponent implements OnInit {

  constructor() {
    let service = new CoursesService;
   }
}
courses.component.ts Update file
import { Component, OnInit } from '@angular/core';
import { CoursesService } from '../courses.service';

@Component({
  selector: 'app-courses',
  templateUrl: './courses.component.html',
  styleUrls: ['./courses.component.scss']
})
export class CoursesComponent implements OnInit {

  courses;

  constructor() {
    let service = new CoursesService;
    this.courses = service.geCourses();
   }

  ngOnInit() {
  }

}
Now we have a service. Now we can initialize this courses field.
courses.component.html file
<p>
  courses work!
</p>

<div>
  <ul>
      <li *ngFor="let course of courses">{{course}}</li>
  </ul>
</div>
Let's look at the result. Same here.
Wow. We get the same list. Looks Beautiful!.
Bit updated courses.component.ts file
import { Component, OnInit } from '@angular/core';
import { CoursesService } from '../courses.service';

@Component({
  selector: 'app-courses',
  templateUrl: './courses.component.html',
  styleUrls: ['./courses.component.scss']
})
export class CoursesComponent implements OnInit {

  courses;

  constructor(service: CoursesService) {
    // let service = new CoursesService;
    this.courses = service.geCourses();
   }

  ngOnInit() {
  }

}
providers: [] into app.module.ts file. Here have all register service. So at first register our CoursesService.
CoursesService as a provider for CourseComponent
import { BrowserModule } from '@angular/platform-browser';
import { NgModule } from '@angular/core';

import { AppComponent } from './app.component';
import { CoursesComponent } from './courses/courses.component';
import { CoursesService } from './courses.service';

@NgModule({
  declarations: [
    AppComponent,
      CoursesComponent
   ],
  imports: [
    BrowserModule
  ],
  providers: [
    CoursesService
  ],
  bootstrap: [AppComponent]
})
export class AppModule { }
Let's look at the result. Same here.
Note: If missing provider then showing bellow error.
![]()
So error is telling us that we have not register CoursesService as a provider in our module.
One more thing - when you register at dependency(CoursesService) in a module. Angular will create a single instant that class on entire module. So imagine in this module have hundred components and fifty of this component need CoursesService. In the memory we have a single instant of CoursesService. Angular will pass the same instant all this component. This is about the called Singleton pattern
So a quick review -
Added CoursesService as a parameter in constructor or add a dependency injection in this class. And register this as a provider in our app module.
 constructor(service: CoursesService) {
    this.courses = service.geCourses();
   }
With this implementation when angular is create a instant of this component. It will inject those dependencies into this constructor into this class.
Angular Learning Day 1: Component
Reference
Create New Project
Thanks for reading.

Top comments (0)