Written by Ingmar Jager✏️
Rust is not like other languages. It’s harder to pick up than, say, Python or JavaScript, and it introduces new concepts that demand a different way of thinking. As daunting as that sounds, learning Rust is worth your time no matter where you are in your career because it will make you better at writing in other programming languages.
This guide aims to help you navigate the Rust ecosystem and set up your dev environment. That way, you’ll have one less thing to worry about as you familiarize yourself with this challenging language.
Installing Rust
This installation for MacOS and linux users. If you want to install Rust on Windows, see Other Rust Installation Methods.
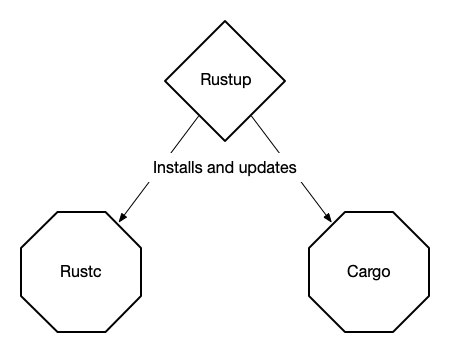
Rustup is the program you would use to install Rust, or to upgrade to a newer or downgrade to an older version. It’s comparable to pyenv for installing Python versions and nvm and n for Node versions, except that it is an official part of the Rust project.
You should visit https://sh.rustup.rs first to check the bash script you’ll be running on your computer. Once you’ve done so, open a terminal and run the following command.
curl --proto '=https' --tlsv1.2 -sSf https://sh.rustup.rs | sh
Answer 1 to proceed with the default installation. When it’s done, run source $HOME/.cargo/env or start a new terminal to make the rustup command available.
Let’s test the install with rustup --version.
Besides rustup, the default installation also installs cargo and rustc.
cargo is the Swiss army knife of the Rust ecosystem, much like npm for JavaScript projects. It’s used to install dependencies and manage the building, testing, running, and publishing of your projects. cargo installs Rust packages, which are called crates,* from crates.io, the language’s package registry, but also from git or a local directory.
rustc is the actual Rust compiler. Although it’s the most fundamental part of the toolchain, you won’t really have to deal with it very often while working on a Rust project. Most of the time, rustc is invoked indirectly by the cargo build or cargo run commands.
You can run rustup show to get an overview of your current Rust setup.
➜  rustup --version
rustup 1.21.1 (7832b2ebe 2019-12-20)
➜  rustup show
Default host: x86_64-apple-darwin
rustup home:  /Users/ijager/.rustup

stable-x86_64-apple-darwin (default)
rustc 1.43.0 (4fb7144ed 2020-04-20)
➜  cargo --version
cargo 1.43.0 (3532cf738 2020-03-17)
Switching to nightly Rust
A new update of Rust is released every six weeks. These updates include new language features, new syntax, and fixes. If you want to try out new language features sooner, the latest updates become available almost daily through the nightly builds. rustup makes it easy to select a Rust build from a certain day.
The following command will install the latest nightly.
➜  rustup toolchain install nightly
➜  rustup toolchain list
stable-x86_64-apple-darwin (default)
nightly-x86_64-apple-darwin
Now you have two Rust versions: stable and nightly. However, stable is still selected by default. To select the nightly compiler, change the default.
➜  rustup default nightly
➜  rustc --version
rustc 1.44.0-nightly (b2e36e6c2 2020-04-22)
If you need a specific nightly version:
➜  rustup install nightly-2020-02-20
➜  rustup toolchain list
stable-x86_64-apple-darwin
nightly-2020-02-20-x86_64-apple-darwin
nightly-x86_64-apple-darwin (default)
➜  rustup default nightly-2020-02-20
➜  rustc --version
rustc 1.43.0-nightly (7760cd0fb 2020-02-19)
This gives us the closest build available, from Feb. 19.
To get rid of a specific toolchain, simply run:
rustup uninstall nightly-2020-02-20
And don’t forget to select a toolchain again.
rustup default stable
Toolchain overview
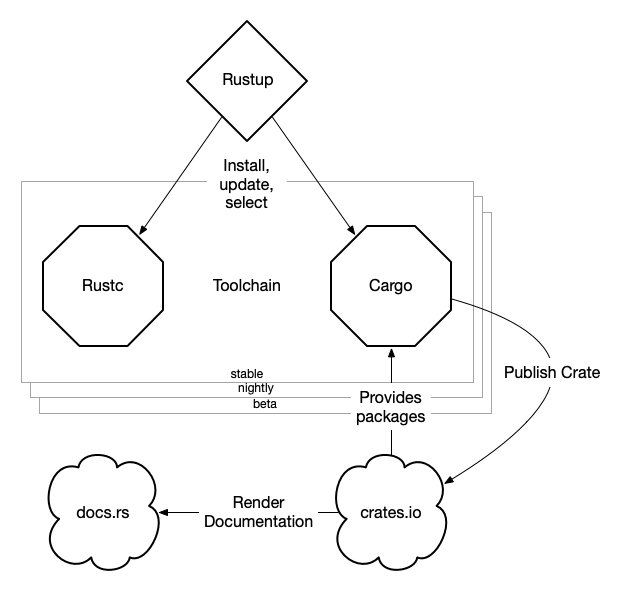
Below is a simple overview of the Rust toolchain and ecosystem.
Included in the toolchain are the following.
-
rustuptoolchain installer -
rustcrust compiler -
cargopackage manager -
crates.iopackage repository -
docs.rscrate documentation
Hello, Rust
Thanks to Cargo, making a “Hello, World’” example in Rust is almost too easy. Start a new project with the name hello_rust using cargo new.
➜  cargo new hello_rust
      Created binary (application) `hello_rust` package
This command creates a new project that is ready to go. Let’s test it.
➜  cd hello_rust
➜  cargo run
  Compiling hello_rust v0.1.0 (/Users/ijager/hello_rust)
   Finished dev [unoptimized + debuginfo] target(s) in 1.22s
    Running `target/debug/hello_rust`
Hello, world!
Change 'world' to 'rust' in src/main.rs to see if you’re really compiling and running this program.
// src/main.rs
fn main() {
    println!("Hello, rust!");
}
Of course, you also build and run it in separate steps.
➜ cargo build
   Compiling hello_rust v0.1.0 (/Users/ingmar/dev/rust/hello_rust)
    Finished dev [unoptimized + debuginfo] target(s) in 0.18s
➜ ./target/debug/hello_rust
Hello, rust!
Adding dependencies
Besides main.rs, cargo also generates Cargo.lock when creating the project. This is the package.json of Rust. It describes the current package and its dependencies.
[package]
name = "hello_rust"
version = "0.1.0"
authors = ["Ingmar Jager"]
edition = "2018"
# See more keys and their definitions at https://doc.rust-lang.org/cargo/reference/manifest.html

[dependencies]
Our standard “Hello, World” app does not have any dependencies yet. Let’s add the [csv](https://crates.io/crates/csv) crate.
[dependencies]
csv = "1.1.3"
Next, add a piece of code from the csv crate README page to main.rs. It reads csv data from stdin and prints the parsed output.
// make csv crate available
use csv;

fn main() {
    println!("Hello, rust!!");

    let mut rdr = csv::Reader::from_reader(std::io::stdin());
    // Loop over each record.
    for result in rdr.records() {
        // An error may occur, so abort the program in an unfriendly way.
        // We will make this more friendly later!
        let record = result.expect("a CSV record");
        // Print a debug version of the record.
        println!("{:?}", record);
    }
}
You can test it easily by piping a two-line csv string (header + data) directly into cargo run.
➜ echo "City, Country\nDelft,The Netherlands" | cargo run
    Finished dev [unoptimized + debuginfo] target(s) in 0.01s
     Running `target/debug/hello_rust`
Hello, rust!!
StringRecord(["Delft", "The Netherlands"])
Local dependencies
You’re won’t always include crates from crates.io. Sometimes, the crates will be local, such as when testing your own library crates.
Make a library crate named hello_print using cargo.
➜ cargo new hello_print --lib
     Created library `csvprint` package
➜ tree csvprint
csvprint
├── Cargo.toml
└── src
    └── lib.rs
Instead of main.rs, a library is created with lib.rs. To this, add a simple function that says “hello” to its argument.
//lib.rs

pub fn print_hello(something: &str) {
    println!("Hello, {}!", something);
}
Next, add your new library crate to the Cargo.toml of your hello_rust app. You can use a relative path for this.
# Cargo.toml

[dependencies]
csv = "1.1.3"
hello_print = {path="../hello_print"}
Finally, in main.rs, import the library and call the only function in its API.
// make csv crate available
use csv;
// import the print_hello function from the hello_print crate
use hello_print::print_hello;

fn main() {
    print_hello("from");
    let mut rdr = csv::Reader::from_reader(std::io::stdin());
    // Loop over each record.
    for result in rdr.records() {
        // An error may occur, so abort the program in an unfriendly way.
        // We will make this more friendly later!
        let record = result.expect("a CSV record");
        // Print a debug version of the record.
        println!("{:?}", record);
    }
}
Note: It’s wise to import with use hello_print::print_hello; so that you can call print_hello("from"); instead of hello_print::print_hello("from").
➜ echo "city, country\nDelft, The Netherlands" | cargo run
   Compiling hello_rust v0.1.0 (/Users/ingmar/dev/rust/hello_rust)
    Finished dev [unoptimized + debuginfo] target(s) in 0.40s
     Running `target/debug/hello_rust`
Hello, from
StringRecord(["Delft", " The Netherlands"])
Rust in VSCode
The community is working hard to make software development using Rust easier and more convenient. There are extensions and plugins available for several editors, but only those for VSCode are officially supported.
Syntax highlighting and code completion
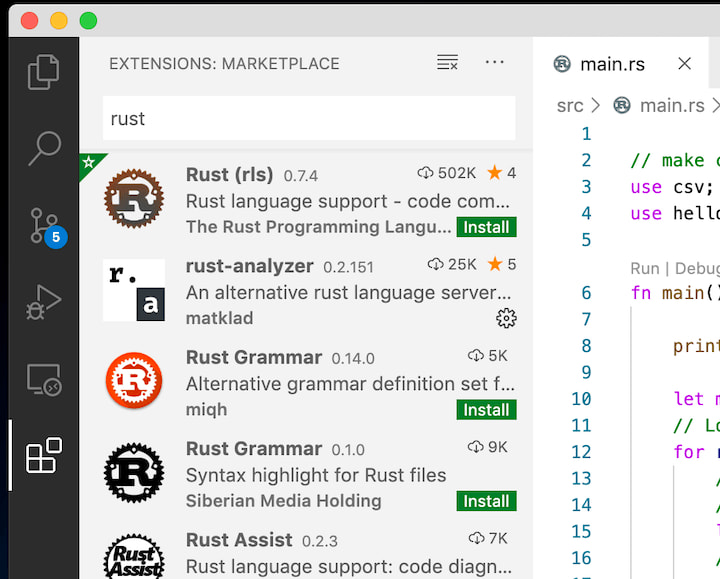
For syntax highlighting and autocomplete, the two most promising options are Rust Language Service (RLS) and rust-analyzer. Interestingly, they work in completely different ways under the hood.
rust-analyzer is more promising and poised to be the successor of RLS. The first release of rust-analyzer was announced just last month. It’s still under heavy development and not yet optimized for all use cases. But for small projects, it is already recommended.
Why not try both for yourself? It’s super easy to install them from the extension marketplace.
TOML language support
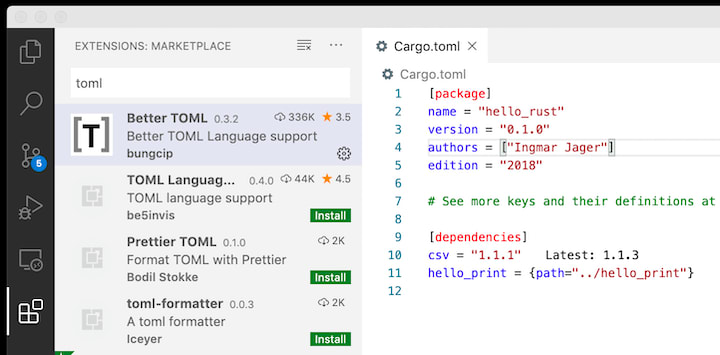
Better TOML is a VSCode extension you can install to make working with Cargo.toml more efficient. Besides syntax highlighting, it also suggests newer available versions for your dependencies, which is very useful.
I hope this guide helps you get up to speed with Rust development. For a deeper dive into the language, I recommend checking out the Rust book and following Rust by example. Better yet, start writing your own project today!
Plug: LogRocket, a DVR for web apps

LogRocket is a frontend logging tool that lets you replay problems as if they happened in your own browser. Instead of guessing why errors happen, or asking users for screenshots and log dumps, LogRocket lets you replay the session to quickly understand what went wrong. It works perfectly with any app, regardless of framework, and has plugins to log additional context from Redux, Vuex, and @ngrx/store.
In addition to logging Redux actions and state, LogRocket records console logs, JavaScript errors, stacktraces, network requests/responses with headers + bodies, browser metadata, and custom logs. It also instruments the DOM to record the HTML and CSS on the page, recreating pixel-perfect videos of even the most complex single-page apps.
Try it for free.
The post Getting up to speed with Rust appeared first on LogRocket Blog.


Top comments (0)