
Introduction
Understanding React useState can be a little daunting especially for beginners learning React. I'm happy to tell you that I've been there before, and in fact, most React developers couldn't grasp the concept the first time they were introduced to it.
If you are here and you're feeling rusty or if the concept of useState is going over your head, don't worry. The aim of this article is to guide you out of the useState confusion 😢 into a useState state of clarity.😊
Why useState?
To clear the air about what useState is, we should ask ourselves why we need to make use of the concept in the first place.
React useState help us to track "state" changes that might occur in dynamic or functional components. The useState hook is also used to store and update state within a component.
Consider a simple scenario where you want to build a toggle button that changes the theme of a website from light mode to dark mode when clicked. You can use the useState hook to manage the state of the button.

If your component state need to change over time or through an event, React useState can come into play to help you manage the state of the component.
We have been mentioning the term state through out this section and will continue to do so in this article. It's high time you understand what state is.
State
A state contains some element of data that can change over time within a component (a component can be as simple as a text, button or input element on a webpage). When the state of a component changes React re-render the the component to reflect the updated state.
Let revisit our toggle button theme switcher scenario. The button can store data that assists in switching between different website themes. Initially, when the button is clicked, the inner data is set to true, which activates the dark mode theme. Subsequently, when the toggle button is clicked again, the inner data is set to false, reverting the website theme back to light mode.
The state holds the information necessary to determine which theme should be applied to the website. By updating the state when the button is clicked, React re-renders the component, causing the website's appearance to reflect the updated state and switch between the light and dark themes.
Putting it together:
useStateis like a black-box that stores and updates the state data of a component.
useState in Action
Since we have the basic understanding of what useState is, let's see how we can make use of the concept. Put on your coding cap and let's hit the ground running.
To have access and make use of useState we need to import the useState hook from React library.
import { useState } from "react"
Before we proceed any further, Let's assign it to a variable print it out to the console.
const mHook = useState();
console.log(mHook);
Output:
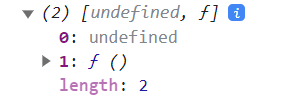
By convention useState hook will return an array of two items: the current state of the component and a function that help us to update its state. The first item in the array returns undefined because there is no value passed into the useState() as an argument.
The useState hook can accept any type of value as its argument. This includes primitive data type like number, string, Boolean and any other complex data types like array, function and object.
// number
const mHook = useState(10)
console.log(mHook); //  [10, function]

// string
const mHook = useState("React");
console.log(mHook); // [React, function]
The
useState()can only accepts one value as its argument. It will ignore other arguments passed into it.
Since the useState hook returns an array of two items, as mentioned earlier, we can easily unpack the items using JavaScript Destructuring. By using destructuring assignment it allows you to assign names to the array items directly within the declaration.
// using Javascript destructuring to extract our item from the array
const [item1, item2] = useState(true);
console.log(item1) // Output: true
console.log(item2) // Output: function
In React the first item in the array returned by the useState() is called the state , and the second item which is the function, is called the setState. The argument passed into the useState() is called the initialValue.
Syntax
Here is the syntax on how to use React useState()
const [state, setState] = useState(initialValue);
state - This represent the current state value of your component.
setState - Function that can be used to update the state of your component.
initialState - The value you want your component to begin with.
Assigning an initial value to a
useStatewill set the current state of the component to that value.
const [state, setState] = useState("React");
console.log(state) // Output: React
useStatehook should only be declared inside a functional component.
Let implement a counter app that allows us to increase and decrease a number using the useState hook.
// Counter.jsx file

import { useState } from "react"

export default function Counter(){
    const [count, setCount] = useState(0);

    function increment(){
        setCount(count + 1);
    }
    function decrease(){
        setCount(count - 1);
    }
    return (
        <>
            <button onClick={increment}>+</button>
            <h1>{count}</h1>
            <button onClick={decrease}>-</button>
        </>
    )
}
In the example above, after defining a component, we declare are useState() by destructuring the array elements. Here, we can refer to our state as count, and the function that allows us to change the state as setCount. We pass in our initialValue, which automatically set the count to that value.
We declare our increment and decrease functions, which help us to update the count (state) each time an event occurs, using the setCount() function. Finally, we return our JSX as usual, which contains a button to increase the count, a text that displays the count each time it is updated, and a button that decrease the the count
Let's create a mental model around the previous example so that you can better understand what's going on.
Analogy: Imagine a piece of clay shaped that represent a numeric value. The clay can be shaped, molded, or reshaped using tools to represent different numbers. The piece of clay shape represents our state (count in the example), and the setState(setCount in the example) acts as the tool that allows you to modify the clay's shape, transforming it into different numeric values.
Alternatively you can pass a function to setState that receives the current state as an argument and returns the new state value. This approach is useful when the new state depends on the previous state. For example using our counter app.
// our function will change to this
function increment(){
    setCount((curState) => { // curState represent our current state
        return curState + 1;
    })
}
function decrease(){
    setCount((curState) => {
       return curState - 1
    })
}
In this approach, the setCount() the function receives a curState as an argument, which represent the current state value. You can use the curState state to perform calculation or modifications and return the new state value based on that. The function approach is generally recommended if you need to update your state based on the previous state.
Creating a theme switcher using useState
import { useState } from "react"

export default function ThemeComponent(){
    const [theme, setTheme] = useState(true);

   function themeEvent(){
        if (theme){
            document.body.style.backgroundColor = "#222222";
        }
        else{
            document.body.style.backgroundColor = "white";
        }
        setTheme((curState) => {
            return !curState;
        });
    }

    return(
        <>
            <button onClick={themeEvent}>{theme ? "Dark" : "Light"}</button>
        </>
    );
}
Inside the ThemeComponent a state variable named theme and a setTheme function is declared using the useState hook:
const [theme, setTheme] = useState(true);
The theme variable is initially set to true by passing it as the initialValue argument to useState(). The setTheme function is used to update the value of theme.
The themeEvent function is defined within the ThemeComponent. It is responsible for changing the background color of the document body and toggling the value of theme.
Here's the breakdown of what it does:
a. if the theme is true, It sets the background color of the body to dark:
// theme = true
document.body.style.backgroundColor = "#222222";
b. if the theme is false, It sets the background color of the body to white:
// theme = false
document.body.style.backgroundColor = "white";
c. Finally, it updates the value of theme by calling setTheme with the current state (curState) negated:
setTheme((curState) => !curState);
This will toggle the value of theme from true to false or vice versa.
The return statement defines the JSX markup that will be rendered by the ThemeComponent. In this case, it consists of a button element:
return (
    <>
        <button onClick={themeEvent}>{theme ? "Dark" : "Light"}</button>
    </>
);
The button has an onClick event handler that triggers the themeEvent function when the button is clicked.
The text content of the button is conditionally rendered based on the value of theme. If the theme is true, the button will display "Dark"; otherwise, it will display "Light".
When to use useState:
1. Managing User Input:
If you have a form or an input field where the user can enter data, you'll likely need to store that data in a state. For example, if you have a text input field and you want to capture and use the value entered by the user, you can use useState to create a state variable that holds the input value. You can then update this state variable whenever the user types or modifies the input.
2. Toggling UI Elements:
When you have UI elements that can be toggled on and off, such as collapsible panels, modals, or tabs you can use useState to manage the visibility state of these elements. By storing a boolean value in state, you can control the visibility of these elements and update it based on user interactions or application logic.
3. Handling Component Interactions:
If you have a component that interacts with other components or triggers certain actions, you might need to use state to keep track of the state of those interactions. For example, you might have a button component that needs to change its appearance or behavior based on certain conditions. By using useState, you can manage the state of the button and update it accordingly.
4. Dynamic Content and UI Updates:
If you have parts of your UI that need to update dynamically based on user actions, such as a list grows as the user adds items, you can utilize useState to manage the state of the dynamic content. By updating the state, React, will automatically re-render the component and reflect the changes in the UI.
5. Fetching and Handling Data:
When you need to fetch data from an API or perform asynchronous tasks, you can use useState to store and manage the data you receive. The state can hold the initial loading state, the fetched data, and any error message that occur during the process. Updating the state based on the API response or error allows you to trigger re-renders and display the appropriate UI components.
Conclusion
When deciding whether to use useState, it is important to determine which components require updates. Identifying the components that need to change is the initial step in selecting the appropriate approach and implementing it. If a component is static and will never change over time, it is recommended to utilize regular props to render the component.

Top comments (0)