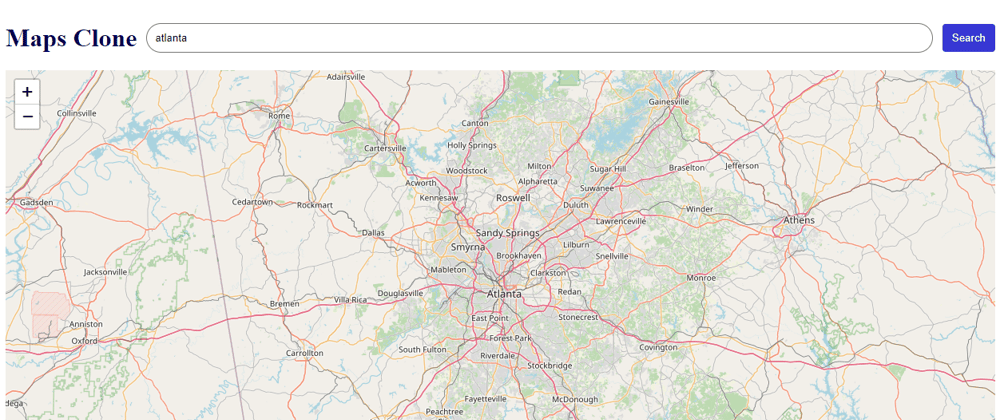
Recently, I have been interested in making some projects such as a MERN stack Zillow clone, or a Django travel booking site. However, in researching the tools needed to create both of these, one critical piece was always too expensive: the google maps api. This API is billed per request, so if you are attaching it to a client application that end users can interact with, this will potentially drain your bank account (without proper captcha & security). The solution to this, instead, is to use a free and open source location data API. You can also follow along with this guide with the full Github source code.
What we are building
Instead of relying on a paid service, this project uses completely free tools. It is built with the following.
- Node.js
- Express.js (server)
- EJS (JavaScript templates)
- OpenStreetMap (Location data API)
- Leaflet.js (Interactive map widget)
Getting started
To start, create a new folder, and open a command line in the directory. From there, initialize a new npm / node.js project.
npm init
Now, install the required dependencies. We are using express for the web server and EJS (JavaScript HTML templates) for the frontend. Also install nodemon so we don't have to refresh the server after every change.
npm install express ejs
npm install --save-dev nodemon
Lastly, open package.json and replace "scripts" with the following.
"scripts": {
    "dev": "nodemon server.js",
    "start": "node server.js"
 },
Building the server
Now, we are ready to build the express.js server to render our site. Copy and paste the following into a new file in the root of your project named "server.js".
const express = require("express");
const app = express()

app.set("view engine", "ejs")
app.use(express.urlencoded({ extended: false }))
app.use(express.static(__dirname + '/static'));

app.get("/", (req, res) => {
    res.render('index')
})

app.listen(process.env.PORT || 8000)
This gives us a basic express server that renders our index page. It is also setup to load CSS, images, and JavaScript from a folder named "static" in the root as well.
Adding the frontend
Our web server should be running, however, there is no index file to render yet. Create a file named "index.ejs" inside a new folder named "views". Then, type "!" and hit enter (if your using VS code) to create a new HTML file. Paste the following into the body of your HTML file.
<div class="map-container">
    <header>
        <form id="search-form" class="nav-bar">
            <h1 class="nav-logo">
                Maps Clone
            </h1>
            <input type="text" class="search" name="searchTerm" required />
            <button type="submit" class="submit-btn">
                Search
            </button>
        </form>
    </header>
    <div id="map"></div>
</div>
Lastly, we need to add some basic styling. Create a file named "style.css" in /static/css. Then, import your style sheet, and paste in these styles from the Github reposory.
Adding the map
We have an HTML div element with an id of map, but there is no actual map being rendered yet. To render the map, paste the CSS and script import for leaflet JS into the head of index.ejs.
<link rel="stylesheet" href="https://unpkg.com/leaflet@1.9.3/dist/leaflet.css" integrity="sha256-kLaT2GOSpHechhsozzB+flnD+zUyjE2LlfWPgU04xyI=" crossorigin="" />
<script src="https://unpkg.com/leaflet@1.9.3/dist/leaflet.js" integrity="sha256-WBkoXOwTeyKclOHuWtc+i2uENFpDZ9YPdf5Hf+D7ewM=" crossorigin=""></script>
Last but not least, paste the following code into a new JavaScript file in /static/js/maplogic.js.
var map = L.map('map').setView([33.659541, -118.1552947], 9)
L.tileLayer('https://tile.openstreetmap.org/{z}/{x}/{y}.png', {
maxZoom: 19,
attribution: '© <a href="http://www.openstreetmap.org/copyright">OpenStreetMap</a>'
}).addTo(map);
const updateMap = (coordinates) => {
map.setView([coordinates[0], coordinates[2]], 9)
}
document.getElementById("search-form").addEventListener('submit', (event) => {
event.preventDefault()
const searchTerm = event.target.searchTerm.value
fetch(("https://nominatim.openstreetmap.org/search?format=json&limit=3&q=" + searchTerm), {
method: "GET",
headers: {
'Content-Type':'application/json',
}
}).then((response) => response.json())
.then((responseJson) => {
if(responseJson[0]) {
const coordinates = responseJson[0].boundingbox
updateMap(coordinates)
} else {
alert("No locations found.")
}
})
.catch((error) => {
console.error(error)
})
});
This renders out the map using the Leaflet script we imported, as well as sets up an event listener to re-render the map when we search for a location.
Conclusion
I hope you enjoy this map project as much as I did making it. I think these open source map libraries have huge potential, and I hope you can get this project running locally to test them out. If you want to download the full source code for this project the repo can be found on Github here.
If you have any questions, feel free to contact me directly on here, or on Twitter.


Top comments (0)