Firebase Crashlytics is a lightweight, real-time crash reporter that collects, organize and group crash report highlighting the circumstances that led to them. It provides you with a platform to track, monitor, and prioritize these unexpected crash issues that arise in your mobile apps. For more reasons why you need Firebase Crashlytics, visit this article post that explains in detail.
In this article, we’ll be looking at how to integrate Firebase Crashlytics into a sample flutter app. This is a Firebase login authentication app that makes use of the provider state management architecture. To follow up with the integration of Firebase Crashlytics, check out the starter project on Github.
Specifically, we’ll cover:
- Setting up Crashlytics on the Firebase Console
- Integrating Crashlytics in a Flutter app
- Platform Integration for IOS
- Configure Crash Handlers
- Testing our sample app
Shall we?
Integrating Crashlytics on Firebase Console
First of all, Open the Firebase console to get started with Crashlytics. Then go to the Release & Monitor section in the side panel of the console and click on ‘Crashlytics’. Next, you’ll need to select the application either Android or IOS that you’re building for.
When this is done, click on the Enable Crashlytics button to set up Crashlytics. After it’s been setup, you’ll be navigated to the Crashlytics Dashboard
Integrating Crashlytics in a Flutter app
We have set up Crashlytics in our Firebase console, the next step is to integrate it into our authentication app. Check out the starter project on Github.
The first step is to add the Firebase dependency that is responsible for connecting your Flutter app to your firebase project.
Next, within the main top-level function in our flutter app ensure WidgetsFlutterBinding is initialized and then initialize Firebase
Then we add the firebase_crashlytics dependency in pubspec.yaml file
Next, we add the dependency to the android/app/build.gradle file path using the command below
Then lastly we need to add the classpath in the android/build.gradle file
Platform Integration for IOS
To generate crash reports for IOS apps, Firebase Crashlytics needs to access your project's debug symbol (dSYM) files. You can configure Xcode to automatically produce your dSYMs, process them, and upload the files whenever you build your app through the following steps:
- Open your project's Xcode workspace and select its project file in the left navigation.
- From the TARGETS list, select your main build target.
- Then click on the Build Settings tab, click All and search for debug information format.
- Set the Debug Information Format to DWARF with dSYM File for all your build types. This allows Xcode to produce dSYMs for your builds.
- Next is to process your dSYMs and upload the files.
- Click the Build Phases tab and select + > New Run Script Phase.
- Make sure to double-check that the new run script phase is your project's last build phase otherwise Crashlytics won't properly process dSYMs.
- Then expand the new Run Script section and add the following script under the Shell label
Then lastly in the input files section, add the paths for the locations of the following files:
- The location of your project's dSYM files:
- Then the location of your project's built Info.plist file:
For more information on dSYM files and how to manually upload dSYM files, visit Get Deobfuscated Reports
Configure Crash Handlers
Crashlytics is now enabled in our authentication app. You can automatically catch all errors that are thrown within the Flutter framework by overriding FlutterError.onError with FirebaseCrashlytics.instance.recordFlutterFatalError in the main top-level function of the app.
When it comes to asynchronous errors that are not handled by the Flutter framework, you use PlatformDispatcher.instance.onError:
Sometimes not all errors are caught by Flutter, there are zoned errors that can also occur as well. A common use-case where a Flutter error would not be enough is when an exception happens inside of an onPressed button. To catch such errors, you can use runZonedGuarded:
Testing our sample app
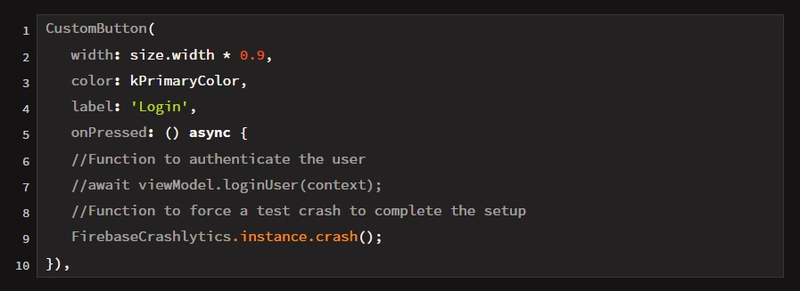
In order to check whether the Firebase Crashlytics is active or not in the app, Go to the login_view and comment out the function that authenticates a user that wants to log in. Add this line of code in order to force a crash in our app.
It will make the app crash forcefully. Then you can go to the Crashlytics Dashboard to check the status report of the crash.
Conclusion
We’ve successfully integrated Firebase Crashlytics into our sample authentication app. In this article, you were introduced to Firebase Crashlytics, how to easily integrate it into your mobile apps and how to test for unexpected crashes when they occur.
Check out the complete source code for the sample app. If you have any questions or inquiries, feel free to reach out to me on Twitter: @CalebJ or LinkedIn: @CalebJ.


Top comments (0)