If you use Rust to create CLI, it would be worth considering create a VSCode extension together.
This is because your Rust script can be used in the extension with almost zero additional cost if you leverage Wasm power!!
This article is about developing CLI and VSCode extension in the same repository by using Rust and Wasm as below:
- implement core calculation common to CLI and VSCode in Rust
- the CLI itself is implemented in Rust
- the VSCode extension is implemented based on TypeScript, and it calls the core calculation as Wasm module
I'll explain what I developed and how I set up this monorepo system👶
Table Of Contents
What I developed
What I created is a formatter for MySQL INSERT queries. It organizes them so that they look like a table, that is, the column names and the values in each row are arranged vertically.
It looks good, doesn't it?🎉
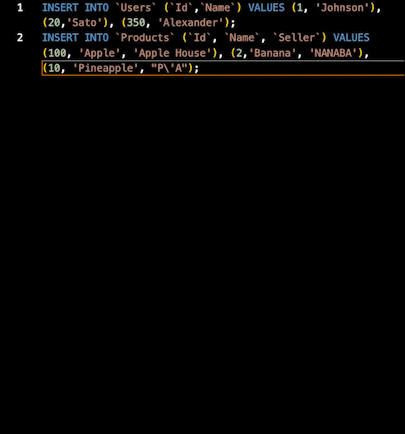
It's really useful especially when you have to manage test data in a form of a large number of INSERT queries. please try using it!
CLI: https://github.com/canalun/insertfmt
VSCode extension: https://marketplace.visualstudio.com/items?itemName=canalun.insertfmt
How to setup monorepo for CLI and VSCode extension
Let's move on to the main topic.
Again, please remember the overall structure of this repository.
- implement core calculation common to CLI and VSCode in Rust
- the CLI itself is implemented in Rust
- the VSCode extension is implemented based on TypeScript, and it calls the core calculation as Wasm module
Let's take a look at the actual sources!!
FYI: The repository is here, so if you're really interested in this topic, why not check it out👶
https://github.com/canalun/insertfmt
1. Overall directory structure
First, this is the repo structure.
.
├── cli
│   └── main.rs     <-------- cli
├── core
│   └── core.rs     <-------- the core calculation
├── Cargo.toml
├── Makefile        <-------- conversion to Wasm is implemented as Make command as mentioned later
├── .vscode         <-------- VSCode ext. debug setting
└── vscode_extension    <---- VSCode ext. directory
    ├── node_modules
    ├── insertfmt_core  <---- Wasm compile destination
    ├── src
    │   └── extension.ts   <- VSCode ext.
    ├── package.json    <---- VSCode ext. meta info
    └── webpack.config.js  <- configured to bundle all including Wasm
2. Separation of core calculation and CLI itself
As you can see, I separated the core calculation from the cli itself. As the name suggests, core dir has the core calculation common to the cli and extension, and cli dir has the cli itself.
This separation makes it easy to share the core calculation with the VSCode extension. And it may be useful for release or reuse of the core calculation as one library.
Just as a side note, Cargo.toml is like this👶
[package]
name = "insertfmt"
...

[[bin]]
name = "insertfmt"
path = "./cli/main.rs"

[lib]
name = "insertfmt_core"
path = "./core/core.rs"
crate-type = ["cdylib", "rlib"]
3. Set up a VSCode extension project in Rust project
The next is about setting up a VSCode extension project in a Rust project.
To add a directory for VSCode extension development to an existing Rust project, you can just run yeoman, npx yo code, in the root directory of the Rust project.
(The scaffolding tool called yeoman is very useful for VSCode extension development. The link is below.)
https://yeoman.io/
After running yeoman, you can find a directory for VSCode extension development in the root directory of the Rust project.
But, here, you should take care of the following two points.
- Where to put the config of VSCode extensions
- How to bundle and call Wasm
Let me explain👶
3.1 Where to put config of VSCode extensions (wasmpack and webpack config)
First of all, you can roughly categorize configuration files of VSCode extensions into the two types as below.
- Meta information (extension name, version etc.)
- Debug configuration (configuration for running and testing the extension on your local)
If the extension project is a typical one (at least if that is a project created by yeoman with no special settings), "meta information" is written in package.json in the root directory and "debug config" is in launch.json and tasks.json in .vscode dir.
You have to pay attention especially to your debug config, because .vscode directory has to be in the root directory otherwise VSCode does not recognize it, and that means you cannot run and debug the extension on your local.
(the workaround might be "Multi-root Workspaces", but idk so much about it...! The info is here: https://code.visualstudio.com/docs/editor/multi-root-workspaces)
So, after initialize an extension project in the existing Rust project, it would be better to move .vscode dir of the extension project to the root directory (= the Rust project directory) and change settings in launch.json and tasks.json regarding file paths.
Of course, if the existing Rust project also has .vscode directory, you have to integrate the two directories👶
3.2 How to call and bundle Wasm
Basically, it's not so difficult to convert your Rust script into Wasm and call it from the extension (+ bundle it).
In short, all I had to do was just compile the Rust script to Wasm by using wasm-pack, call it from the extension by dynamic import and change the webpack setting a bit.
So let me explain in detail!
I generated Wasm by wasm-pack. I took a bit long time to notice I had to set --target bundler.
The make command I use is below.
gen-wasm-for-extension:
  rm -rf ./vscode_extension/insertfmt_core
  wasm-pack build --target bundler --out-dir ./vscode_extension/insertfmt_core --release
After that, the compiled Wasm is called by dynamic import from the extension .
export function activate(context: vscode.ExtensionContext) {
  const disposable = vscode.commands.registerCommand(
    'insertfmt.fmtInsertQueries',
    () => {
        // after some calculations...
        // ok, let's use wasm
        import('../insertfmt_core').then((module) => {
          const result = module.format_insert_queries_wasm(text)
          // ...
        })
        // ...
    })
}
This way of using Wasm is also explained in the below MDN doc.
https://developer.mozilla.org/en-US/docs/WebAssembly/Rust_to_wasm#using_the_npm_package_on_the_web
But please be careful about your webpack version. I'm not very clear at this point, but webpack 4 and 5 handle Wasm differently.
The above MDN doc uses webpack 4, so you may have to change the setting of webpack if you use other versions.
This time, the version of webpack I used was webpack@^5.75.0. So, I had to consider the webpack config about Wasm.
After a lot of trial, I arrived at the following setting.
experiments: {
    asyncWebAssembly: true,
}
What is written regarding the webpack params of Wasm varies. Unfortunately, I won't get surprised if you take a tough time to find settings that work...!
If you are also interested in the version of related modules, please see my repository.
https://github.com/canalun/insertfmt
Finally, this article ends here!!
I think this monorepo way is a quite good idea if you use Rust to develop CLI!!
Thank you for reading😊

Top comments (0)