Overview
The main purpose of this project was to learn the basics of developing software in an IoT environment by creating a wifi-controlled stoplight with a Raspberry Pi. The principles learned in this project are as follows.
- Setup and configure a Raspberry Pi for initial use.
- Develop non-blocking, multi-threaded code to complete multiple operations at the same time.
- Become familiar with using general purpose input-output (GPIO) pins.
Materials
The physical materials used in this project are as follows.
- Personal Computer
- RaspberryPi 3+ (preconfigured to use)
- (1) Breadboard
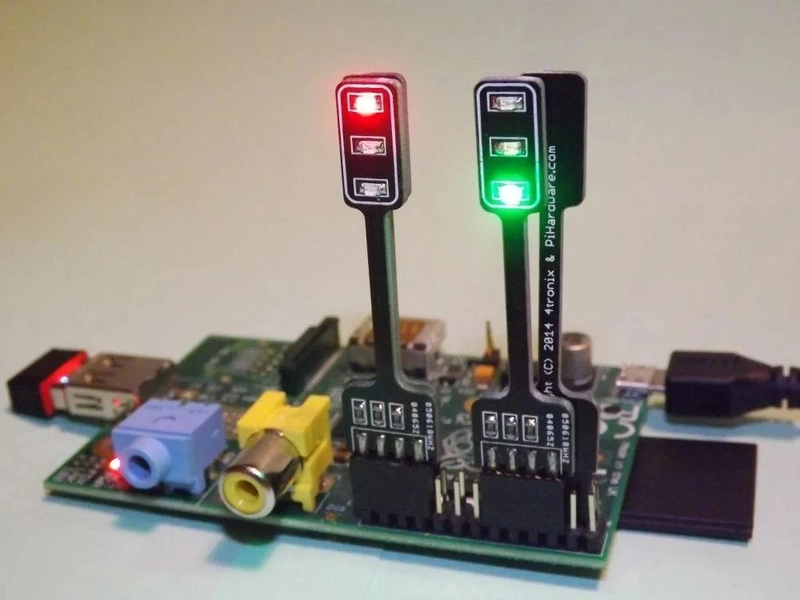
- (1) Circuit-Printed Stoplight
- (1) RaspberryPi Jumper Cable Bus
Resources
The software, services, and code libraries used in this project are as follows.
- Python 3
- Threading
- Time
- GPIO
- Flask
- UIKit
References
The following guides and references were very useful in the completion of this project.
- RaspberryPi.org Create a basic website using Python and Flask.
- ThePiHut Basic interaction with the GPIO pins via Python.
- StackOverflow Create a separate thread in a Python script. And, exit a blocked thread in Python.
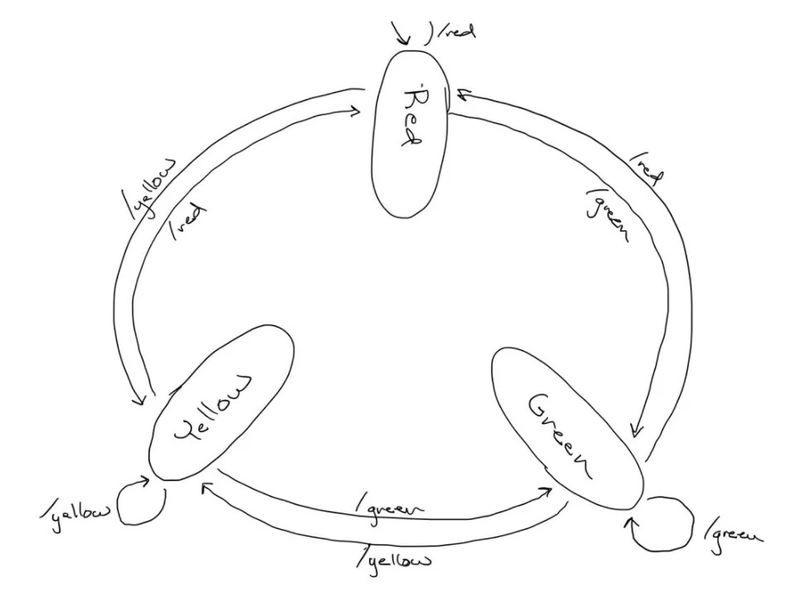
State Machine 1
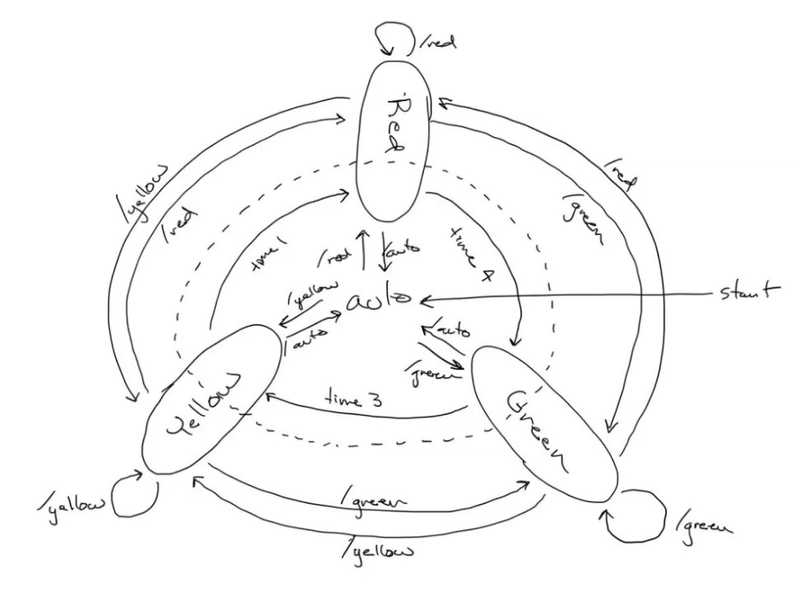
State Machine 2
Procedures
In the development environment of your choice (for me, this was an Azure VM running Visual Studio Code),
- Use the “write, test, modify, repeat” method of development to create a Python-based website to change the states of the stoplight. For simplicity, use a different URL path to specify each state of the stoplight. (I recommend using the Flask library. It made it very easy for me.)
- Optional. Implement UIKit elements into your website to make it pretty.
- Optional. Find images of stoplight states to use as visual indicators on your website. Using your website as the input method, implement State Machine 1 in Python code.
- Build upon your new state machine to add an “automatic mode” where the stoplight will run on a timer. (State Machine 2) It is important that all blocking elements of this code run in a separate thread. The main thread should never be blocked as it will be running the website. (I accomplished this by using the time and threading libraries.) To the best of your ability, add the necessary components to your code to interact with GPIO pins. (I made the pin numbers in my code global variables so that they could easily be changed on the Pi itself.)
On your RaspberryPi,
- Transfer over your already-created code and verify that it works. (I did this by reinstalling the Flask and Threading libraries to my Pi. Then, I transferred my code with the SFTP protocol.) Connect your RaspberryPi to the breadboard, using your GPIO ribbon cable and cobbler.
- Add connect your stoplight LEDs to the breadboard, taking note of the pins that the lights are connected to. If you are using individual LEDs, make sure to add a resistor into the circuit before it connects to ground. (In my case, the resistors were built into the stoplight itself, so this was not needed.)
- Modify your code so that the pins specified for red, yellow, and green match those that the are connected on the board. Make sure to take note of whether or not you are using the Broadcom or GPIO specified numbers. By default, the GPIO library will use the GPIO numbers which inconveniently do not match those specified on the board. (In my case, I solved this problem by searching online for a Broadcom schematic of the GPIO pin numbers.)
If you’ve done everything correctly, you should now have a fully-functioning wifi-controlled stoplight.
Appendix
Thought Questions
- What are some practical applications for a device like this? Strictly speaking, a device exactly like this might not have a whole lot of practical application since it enables going directly from green to red without any delay. However, many devices somewhat similar to this could be and are used be city administrators to control traffic flow remotely.
- What are some enhancements that could be made to this device? The primary way to enhance this device would be to add functionality for a cross-street stoplight to work in tandem with the first stoplight. Also, a camera of proximity sensor could be added to this device to enable it to intelligently change from one state to another as needed.
- How much time did it take to complete this project? It took me about three hours to complete this specific project. (In my case, I had additional preparation and post-work that took me more time to complete.
Code
All code for this project can be found in my repo on GitHub.

Top comments (0)