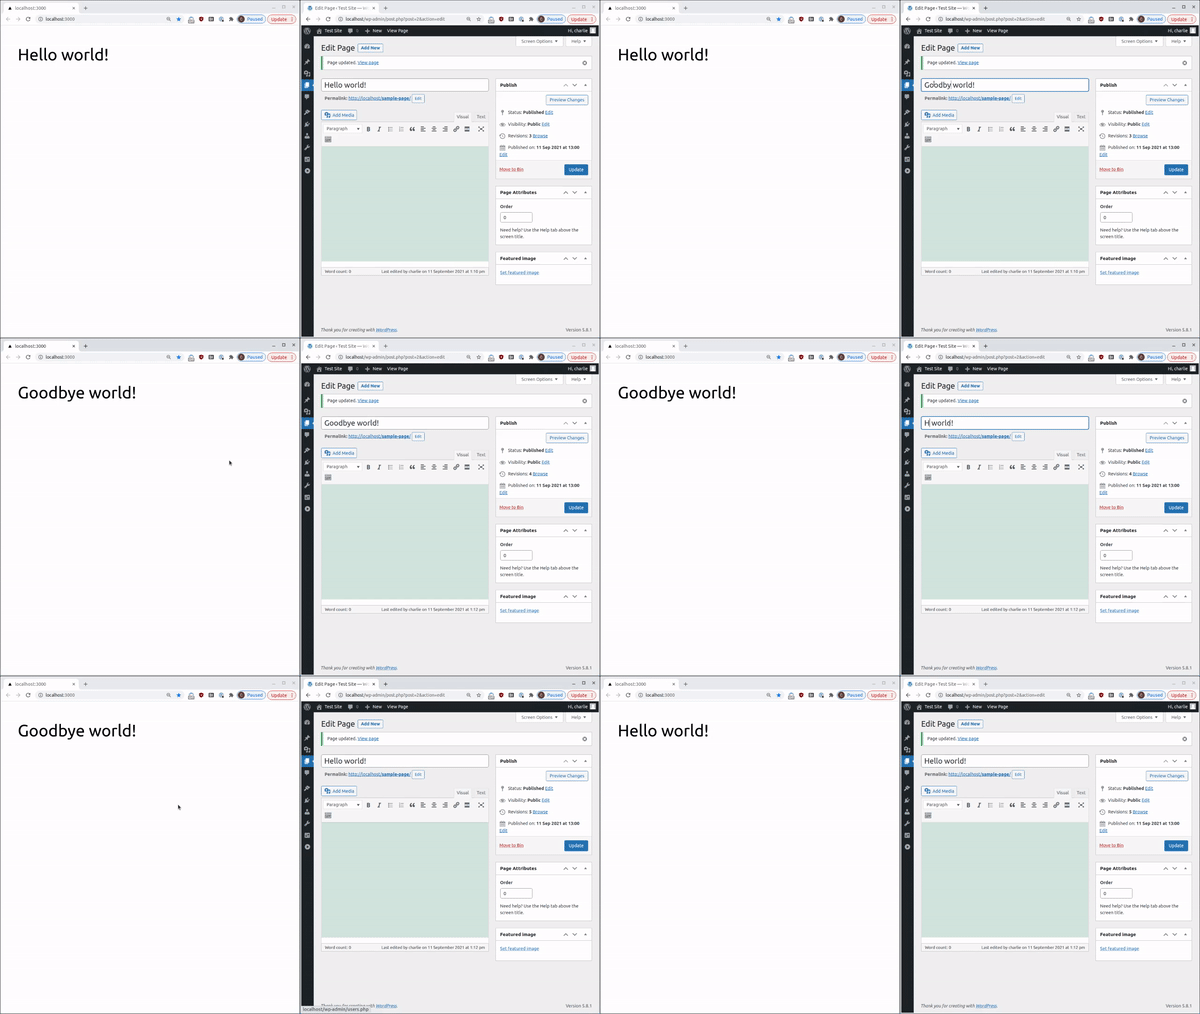
Stale-while-revalidate has some exciting implications for the future of web performance: by serving stale data instead of loading spinners, the user experience can be smoother and snappier. It also opens up the possibility for pages with dynamic content to be built to static files at intervals without the need to be server-side rendered on demand, meaning websites can utilise features of a dynamic website without sacrificing the speed of a static one.
This is feasible thanks to a few new technologies which have been cropping up on the JS horizon: A new build option for Next.js, called Incremental Static Regeneration, and a cache-revalidation package called React Query. Alternatives have appeared, such as Vercel's own SWR package, but all aim to reach the same goal: To handle query caching, error handling, polling and most importantly, to revalidate data when required. These two technologies work in perfect harmony to create super-fast, up-to-date static websites that will amaze clients and improve SEO.
In this article, I'll be showing you how to get the best of both worlds by setting up ISR to do the main content fetching and React Query to 'fill in the gaps' and provide more recent data.
How it works
ISR works by building static 'snapshots' of a populated site: It will go through each page and make all the requests it needs to, finally building each page to a static HTML file. This isn't much different to a regular static site builder; what ISR does differently is it goes back and checks at regular intervals if the data it served has changed. If it has, ISR will rebuild only the pages which have changed. If you have a site with 100 pages and only 5 pages were changed, it skips over the 95 that didn't change and only rebuilds the 5 that did. This saves a lot of processing power while also allowing for more 'dynamic' sites that still have the speed of static sites. It also means that both the developer and the client don't need to worry about rebuilding the site: Everything is handled automatically.
There's a little more to it than that, but that's the general gist. You can read more about the details of ISR here.
ISR can do the majority of the heavy lifting: For most posts and pages, content does not need to be up to date to the exact minute. Usually 30 seconds or a minute is enough, or even higher in some cases.
Sometimes, however, you need the data you're displaying to be precise. Perhaps you're building an online shop with stock indicators that need to be exact, or you're building a recruitment website that always needs to display fresh jobs. That's where React Query comes in. Using a combination of ISR for menus and general page data alongside React Query for up-to-date listing information, you can build a frontend that is not only fast but also completely up to date.
0. Installation
Start by creating your Next.js project using create-next-app.
npx create-next-app my-projectNext, let's add react-query to the mix.
npm i react-queryYou will also want some kind of CMS which serves up a REST API - your data will be served as JSON objects. I'm using Wordpress' REST API feature for demonstration.
Now we've got everything installed, it's time to get started.
1. Set up your Next.js page to use Incremental Static Regeneration
Set up your page in Next.js under the pages folder.
You can use this method for either non-dynamic routes for things like homepages and unique pages, or you can use dynamic routes which allow you to re-use the same template for different pages. I'm hard-coding my page ID here for the sake of the tutorial, but I intend on writing a guide for dynamic routes in Next.js in future.
You can style up the page now if you want, or wait until you have your data to worry about displaying it on the page.
// pages/index.js

export default function Home(props) {
  return (
    <div>
      <Head>
        <title>My App</title>
        <link rel="icon" href="/favicon.ico" />
      </Head>

      <main>
        <-- your page content -->
      </main>
    </div>
  )
}

export const getStaticProps = async () => {...}
The area you need to pay attention to when setting up ISR is the getStaticProps function below the main body. This function is run on the server side during its rendering process, and can be used to prefetch any queries required for that page. In the example below, we use this function to prefetch page data:
// pages/index.js

export const getStaticProps = async ({ params }) => {
  const pageId = 1; // pageId could be dynamic

  // fetch page data using id
  const pageData = await getPageById(pageId);

  return {
    props: {
      pageData
    }
  };
};
The request function, getPageById, can be anything you like so long as it returns the data you're trying to fetch. I used Axios:
// util/queries/pages.js

export const getPageById = async (id) => {
  const res = await axios
    .get("http://localhost/wp-json/wp/v2/pages/" + id)
    .catch((err) => err);

  return res;
};
Setting up Incremental Static Regeneration from here is simple: All you need to do is add a revalidate property to the return object. This value is the number of seconds before Next.js will wait before attempting to revalidate and rebuild the page, once a user requests it again.
If someone visits the page before that number of seconds is up, they will be served the old, cached version of the page. However if someone visits the page after that amount of time, they will be served the old version but a new version of the site will regenerate in the background and update the user when it's ready. That new version is then cached and the cycle repeats.
I've used 60 seconds for the sake of testing, but the time period you use will depend on the app requirements. If it's just a blog, you can probably get away with a longer time period.
// pages/index.js - getStaticProps()

return {
  props: {
    pageData
  },
  revalidate: 60
};
To test if ISR is working, you can put some dates on the page. One is returned from getStaticProps at build time, and the other is returned when the page is loaded. I've used moment to format the dates to time. Your page will look something like this:
// index.js

export default function Home({ data, updatedAt }) {
  return (
    <div>
      <Head>
        <title>My App</title>
        <link rel="icon" href="/favicon.ico" />
      </Head>

      <main className="p-12">
        <p className="text-48">
          Rendered: {moment(new Date(updatedAt)).format("h:mm:ssa")}
          <br />
          Loaded: {moment(new Date(Date.now())).format("h:mm:ssa")}
        </p>
      </main>
    </div>
  );
}

export const getStaticProps = async ({ params }) => {
  const pageId = 1;

  // fetch page data using id
  const pageData = await getPageById(pageId);

  return {
    props: {
      pageData,
      updatedAt: Date.now(),
    },
    revalidate: 60,
  };
};
Run npm run build followed by npm run start to see the result - ISR won't be enabled in dev mode. If the timestamps don't match up, ISR is enabled. You should be able to continually refresh the page for the duration of the revalidate timer before the 'rendered' timestamp updates.
2. Add React Query context to _app.js
Now ISR is set up and we've tested it works, it's time to get React Query working. We'll need to create a QueryClient to handle our queries, then add some context to provide our app with a central point of control. The QueryClientProvider allows us to access the same QueryClient using Hooks.
First we'll need to import some things from React Query:
// pages/_app.js

import { useRef } from "react";
import { QueryClient, QueryClientProvider } from "react-query";
Next we create a reference to attach to the QueryClientProvider and add logic to create a new QueryClient if one doesn't exist.
// pages/_app.js

const queryClientRef = useRef();
  if (!queryClientRef.current) {
    queryClientRef.current = new QueryClient();
  }
Finally, we can add our QueryClientProvider and attach our QueryClient using the reference we just made.
// pages/_app.js

return (
    <QueryClientProvider client={queryClientRef.current}>
        <Component {...pageProps} />
    </QueryClientProvider>
  );
Here's how the whole _app.js should look:
// _app.js

import { useRef } from "react";
import { QueryClient, QueryClientProvider } from "react-query";

function MyApp({ Component, pageProps }) {
  const queryClientRef = useRef();
  if (!queryClientRef.current) {
    queryClientRef.current = new QueryClient();
  }

  return (
    <QueryClientProvider client={queryClientRef.current}>
      <Component {...pageProps} />
    </QueryClientProvider>
  );
}

export default MyApp;
3. Prefetch page queries
We've now got a QueryClient on the app, so let's give it some data to revalidate. This is the exact same process as you'd usually use to populate a page using getStaticProps - essentially, return the data inside the props object as usual. This data will be revalidated according to the revalidate timer we set before.
// pages/index.js

export const getStaticProps = async ({ params }) => {
  const pageId = 1; // pageId could be dynamic

  // fetch page data using id
  const pageData = await getPageById(pageId);

  return {
    props: {
      pageData, // this could be data from any kind of request
      pageId
    },
    revalidate: 60 * 5, // 5 minutes
  };
};
4. Set up client-side queries
This is where React Query comes in: if ISR will revalidate our page every 5 minutes, React Query is going to revalidate it immediately upon page load to make sure everything is 100% up-to-date.
We'll use the useQuery hook, set an ID for the request in the first parameter, then an arrow function that returns our request function, and for the third parameter we'll tell it the data it's going to be revalidating. This means that the data const we created will initially be set to the data provided in getStaticProps, but when it's revalidated this value will be automatically updated to the new result.
export default function Home({ pageData, pageId }) {
  const { isLoading, isError, data } = useQuery(
    ["page-data"],
    () => getPageById(pageId),
    {
      initialData: pageData
    }
  );

  return (
    <div>
      <main className="p-12">
        <h1 className="text-48">{data?.title}</h1>
        <p className="text-24">{data?.body}</p>
      </main>
    </div>
  );
}
5. Enjoy insane performance
That's it! You can do npm run start and see your site working.
To improve user experience, it's worth thinking about how you want to use each technology. After all, using React Query for all data is usually overkill.
For page data that might not change often, perhaps just a few times per day or less, then ISR is probably enough. I tend to use ISR mainly for content coming from a CMS - it doesn't need to be live to the minute, it just needs to appear sometime soon after the client changes content.
For data that is constantly updating - news feeds, weather results, any dynamic content - React Query is going to make sure that your page is always updated for every user, regardless of what time they access the site. You could even go a step further and take advantage of HttpOnly cookies with JWT authentication and use React Query for personalised user data, loading into a static 'frame' that is populated on load.
I'm sure I've only scratched the surface of these technologies: There are so many potential applications for this and so much performance to be squeezed out. I hope to see more developers and organisations adopting stale-while-revalidate approaches in future.
// index.js

export const getPageById = async (id) => {
  const res = await axios
    .get(
      "https://jsonplaceholder.typicode.com/posts/" +
        (Math.floor(Math.random() * 100) + 1)
    )
    .catch((err) => err);

  return res.data;
};


Latest comments (0)