The less prerequisites you need before building an app the less resitance you will feel to build it. Sometimes you just want to build stuff. You don’t want to worry about the friction that comes with setting up an infrastructure.
I write a lot of UI code every day and sometimes I just want to add some data to bring it to life. But I don’t want to set up a server yet. Amplify Admin UI Sandbox has been a super useful tool for me in the past few weeks to build full featured, data-backed frontend without setting up a server.
Amplify Admin UI
Amplify Admin UI is one of the tools in the AWS Amplify toolbox. You have two options for creating and managing an Amplify backend:
- A CLI + Schema file combo
- Admin UI
With the CLI and Schema file option you set up a backend using a CLI command, then design a schema for your data, auth, relationship, etc using a schema file. This option is preferred for automation but tedious and error prone.
Admin UI is a UI version of the first option. Instad of using the CLI and editing a file, you use a UI with visual guides to set up an Amplify backend.
Here is a screenshot of adding two models to your database
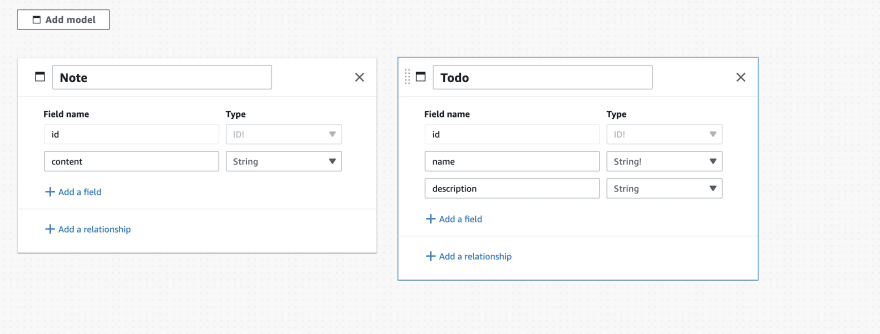
And here is how to create a relationship between them

Amplify Admin UI Sandbox
To use Admin UI, you need an account. If you want to use your models locally without setting up an account, then you need the Admin UI Sandbox.
The Admin UI Sandbox allows you the same feature as the Admin UI but with zero account set up. You can model your data and start using the model on a local project.
The reason this works is because of Amplify Datastore which has a local-first data persistence strategy. Your data is stored in the browser’s Index DB first before it is synched to the cloud. Since synching is optional, you can use the local data for building and testing.
Setup a Project with Sandbox
Head to https://sandbox.amplifyapp.com/getting-started and click the Get Started button on the Create an app backend card

On the next page, click the Data card

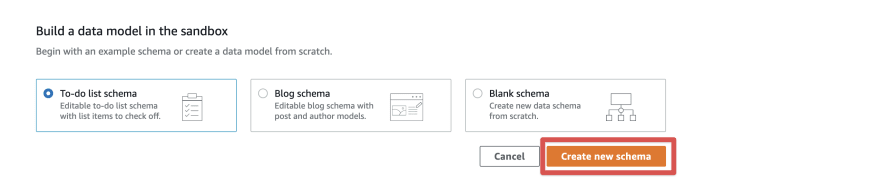
Leave the default To-do list schema as the starter schema and click Create new schema
If you look at the browser URL, it looks like this:
https://sandbox.amplifyapp.com/schema-design/6d3c7f99-5f64-46e5-bedb-7b3b894792bb
6d3c7f99-5f64-46e5-bedb-7b3b894792bb is the unique ID of your sandbox.
That’s all it takes to create a Sandbox.
Model Your Data
You can add more models (tables) to your database by clicking the Add model button

I am just going to leave it to be a simple single todo model so we can move on to building the UI
Create a React App
Create a new React app using create-react-app
npx create-react-app zero-cloud
cd zero-cloud
Install the Amplify CLI command and pull the Sandbox into your React project:
## Install CLI command
npm install -g @aws-amplify/cli

## Pull sandbox into project
amplify pull --sandboxId <Sandbox ID> # eg 6d3c7f99-5f64-46e5-bedb-7b3b894792bb
Replace the <Sandbox ID> with your sandbox ID which you can find in your URL.
Install the JS Amplify library in your React project:
npm install aws-amplify
Configure Amplify in your src/index.js file:
import Amplify from 'aws-amplify'
import awsconfig from './aws-exports'
Amplify.configure(awsconfig)
Creating Data
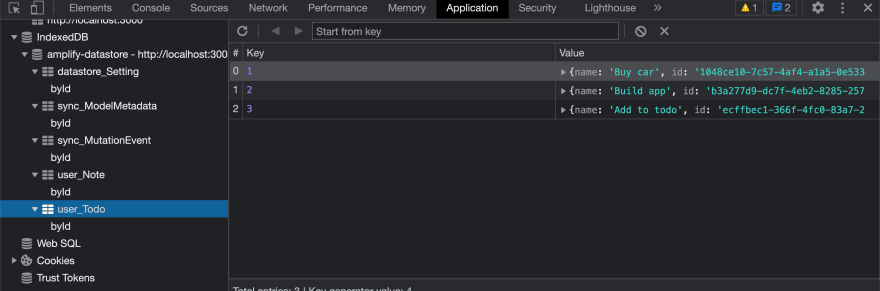
You can start adding data to your todo model and Amplify will store the data in your browser’s Index DB.
Add a form to the App component in src/App.js:
import { DataStore } from "@aws-amplify/datastore";
import React from "react";
import { Todo } from "./models";
function App() {
  const [todo, setTodo] = React.useState("");
  async function saveTodo(todo) {
    await DataStore.save(
      new Todo({
        name: todo,
      })
    );
  }
  return (
    <div className="App">
      <form
        onSubmit={(e) => {
          e.preventDefault();
          saveTodo(todo);
        }}
      >
        <input
          type="text"
          placeholder="Todo"
          onChange={(e) => setTodo(e.target.value)}
        />
        <button type="submit">Submit</button>
      </form>
    </div>
  );
}
export default App;
When you submit the form, it calls the saveTodo function which calls DataStore.save to save the todo item in Amplify DataStore.
If you look in your Index DB, you will find the todo item you just created.
Reading Data
You can also read data using the DataStore module. In the example below, I am calling the Datastore.query method after the component renders for the first time.
import { DataStore } from "@aws-amplify/datastore";
import React from "react";
import { Todo } from "./models";
function App() {
  //...
  const [todos, setTodos] = React.useState([]);
  async function saveTodo(todo) {
    //...
    setTodos([...todos, saved]);
  }
  async function fetchTodos() {
    const todos = await DataStore.query(Todo);
    setTodos(todos);
  }
  React.useEffect(() => {
    fetchTodos();
  }, []);
  return (
    <div className="App">
      // ...
      <ul>
        {todos.map((t) => (
          <li key={t.id}>{t.name}</li>
        ))}
      </ul>
    </div>
  );
}
export default App;
Conclusion
Learn more about Admin UI and Admin UI Sandbox:

Top comments (0)