Hello, #DEVCommunity! For the past year, Codecademy Docs, or just "Docs", has grown into over 1,000 entries covering a variety of concepts and terms related to programming languages and frameworks. In this post, we will learn about how to contribute to Docs!
Table of Contents
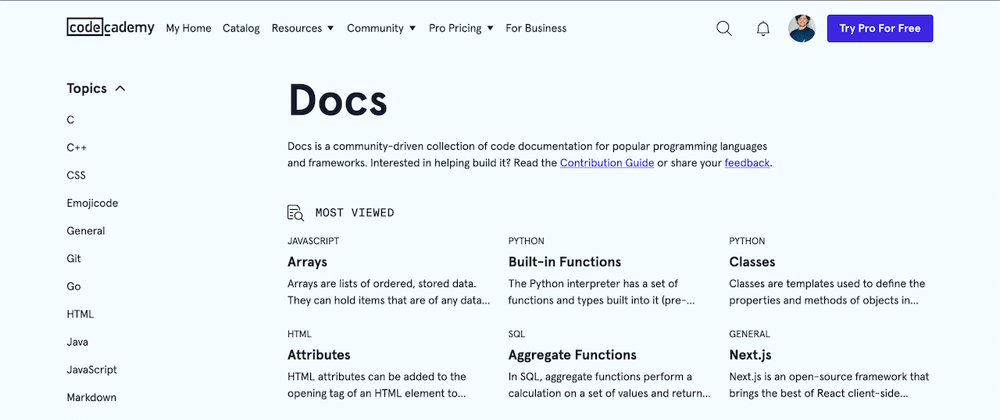
What is Codecademy Docs?
Docsis a free, open-contribution resource that has an ever-growing collection of entries spanning many languages and frameworks, including:
- C++
- CSS
- HTML
- JavaScript
- React
- SQL

There are currently more than 1000 entries that have been submitted and edited by learners from across the world! Docs was also recently added on Product Hunt and has already amassed over 150 upvotes.
How does it work?
Docs is built by the community and maintained by Codecademy. Every time a new/edited entry goes live, if they want, the author can be credited on the "Contributors" list for that entry.

Docs Github repo
All of the changes to Docs are housed in the Codecademy/docs repo on GitHub.
The "Pull requests" tab contains any open PRs pertaining to Docs entries.
Answering an issue
Issues are ideally created by Docs maintainers in the "Issues" tab to request new entries, edits, or bug fixes. However, this is the place where many contributors go to pick a subject that is appealing and create entries about them.

If you see an issue that you'd like to work on, select it and leave a comment on the thread. Someone from our team will reach out!
Creating a new entry
The following sets of instructions represent two common workflows for contributing to Docs. Contributing to Docs is a great way of brushing up on Git using the command line.
1. Fork the Docs repo and clone locally
To mitigate any conflicts when merging changes, we recommend that you fork the Codecademy/docs repo.

From your forked Docs repo (or your remote repo), you can then clone the project onto your local machine using the repo URL (I usually go with the HTTPS one). This will create your local repo.
git clone https://github.com/github_username/docs.git
Before working on any new changes, always make sure sure that your forked main branch is even with the original Codecademy/docs:main branch. You do this by clicking "Fetch Upstream" and then "Fetch and Merge" on your remote repo:

Then, pull those changes down to your local repo (make sure you're on your main branch):
git checkout main
git pull
2. Create and switch into separate branch
Another important part of contributing to the Docs repo is to never push changes from your forked repo's main branch. This is because reviewers and maintainers may want to test your changes on their own forks. However, they can't do this if the name of the branch they're pulling from is also called main. Therefore, do the following, always create and switch into a separate branch before editing files:
git checkout -b separate-branch
3. Edit and save the file
In this step, go ahead and make all the necessary changes to the file and save afterwards. When contributing to Docs, you should only work on a single entry (a single file) at a time.
4. Commit and push changes to separate branch
Tip: I run git status before following this step just to see which files are staged vs. un-staged for commit.
When finished making changes, we can add (or stage) the files for commit:
git add <space-separated list of files here>
git commit -m "brief summary of changes."
This next part is crucial: we're gonna push the changes up to the branch we created in the last step.
git push origin separate-branch
This will cause a remote-equivalent of the branch to be created on GitHub and, by extension, trigger a prompt to create a new pull request.

The origin remote is the connection between your local repo and the remote repo. It can be set with the git remote add command. It is also recommended that you set up an upstream remote that points to the base Codecademy/docs repo:
git remote add origin https://github.com/Dusch4593/docs.git
git remote add upstream https://github.com/Codecademy/docs.git
The git remote -v command can then be run to check that the remotes were set up correctly:
git remote -v
origin  https://github.com/github_username/docs.git (fetch)
origin  https://github.com/github_username/docs.git (push)
upstream https://github.com/Codecademy/docs.git (fetch)
upstream https://github.com/Codecademy/docs.git (pull)
5. Create pull request on GitHub
After the staged changes are committed and pushed, it is time to switch over to GitHub and finish by creating a pull request, or PR.
When we open up our forked repository, we will notice a notification that appears near the top:

After clicking on "Compare & pull request", we will be directed to a page with a markdown editor for creating the PR:

After filling out some of the provided fields and checking all the boxes (please do!) we can click "Create pull request."
Past this point, the review process can begin where as many as three reviews can take place depending on depth and how many files are involved with the PR.
Using the GitHub UI
Alternatively, this process can be performed entirely from GitHub's user interface (UI) on the web, no command line necessary! The following steps are outlined below:
- Create a new PR branch on your forked repo.

- Find a place to create new content:
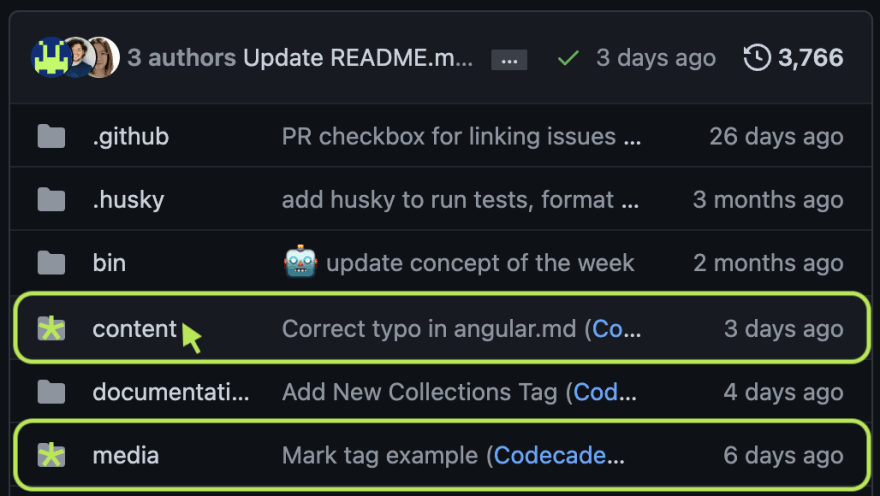
- Create and name a new file:

- Files can be made within new or existing folders as well!
- Commit the newly-changed file:
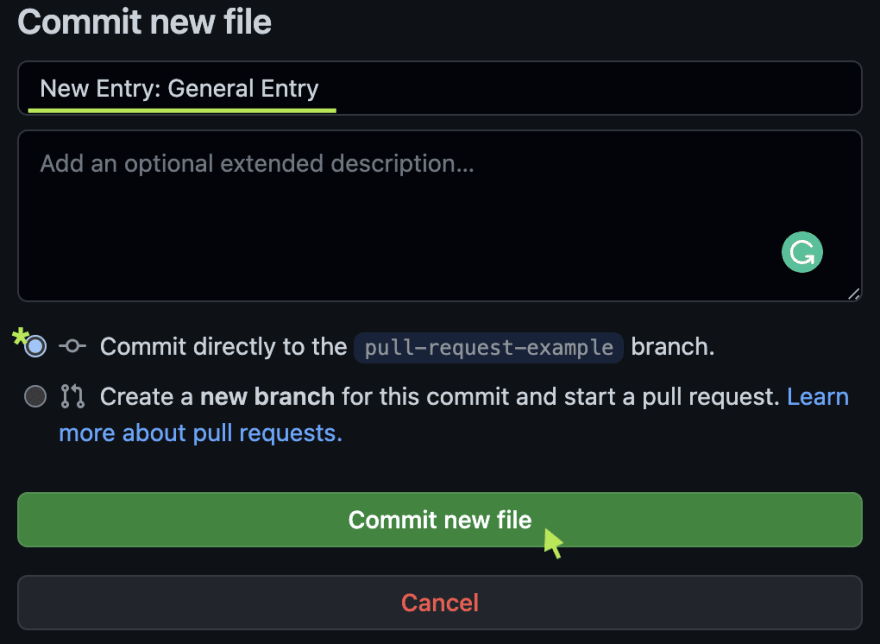
- Finish by creating a new pull request (using step 5 under "Using Git").
Editing an existing entry
There are two distinct methods for editing an existing Docs entry:
- By following the same steps listed in the previous section.
- By editing the file and committing the changes directly on GitHub.
For the second method, a great place to start is from a live entry on the Docs site.

Near the top-right corner of the page for any Docs entry is an "Edit this page on GitHub" link to the equivalent file on the Docs repo, ready for editing!

After making changes, scroll down near the bottom to find a prompt for committing the changes and submitting a pull request.

Inside this prompt, you can:
- Give the commit a specific name and description.
- Custom-name the separate branch that will be auto-created by the prompt.
Handling bugs and errors
For bugs and errors, your options include:
- Reporting it by filling out this issue form.
- Following the steps outlined earlier in the "Editing an existing entry" section.
Conclusion
At this point, you will have committed/pushed your changes and submitted a pull request to be reviewed by either me or one of my colleagues. After we've approved and merged the changes, congratulations! You've just made your first contribution on Codecademy Docs!
I hope this post was help to anyone interested in building the next best documentation resource. I'm excited to have helped build this project and I hope you'll come and help us build it more!
To hear any updates with Docs, go to #CodecademyDocs on Twitter. And please feel free to leave us any feedback about Docs here.


Top comments (0)