
Chris McCord showed how a single Phoenix server could power a million connections. That means a million people send and receive messages in a chat application powered only by a single physical server.
Phoenix is industry-leading when it comes to scalability and real-time systems.
What is a real-time system?
You might be more familiar with a typical one-way server request. The client requests information from the server, and the server responds.

WebSockets
Websockets allow for direct two-way communication between the client and server. Therefore, for most real-time applications, WebSockets are preferable.
At any point, the client or the server can send a message to the other. Websockets are the default method of real-time communication in Phoenix.
Long polling
Long polling is another less popular communication protocol for real-time features often used when clients have a poor internet connection. Long polling is a continuous cycle of request and response rather than open two-way communication.
The client establishes a connection. The connection then remains open until the server times out or responds. The client then reestablishes a connection, and the cycle continues.

This allows the server to control when to update the client and benefits clients with poor internet connections.
"A client can change from WebSocket to long polling if something goes wrong, such as poor network connectivity." - Pragmatic Programmer
Phoenix Channels
Channels are an exciting part of Phoenix that enable soft real-time communication with and between millions of connected clients.
Some possible use cases include:
Chat rooms and APIs for messaging apps
Breaking news, like “a goal was scored” or “an earthquake is coming”
Tracking trains, trucks, or race participants on a map
Events in multiplayer games
Monitoring sensors and controlling lights
Phoenix Channel Documentation
Some other use cases include:
Collaborative documents
Unified cross-tab experience. For example, a shopping cart that updates even across multiple tabs.
Phoenix channels allow real-time features across many clients. Here’s what that looks like in practice.
Notice that when a message is sent, it updates both browser windows.
Phoenix Real-time Infrastructure
When you generate a new phoenix project
mix phx.new app
Phoenix provides everything you need to get started with real-time features. The important pieces to know are the Endpoint, Socket, Topic, and Channel.
Endpoint
Defines a Phoenix endpoint.
The endpoint is the boundary where all requests to your web application start. It is also the interface your application provides to the underlying web servers.
Overall, an endpoint has three responsibilities:
to provide a wrapper for starting and stopping the endpoint as part of a supervision tree
to define an initial plug pipeline for requests to pass through
to host web specific configuration for your application
- Phoenix Endpoint Documentation
In your Phoenix application in the endpoint.ex file, you’ll notice the Endpoint sets up the user socket by default. It also sets up a LiveView socket, but we’ll focus on the user socket.
The Socket
The socket ties transports and channels together.
By default, Phoenix uses WebSockets instead of long-polling, but it comes with support for both. Notice websockets: true and longpolling: false in the socket method.

Sockets must define two callbacks, connect and id . These callbacks are used to authenticate and identify socket connections.
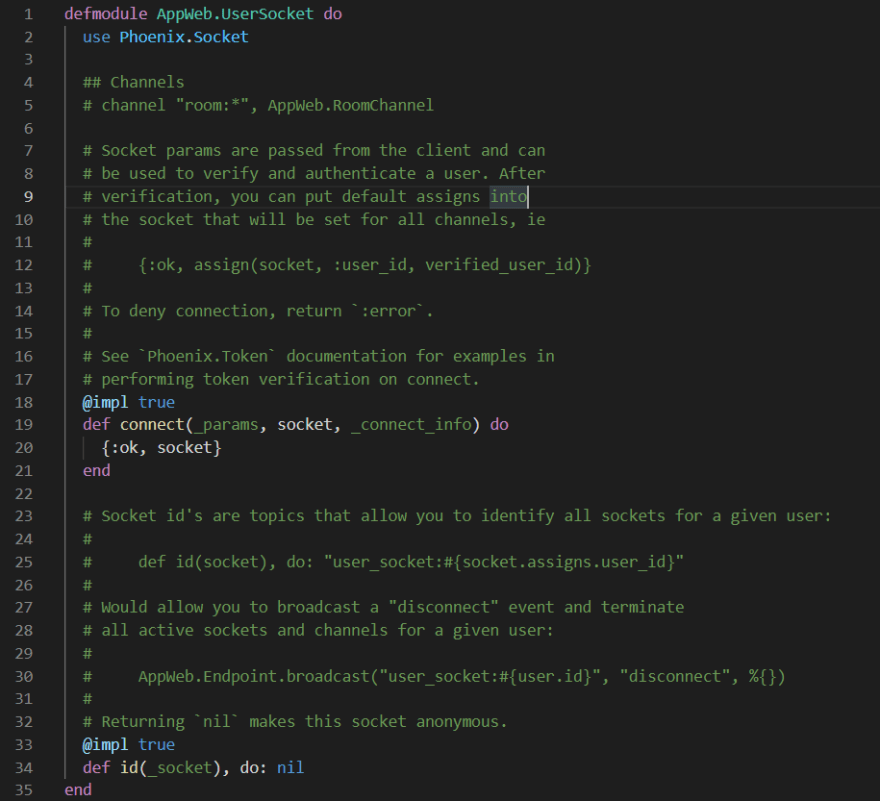
The socket manages the different channels in your Phoenix application. You can connect a channel under a particular context using the built-in channel method provided by the Phoenix.Socket module. The channel method takes in two values, the context for messages and the Channel module to handle messages under that context.
For example, here’s how to connect all messages under the chat context to the ChatChannel. The asterisk * is a wildcard. This means the ChatChannel handles all events under the chat topic.

The Channel
To create a new channel, you can use the mix phx.gen.channel command.

This generates a ChatChannel that looks like this.

This channel is responsible for handling the live communication between the client and server.
By default, generated channels contain a join method that handles connecting the client to the channel. This join method uses the authorized? method as a placeholder for any authorization logic that you might want to implement in the future. By default, all join requests are authorized.
channels use handle_in methods that handle receiving a message from a client. The first parameter of the handle_in method is an event name string to pattern match on. The client sends the same event name string so that the channel knows which handle_in method should handle the incoming message.
The Client
Phoenix provides a socket.js file to handle connecting to the server from the client. There you will find some boilerplate code to handle connecting to a channel.

Change that code to match your topic and subtopic. This should match the string you used for the channel’s join method.

Import the socket in your app.js file.

Start your phoenix project using mix phx.server and open up your browser console (usually f12), and you’ll see that you’re joining successfully.

Sending Messages
You can send messages using the channel.push() method

Receiving Messages
You can handle receiving messages using the channel.on method.

channel.on gets triggered by the broadcast method inside of the Phoenix Channel.

Here’s what that looks like if you add both methods to the socket.js file.

Now you’ll see the following in your browser console:

Intercepting Messages
You can intercept messages using the handle_out method in the Phoenix Channel. You can override values, perform authentication, or add additional information.
The handle_out method is triggered whenever the broadcast method is called by the handle_in method with the same event string. In this case, “shout.”
You also have to include the event name in an intercept call inside of the Phoenix Channel.
To push the message to the client inside of the handle_out method use the push method.

When you load the app inside your browser console, you will see the payload with extra information.

Conclusion
Now you know everything you need to know to handle receiving, sending, and intercepting messages using Phoenix Channels.
If you’d like to know more about what you can do with Phoenix Channels, then the Phoenix Documentation is a great place to start!
Originally published at codecast.io by Brooklin Myer

Top comments (0)