MochaJs and tests driven by input data ("data driven tests")
One thing I really like and 'dislike' about JavaScript is that there is not a single-better option of doing the same thing
What I mean is that the language provides you with enough flexibility to write the same functionality in many different ways, and deciding which is the best or worst way to implement it, will probably be very subjective.
I will explain below a very intuitive approach to use data driven with mochaJS in order to to cover a real life scenario
Pre-Requisites
For this article I will use nodeJS, so make sure that is installed.
Getting Started
First, lets create a folder project folder and create our package.json file
$ mkdir mocha-ddt && cd mocha-ddt
$ touch package.json
Now copy the following snippet in our recently created file. This is far from a real package.json file but works for the purpose
{
  "name": "mocha-sample",
  "scripts": {
    "test": "mocha"
  },
  "devDependencies": {
    "chai": "^4.2.0",
    "chai-http": "^4.3.0",
    "mocha": "^6.2.2"
  }
}
We just defined some dev dependencies and a script to run our tests. We are going to use chai for the assertions and http requests
Finally let's create a test folder under the root project, so we end up with the following path: mocha-ddt/test
Let's keep it simple
Firs't thing to understand is how mocha and chai work together. create a file called test.js under the test folder.
then we are going to add a simple test:
var chai = require('chai');  // assertions library
describe('When Math works', function() { // describe is our spec definition
  it('should return the result of a sum operation', function() { // this is our test case
    let sum = 2 + 2; // do I need to explain this?
    chai.expect(sum,'In case this fails this is the error').to.be.equal(4); // very simple validation
  });
});
Now we can run our test case, so under the root folder execute:
$ npm run test
And we can see the following output:
Let's get into a real life test scenario
Many times in my career I have being given with a list of links and a test case that says: For all this links, verify which ones work. So instead of writing different test cases, or even worse request them manually, we can use DDT to accomplish the task:
Create a new file mocha-ddt.js under the test folder and add the following:
// required libraries + chai-http as a chai plugin
var chai = require('chai'),
  chaiHttp = require('chai-http'); // for this example we are going to use chai-http to perform http requests
chai.use(chaiHttp);

// this is the magical data source. we are creating a json list of urls and a expected response code for each
let urls = [
    { 'url' : 'https://www.google.com', 'response_code' : 200},
    { 'url' : 'https://pjcalvo.github.io', 'response_code' : 200},
    { 'url' : 'https://dev.to/error500', 'response_code' : 500},
    { 'url' : 'https://pjcalvo.github.io/notfound/page', 'response_code' : 404}
]

describe('When the links are working as expected', function() {

  urls.forEach(({url, response_code }) => { // foreach is an iterator function that will run thought all the items on urls

    // using ` and $ {} we can simple format the test case name to a meaningful output
    it(`should return '${ response_code }' for request '${ url }'`, function(done) {  // done parameter is required by http-chai to handle the it when the operation is completed

      chai.request(url) // this url comes from urls.foreach element
        .get('/') // just on the
        .end(function(err, res) {
           // here we will validate that the response call from http-chai will match the url response_code given above
          expect(res,`... instead got ${ res.status}`).to.have.status(response_code);
          done(); // you need this here to tell mocha that the request is completed
        });
    });
  });
});
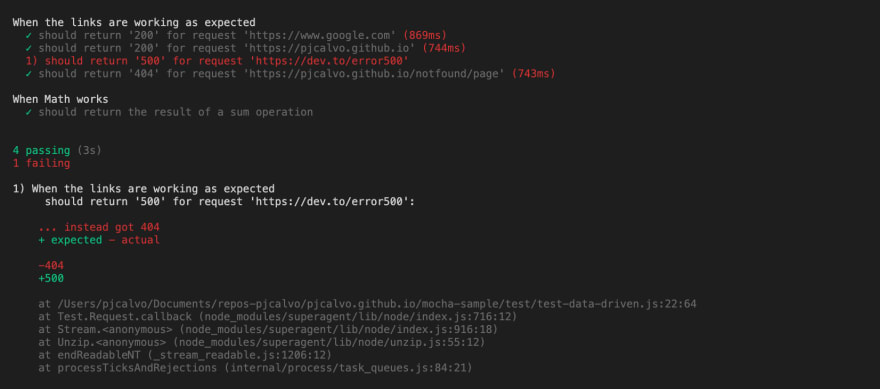
Let's add a little explanation before running this sample: because javaScript is an interpreted language (which means that NodeJS reads every line at execution time and interpret it) we have a certain flexibility to create test cases during runtime. We could also create describes and add subsets of test cases based on if conditions, unlike Java in which the test cases need to be compiled in order for the test runner to find them. But we are not comparing apples with gallinas here.
So running again the test command npm run test, gives us a new very nice output.
Duty Segregation
An even cleaner solution would be separate the json data from the test file and add it to a urls.json and use a custom wrapper to read, transform and present it to the test files.
// data-wrapper.js
getUrl((condition) => {
  if (condition)
    return JSON.parse(fs.readFileSync('mocha-ddt/test/url.json'));
  else
    return JSON.parse(fs.readFileSync('mocha-ddt/test/thisotherjson.json'));

// test file
let testUrls = datawrapper.getUrl(condition);
This is more a suggestion, so we are not fully implementing it.
Final thoughts
As I said at the beginning there are many ways to accomplish the same outcome, I like this way of creating data driven tests because it is really easy to explain and with some teawking and condition it can also manage more complex scenarios. I have used this approach with UI testing using WDIO as the UI framework and it also adapts very well. just be mindful that UI tests are normally not stateless tests and to accomplish navigability you need to handle proper before and each scenarios.
Comments?
Cheers :) and remember to be data driven
https://pjcalvo.github.com


Oldest comments (0)