This post is an modified excerpt chapter from my new EBook Angular Form Essentials
When building out large Angular applications likely, you will come across the use case of creating reusable Forms as well as nesting form components. In this post, we will cover how to build a reusable Angular form using the ControlValueAccessor API.
For our use case, we will have three forms we need to build. The first form will be a create password form that will have two fields, password and confirmPassword. The second form will be a user profile form with three fields, firstName, lastName, and email. Our last a final form will combine both the user profile form and the create password form into a single user sign up form.
We split the sign up form into the two smaller forms to allow the forms to be reusable in other parts of our application. For example, the password form can be used in the sign up form as well as a password reset form.
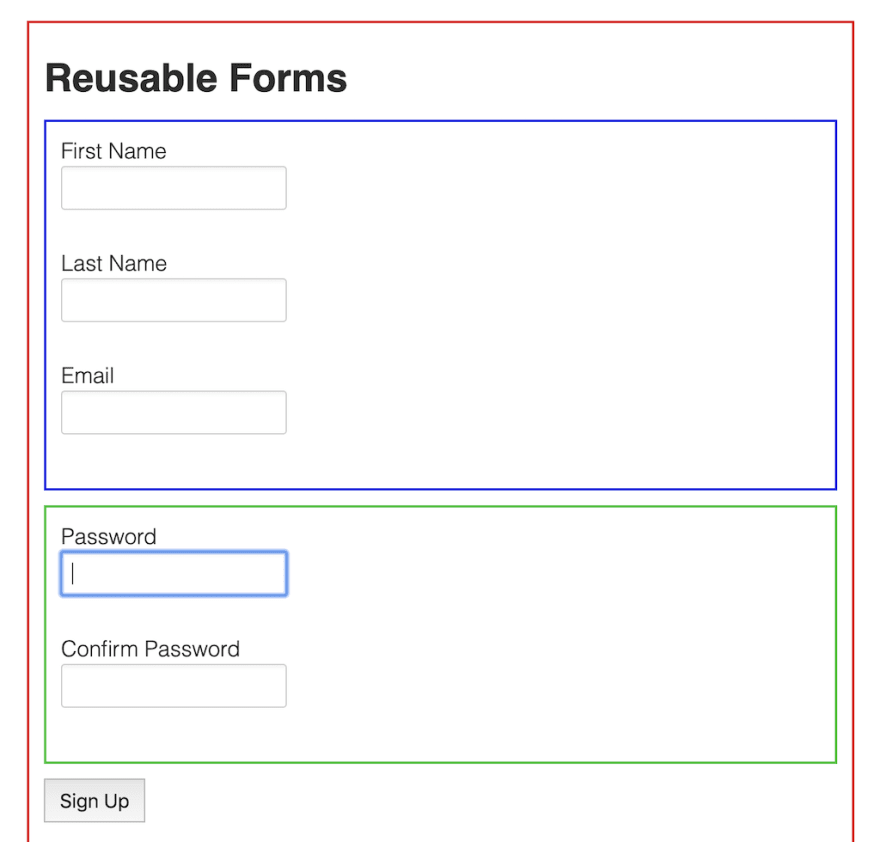
In the image above, we see all three forms. Each form is highlighted with a different color. The blue form is the user profile form. The green form is the create password form, and the red form is the combined user sign up form. Let's start with the parent user sign up form.
import { Component } from '@angular/core';
import { FormGroup, FormBuilder } from '@angular/forms';

@Component({
  selector: 'app-reusable-forms-example',
  templateUrl: './reusable-forms-example.component.html',
  styleUrls: ['./reusable-forms-example.component.scss']
})
export class ReusableFormsExampleComponent {
  signupForm: FormGroup;

  constructor(private formBuilder: FormBuilder) {
    this.signupForm = this.formBuilder.group({
      password: [],
      profile: []
    });
  }

  submit() {
    console.log(this.signupForm.value);
  }
}
Our parent form is a standard reactive form using the FormBuilder service. Notice how we have only two control names, password and profile. Only two control names are needed as they represent a single subform control. Each of our form controls are nested reactive forms. Even though they are nested forms, the parent form sees them as just another form control.
<form [formGroup]="signupForm" (ngSubmit)="submit()">
  <app-profile-form formControlName="profile"></app-profile-form>
  <app-password-form formControlName="password"></app-password-form>
  <button>Sign Up</button>
</form>
By having our subforms implement the ControlValueAccessor API, each subform is a stand-alone reusable form control. By making each subform a standalone control, it makes it easy to reuse, validate, and nest our custom forms in Angular.
Sub Forms with Control Value Accessor
Let's take a look at the profile form to see how to implement it using the ControlValueAccessor API to make it reusable. Our profile form has three inputs, firstName, lastName, and email. In this form, the email input is required. Let's first start with the template.
<div [formGroup]="form">
  <label for="first-name">First Name</label>
  <input formControlName="firstName" id="first-name" />

  <label for="last-name">Last Name</label>
  <input formControlName="lastName" id="last-name" />

  <label for="email">Email</label>
  <input formControlName="email" type="email" id="email" />
  <div *ngIf="emailControl.touched && emailControl.hasError('required')" class="error">
    email is required
  </div>
</div>
This form is a standard reactive form but notice that we don't use a form tag and instead use a div. We don't use a form tag because when we make this a custom control that we can embed into other forms and we cannot nest a form element in another form. In the TypeScript, we will create a reactive form using the FormBuilder as well as the ControlValueAccessor API.
import { Component, forwardRef, OnDestroy } from '@angular/core';
import { FormBuilder, FormGroup, Validators } from '@angular/forms';

@Component({
  selector: 'app-profile-form',
  templateUrl: './profile-form.component.html',
  styleUrls: ['./profile-form.component.scss']
})
export class ProfileFormComponent {
  form: FormGroup;

  get emailControl() {
    return this.form.controls.email;
  }

  constructor(private formBuilder: FormBuilder) {
    this.form = this.formBuilder.group({
      firstName: [],
      lastName: [],
      email: ['', Validators.required]
    });
  }
}
The profile form we create with the FormBuilder service. To make
the form reusable we will use the ControlValueAccessor to map the form to the parent form and relay updates such as value changes and validations updates.
import { Component, forwardRef, OnDestroy } from '@angular/core';
import { ControlValueAccessor, NG_VALUE_ACCESSOR, FormBuilder, FormGroup, Validators, FormControl, NG_VALIDATORS } from '@angular/forms';
import { Subscription } from 'rxjs';

// describes what the return value of the form control will look like
export interface ProfileFormValues {
  firstName: string;
  lastName: string;
  email: number;
}

@Component({
  selector: 'app-profile-form',
  templateUrl: './profile-form.component.html',
  styleUrls: ['./profile-form.component.scss'],
  providers: [
    {
      provide: NG_VALUE_ACCESSOR,
      useExisting: forwardRef(() => ProfileFormComponent),
      multi: true
    },
    {
      provide: NG_VALIDATORS,
      useExisting: forwardRef(() => ProfileFormComponent),
      multi: true,
    }
  ]
})
export class ProfileFormComponent implements ControlValueAccessor, OnDestroy {
  form: FormGroup;
  subscriptions: Subscription[] = [];

  get value(): ProfileFormValues {
    return this.form.value;
  }

  set value(value: ProfileFormValues) {
    this.form.setValue(value);
    this.onChange(value);
    this.onTouched();
  }

  get emailControl() {
    return this.form.controls.email;
  }

  constructor(private formBuilder: FormBuilder) {
    // create the inner form
    this.form = this.formBuilder.group({
      firstName: [],
      lastName: [],
      email: ['', Validators.required]
    });

    this.subscriptions.push(
      // any time the inner form changes update the parent of any change
      this.form.valueChanges.subscribe(value => {
        this.onChange(value);
        this.onTouched();
      })
    );
  }

  ngOnDestroy() {
    this.subscriptions.forEach(s => s.unsubscribe());
  }

  onChange: any = () => {};
  onTouched: any = () => {};

  registerOnChange(fn) {
    this.onChange = fn;
  }

  writeValue(value) {
    if (value) {
      this.value = value;
    }
  }

  registerOnTouched(fn) {
    this.onTouched = fn;
  }

  // communicate the inner form validation to the parent form
  validate(_: FormControl) {
    return this.form.valid ? null : { profile: { valid: false, }, };
  }
}
In our decorator, we register the component using NG_VALUE_ACCESSOR as well as using NG_VALIDATORS to have angular acknowledge that this form will self validate. By self-validating, we can have the form validate its inputs and then communicate the validation state to the parent form.
In the constructor, we listen for our inner form values and the trigger the control to update that the form value has changed.
this.subscriptions.push(
  this.form.valueChanges.subscribe(value => {
    this.onChange(value);
    this.onTouched();
  })
);
We also want the parent form to be able to know if the profile form is valid or not. To do this, we implement a validate() method.
validate(_: FormControl) {
  return this.form.valid ? null : { profile: { valid: false, } };
}
If the inner form is invalid, then we communicate back to the parent form
that the inner form is in an invalid state which will allow us to handle
validation at the parent level. Next, let's take a look at the Password form.
Reusable Password Creation Form
The password form uses the same technique as our profile form. We will use the FormBuilder service as well as the ControlValueAccessor API.
<div [formGroup]="form">
  <label for="password">Password</label>
  <input formControlName="password" type="password" id="password" />
  <div *ngIf="passwordControl.touched && passwordControl.hasError('required')" class="error">
    password is required
  </div>

  <label for="confirm-password">Confirm Password</label>
  <input formControlName="confirmPassword" type="password" id="confirm-password" />
  <div *ngIf="confirmPasswordControl.touched && confirmPasswordControl.hasError('required')" class="error">
    password is required
  </div>

  <div *ngIf="passwordControl.touched && confirmPasswordControl.touched && form.hasError('missmatch')" class="error">
    passwords do not match
  </div>
</div>
The Password form has two inputs, the password as well as the confirm password. The form will also use group validation to make sure that both inputs match correctly.
import { Component, forwardRef, OnDestroy } from '@angular/core';
import { NG_VALUE_ACCESSOR, FormGroup, FormBuilder, ControlValueAccessor, Validators, NG_VALIDATORS, FormControl } from '@angular/forms';
import { Subscription } from 'rxjs';

import { matchingInputsValidator } from './validators';

export interface PasswordFormValues {
  password: string;
  confirmPassword: string;
}

@Component({
  selector: 'app-password-form',
  templateUrl: './password-form.component.html',
  styleUrls: ['./password-form.component.scss'],
  providers: [
    {
      provide: NG_VALUE_ACCESSOR,
      useExisting: forwardRef(() => PasswordFormComponent),
      multi: true
    },
    {
      provide: NG_VALIDATORS,
      useExisting: forwardRef(() => PasswordFormComponent),
      multi: true,
    }
  ]
})
export class PasswordFormComponent implements ControlValueAccessor, OnDestroy {
  form: FormGroup;
  subscriptions: Subscription[] = [];

  get value(): PasswordFormValues {
    return this.form.value;
  }

  set value(value: PasswordFormValues) {
    this.form.setValue(value);
    this.onChange(value);
    this.onTouched();
  }

  get passwordControl() {
    return this.form.controls.password;
  }

  get confirmPasswordControl() {
    return this.form.controls.confirmPassword;
  }

  constructor(private formBuilder: FormBuilder) {
    this.form = this.formBuilder.group({
      password: ['', Validators.required],
      confirmPassword: ['', Validators.required]
    }, { validator: matchingInputsValidator('password', 'confirmPassword') });

    this.subscriptions.push(
      this.form.valueChanges.subscribe(value => {
        this.onChange(value);
        this.onTouched();
      })
    );
  }

  ngOnDestroy() {
    this.subscriptions.forEach(s => s.unsubscribe());
  }

  onChange: any = () => {};
  onTouched: any = () => {};

  registerOnChange(fn) {
    this.onChange = fn;
  }

  writeValue(value) {
    if (value) {
      this.value = value;
    }
  }

  registerOnTouched(fn) {
    this.onTouched = fn;
  }

  validate(_: FormControl) {
    return this.form.valid ? null : { passwords: { valid: false, }, };
  }
}
We define our form with the FormBuilder and then relay that information back to the parent.
constructor(private formBuilder: FormBuilder) {
  this.form = this.formBuilder.group({
    password: ['', Validators.required],
    confirmPassword: ['', Validators.required]
  }, { validator: matchingInputsValidator('password', 'confirmPassword') });

  this.subscriptions.push(
    this.form.valueChanges.subscribe(value => {
      this.onChange(value);
      this.onTouched();
    })
  );
}
We also create the validate method to tell the parent form when the password control form is invalid or valid.
validate(_: FormControl) {
  return this.form.valid ? null : { passwords: { valid: false, }, };
}
Now that we have both subforms created and defined, we can easily reuse them and compose them into other forms in our Angular application. Going back to our sign up form, we can see both subforms used as independent controls.
<form [formGroup]="signupForm" (ngSubmit)="submit()">
  <app-profile-form formControlName="profile"></app-profile-form>
  <app-password-form formControlName="password"></app-password-form>
  <button>Sign Up</button>
</form>

<p>
  Form is {{signupForm.valid ? 'Valid' : 'Invalid'}}
</p>

<pre>
{{signupForm.value | json}}
</pre>
When we submit our form, we get the following form values.
{
  "password": {
    "password": "123456",
    "confirmPassword": "123456"
  },
  "profile": {
    "firstName": "John",
    "lastName": "Doe",
    "email": "example@example.com"
  }
}
Angular passes back the form value the way we structured our subforms making it easy to gather multiple values from composed and nested forms. By using the ControlValueAccessor API we can make our forms reusable and composable for our Angular applications. Find the full working demo here.

Latest comments (0)