Background: "Rosetta" is the name of the Apple Mac application that can emulate x86 architecture even when on an Apple ARM (ie. Apple M1 chip). "Terminal" is the application on Mac that takes command line input (CLI), and is integrated with Visual Studio Code. Visual Studio Code is one of the most popular development IDE tools.
A Rosetta terminal (on MacOS) means you are loading and running the Terminal app using the x86 emulation.
I'll share a few tips on how to set the default terminal in Visual Studio Code.
This is useful for example when developing with Rust and Solana on an Mac with M1 chip. As of December 2021, there were some issues, so developers often use a Rosetta terminal which resolves the issues. (see links at bottom of article for more on that)
Since I am doing some Solana/Rust development currently, I needed Visual Studio Code (VSC) to open the Rosetta terminal by default.
Howto for Visual Studio Code
- Open the VSC Command Palette (Ctrl/Command + Shift + P)
- Type "settings.json" to find related commands
There are a couple variations of how you could do this, such as in User or Workspace settings.
I'm going to show how to do it for the Workspace settings.
(option 1) Change VSC Workspace settings
This method is useful because it's project-specific and you may not want all your projects to default to Rosetta terminal (x86). It saves a settings file in your current project.
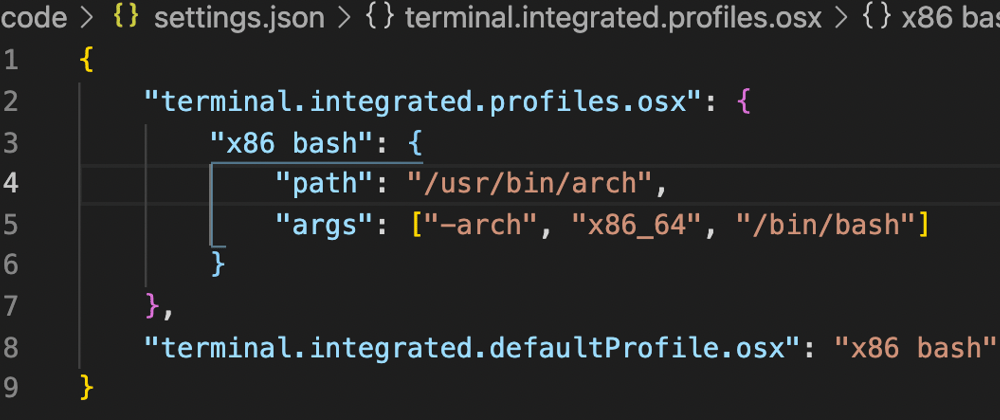
- After typing "settings.json" into Command Palette you should see some selections like this, I chose the Workspace one.
- This brought up an empty file. If you already have Workspace preferences it may show some JSON. Either way, just add the JSON below.
    "terminal.integrated.profiles.osx": {
        "x86 bash": {
            "path": "/usr/bin/arch",
            "args": ["-arch", "x86_64", "/bin/bash"]
        }
    },
    "terminal.integrated.defaultProfile.osx": "x86 bash"
note: you can change this to zsh (/bin/zsh) or another shell, just change the corresponding values as above.
You can also identify if you are using Rosetta terminal (or not) with the command
$ arch
output (validating Rosetta): i386
or
output (validating NOT Rosetta): arm64
After I closed my VSC terminal and initiated a new one it looks like this:
(alternate option) Change VSC User settings
You can also change your Visual Studio Code global User settings to do the same.
It's slightly trickier because you have to find the correct part of the JSON, load that up, add a comma and append it.
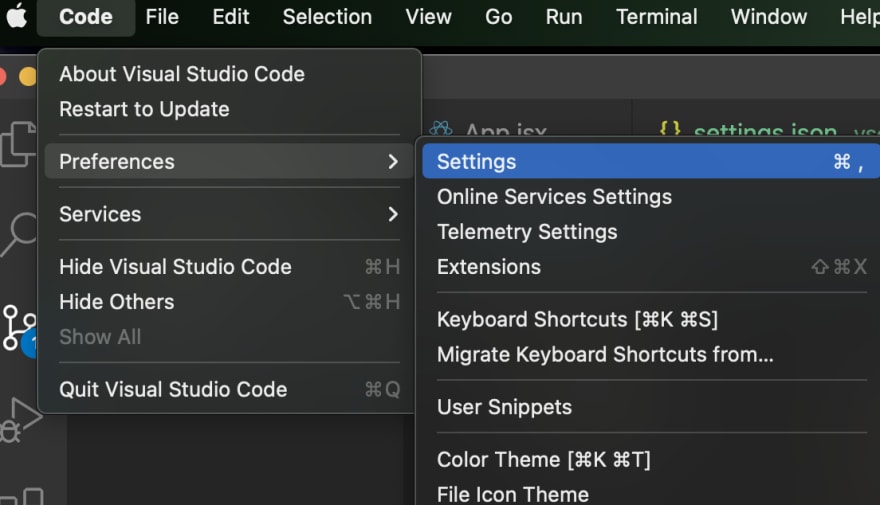
I first went to Settings in the regular app Preferences:
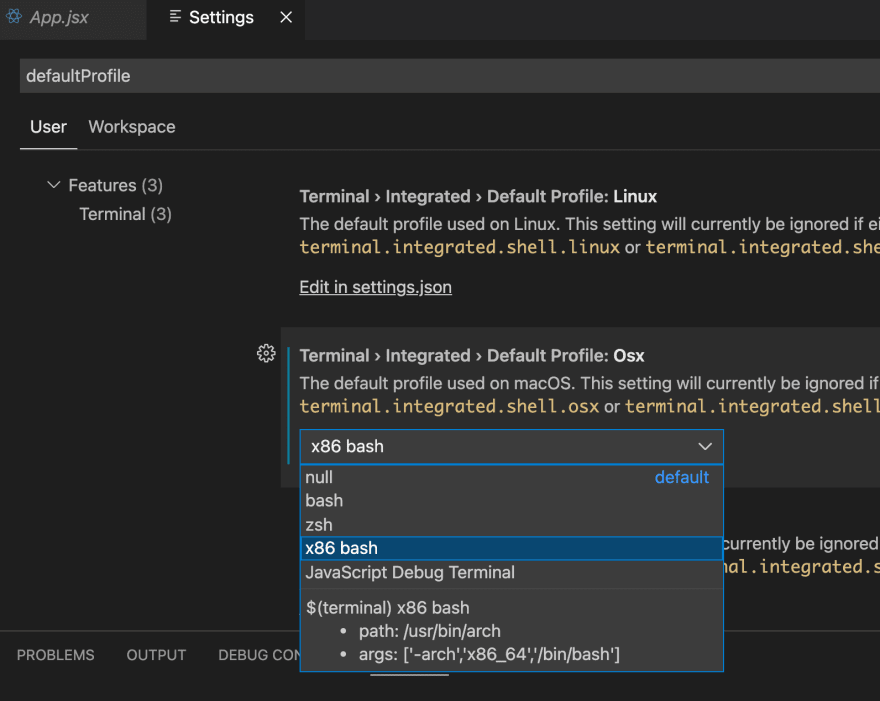
I typed in "defaultProfile". That brings up this menu:
After setting my default terminal, I closed my previous terminal and started a new one. And this is the result:
As I mentioned using Rosetta terminal for Rust/Solana dev, you can find out more on that config here: https://dev.to/nickgarfield/how-to-install-solana-dev-tools-on-an-m1-mac-kfn
Once you are set up for that, you can follow Nader Dabit's Solana/Rust and Phantom tutorial: https://dev.to/dabit3/the-complete-guide-to-full-stack-solana-development-with-react-anchor-rust-and-phantom-3291
Also for citation, note that I originally found the terminal settings info at the following url, expanded on it with screenshots and different methods, and adapted for bash profile: https://stackoverflow.com/questions/70217885/configure-m1-vscode-arm-but-with-a-rosetta-terminal
I hope this was helpful, thanks for checking this article out.
Feel free to comment on any other related helpful suggestions.


Latest comments (0)