


In this tutorial, you’ll build a simple enemy spawning system in Unity. When the player enters a trigger, enemies appear at designated spawn points. The player can remove them by touching them, and the trigger keeps spawning enemies until it reaches a specified total.

Prerequisites
- Unity 6.6 (6000.6.8f1)
- Basic familiarity with the Unity Editor (Hierarchy, Inspector, and Project windows)
- The free First Person + Third Person | Character Controllers package (also known as the Starter Assets) from Unity Technologies
Set up the project
-
Create a new project
In Unity Hub, create a new project and choose the Universal 3D template.

-
Check the empty project
This is what an empty project looks like.

Add a floor
-
Create a plane
Go to GameObject > 3D Object > Plane.

-
Reset the transform
In the Inspector, right-click the Transform header and choose Reset. This puts the floor at the origin.

-
Enlarge the floor
Set the Scale to (5, 1, 5). A Unity plane is 10 × 10 meters by default, so this gives you a 50 × 50 meter floor.

Import the Starter Assets
-
Open the Asset Store tab
Click the Asset Store tab to activate it.

-
Go to the Asset Store website
Click Search online to open the Asset Store.

-
Search for the Starter Assets
Enter Starter Assets Third Person in the search bar at the top, then click the magnifying glass icon.

-
Select the package
Click First Person + Third Person | Character Controllers from Unity Technologies.

-
Add it to your assets
Click Add to My Assets.

-
Open the Package Manager
Back in Unity, open the Package Manager with Window > Package Management > Package Manager.

-
Download the package
Under My Assets, select First Person + Third Person | Character Controllers and click Download.

-
Import the package
When the download finishes, click Import 2.0.2 to project. Your version number may differ.

-
Confirm the files
In the Import Unity Package window, leave everything checked and click Import.

-
Install the dependencies
When asked to install or upgrade dependencies, click Install/Upgrade. If Unity asks to restart the editor, click Yes.

Add the player
-
Open the Prefabs folder
In the Project window, go to
Assets/Starter Assets/Runtime/ThirdPersonController/Prefabs.
-
Drag the player into the scene
Drag
NestedParentArmature_Unpackfrom the Project window into the Hierarchy.
-
Delete the original Main Camera
Select the Main Camera that came with the template, the one at the top of the Hierarchy, and press Delete or select Delete from the right-click menu. The prefab brings its own camera, and two cameras would conflict.

-
Select the player
In the Hierarchy, click the arrow next to
NestedParentArmature_Unpackto expand it, then selectPlayerArmature.
-
Center the player
In the Inspector, set its Position to (0, 0, 0).

The parent object is a container that groups the player and its cameras. The character itself is
PlayerArmature, so that’s the object to position. -
Test the player
Click the Game tab, then press Play. Use WASD to move, the mouse to look around, Space to jump, and Shift to sprint.

If you click inside the Game view, the mouse cursor is hidden and locked. Press Esc to get it back.

If the character falls through the floor, stop Play mode and set the Y position of
PlayerArmatureto 0.1. -
Save the scene
While the game runs, the Play button becomes a Stop button. Click it to stop the game, then press Ctrl + S to save the scene. Changes made during Play mode are lost when you stop, so make any adjustments after you exit.

Create the enemy
-
Make folders for your files
Make a
SpawnTutorialfolder withMaterials,Prefabs, andScriptsinside to keep your work separate from the Starter Assets.
-
Create the capsule
First you create the enemy in the scene. Later, you turn it into a prefab.
- Go to GameObject > 3D Object > Capsule to create a capsule for the enemy. A white capsule appears in the Scene view and in the Hierarchy as
Capsule. -
Rename it to
Enemy.
- Go to GameObject > 3D Object > Capsule to create a capsule for the enemy. A white capsule appears in the Scene view and in the Hierarchy as
-
Make the enemy red
Give the enemy a simple red material to mark it as hostile.
- In the Project window, open
SpawnTutorial/Materials. - Right-click in the empty area and choose Create > Material. In some Unity 6 versions, it’s under Create > Rendering > Material.
-
Rename it
EnemyRed.
-
With
EnemyRedselected, find Base Map in the Inspector. It has a small color box on the right.
-
Click the color box and pick red. You can type
FF0000into the Hexadecimal field for pure red, or choose a slightly darker red likeCC0000, which looks less harsh under lighting.
Close the color picker.
-
Apply the material to the capsule.
Drag
EnemyRedfrom the Project window onto the capsule, either in the Scene view or onEnemyin the Hierarchy. The capsule turns red.The capsule may sit partly in the floor. That's fine, since spawned enemies get their position from spawn points.

- In the Project window, open
-
Make the collider a trigger
A normal collider is solid, so the player would bump into the capsule. A trigger collider lets the player walk into it, and Unity sends an
OnTriggerEntermessage that your script will use to remove the enemy.- Select
Enemyin the Hierarchy. -
In the Capsule Collider component, check Is Trigger.

- Select
-
Turn it into a prefab
A prefab is a reusable template saved in your project. The spawner will create copies of it at runtime, so the enemy in the scene is no longer needed once the prefab exists.
-
Drag
Enemyfrom the Hierarchy into theSpawnTutorial/Prefabsfolder in the Project window.
Select
Enemyin the Hierarchy and press Delete.
-
-
Check the player's tag
The
Enemyscript identifies the player by its tag, soPlayerArmatureneeds the Player tag. The Starter Assets already set this tag, but it’s worth confirming.- Select
PlayerArmaturein the Hierarchy. -
In the Inspector, confirm Tag is set to Player. If it isn't, choose Player from the drop-down.

- Select
-
Create the Enemy script
The enemy removes itself when the player touches it. Keeping this logic on the enemy means you don't have to modify the Starter Assets player.
- In
SpawnTutorial/Scripts, right-click and choose Create > Scripting > MonoBehaviour Script. Name itEnemy. -
Double-click
Enemyto open it in your code editor, and replace its contents with this code:
using UnityEngine;

public class Enemy : MonoBehaviour
{
    private void OnTriggerEnter(Collider other)
    {
        if (other.CompareTag("Player"))
        {
            Destroy(gameObject);
        }
    }
}
Save the file and switch back to Unity. Unity recompiles the script automatically.
-
Select the
Enemyprefab inSpawnTutorial/Prefabs. In the Inspector, click Add Component and chooseEnemy.
How it works:
- In
- Unity calls `OnTriggerEnter` when another collider enters the enemy's trigger. The player's Character Controller counts as a collider, so no Rigidbody is needed.
- `CompareTag("Player")` checks whether the object that entered is the player. It's faster than comparing `other.tag == "Player"`.
- `Destroy(gameObject)` removes the whole enemy. Writing `Destroy(this)` instead would remove only the script and leave the capsule in the scene.
-
Test the enemy
- Drag the
Enemyprefab into the Scene view a few meters in front of the player. Unity places it on the floor. - Press Play and walk into the capsule. It disappears.
-
Stop Play mode and delete the test enemy from the scene.

- Drag the
Create the spawn trigger
The spawn trigger is a box marked by a see-through orange visual. When the player walks into it, the box disappears and enemies spawn at a set of spawn points, keeping no more than a set number alive at once until the trigger has spawned its total.
-
Create the SpawnGroupTrigger script
- In
SpawnTutorial/Scripts, create a new MonoBehaviour Script namedSpawnGroupTrigger. -
Double-click it to open it in your code editor, and replace its contents with this code:
using System.Collections.Generic;
using UnityEngine;
using UnityEngine.Events;

[RequireComponent(typeof(BoxCollider))]
public class SpawnGroupTrigger : MonoBehaviour
{
    [SerializeField] private GameObject enemyPrefab;
    [SerializeField] private Transform[] spawnPoints;
    [SerializeField, Min(1)] private int totalToSpawn = 6;
    [SerializeField, Min(1)] private int maxAlive = 3;
    [SerializeField, Min(0f)] private float minDistanceFromPlayer = 3f;
    [SerializeField] private bool disableAfterUse = true;
    [SerializeField] private UnityEvent onTriggered;

    private readonly List<GameObject> aliveEnemies = new List<GameObject>();
    private Transform player;
    private int spawnedCount;
    private bool isSpawning;
    private bool hasTriggered;

    // Called when the component is first added. Makes the box a trigger automatically.
    private void Reset()
    {
        GetComponent<BoxCollider>().isTrigger = true;
    }

    private void OnTriggerEnter(Collider other)
    {
        if (!other.CompareTag("Player")) return;
        if (isSpawning) return;
        if (disableAfterUse && hasTriggered) return;

        if (enemyPrefab == null || spawnPoints == null || spawnPoints.Length == 0)
        {
            Debug.LogWarning($"{name}: assign an enemy prefab and at least one spawn point.", this);
            return;
        }

        player = other.transform;
        hasTriggered = true;
        isSpawning = true;
        spawnedCount = 0;
        onTriggered?.Invoke();
    }

    private void Update()
    {
        if (!isSpawning) return;

        // Destroyed objects compare equal to null in Unity, so this drops enemies the player removed.
        aliveEnemies.RemoveAll(enemy => enemy == null);

        while (aliveEnemies.Count < maxAlive && spawnedCount < totalToSpawn)
        {
            Transform point = FindFreeSpawnPoint();
            if (point == null) break; // No usable point right now. Try again next frame.
            SpawnEnemy(point);
        }

        if (spawnedCount >= totalToSpawn)
        {
            isSpawning = false;
        }
    }

    // Returns a spawn point that has no enemy on it and isn't too close to the player.
    private Transform FindFreeSpawnPoint()
    {
        for (int i = 0; i < spawnPoints.Length; i++)
        {
            // Start at a different point each time so enemies spread out.
            Transform point = spawnPoints[(spawnedCount + i) % spawnPoints.Length];
            if (point == null) continue;
            if (player != null && Vector3.Distance(point.position, player.position) < minDistanceFromPlayer) continue;
            if (IsOccupied(point)) continue;
            return point;
        }
        return null;
    }

    private bool IsOccupied(Transform point)
    {
        foreach (GameObject enemy in aliveEnemies)
        {
            if (enemy != null && Vector3.Distance(enemy.transform.position, point.position) < 0.5f)
            {
                return true;
            }
        }
        return false;
    }

    private void SpawnEnemy(Transform point)
    {
        GameObject enemy = Instantiate(enemyPrefab, point.position, point.rotation);
        aliveEnemies.Add(enemy);
        spawnedCount++;
    }

    // Draws the trigger box and spawn points in the Scene view so you can see them while editing.
    private void OnDrawGizmos()
    {
        BoxCollider box = GetComponent<BoxCollider>();
        if (box != null)
        {
            Gizmos.color = new Color(1f, 0.6f, 0f);
            Gizmos.matrix = transform.localToWorldMatrix;
            Gizmos.DrawWireCube(box.center, box.size);
            Gizmos.matrix = Matrix4x4.identity;
        }

        if (spawnPoints == null) return;

        Gizmos.color = Color.red;
        foreach (Transform point in spawnPoints)
        {
            if (point == null) continue;
            Gizmos.DrawSphere(point.position, 0.3f);
            Gizmos.DrawLine(transform.position, point.position);
        }
    }
}
Save the file and switch back to Unity.
How it works:
- In
- **Settings:** `[SerializeField]` makes each private field editable in the Inspector. `[Min(1)]` stops the Inspector from accepting zero or negative counts.
- **`Reset`:** Unity calls this when the component is first added. It checks **Is Trigger** on the Box Collider for you, and `[RequireComponent]` makes sure the Box Collider exists.
- **`OnTriggerEnter`:** starts spawning when the player enters. It ignores everything that isn't tagged **Player**, ignores the player while a wave is already spawning, and fires only once when **Disable After Use** is checked. It also invokes `onTriggered`, so you can hook up extra actions in the Inspector without writing code. You’ll use it to hide the trigger’s visual box.
- **`Update`:** the core of the system. Each frame, it removes enemies the player has destroyed from the list. In Unity, a destroyed object compares equal to `null`. Then it spawns new enemies until either **Max Alive** enemies are alive or **Total To Spawn** have been spawned.
- **`FindFreeSpawnPoint`:** picks a spawn point that has no enemy on it and is at least **Min Distance From Player** away. Without this check, a new enemy could spawn on top of another enemy, or right inside the player, where it would be touched and removed instantly. If no point qualifies, spawning waits until one frees up.
- **`SpawnEnemy`:** creates an enemy at the chosen point and adds it to the list.
- **`OnDrawGizmos`:** draws the trigger box in orange and the spawn points as red spheres. Gizmos appear only in the Scene view, so they help you place things while editing. The `TriggerVisual` cube you add next shows the trigger in the game.

Because the spawner tracks its own enemies, the `Enemy` script doesn't need to know the spawner exists.
-
Create the trigger in the scene
- Go to GameObject > Create Empty and rename it
SpawnTrigger1. The number makes it easy to add more triggers later, likeSpawnTrigger2further along the path. - Click Add Component and choose
SpawnGroupTrigger. Unity adds a Box Collider with Is Trigger already checked. - Set the Box Collider's Center to (0, 1, 0) and its Size to (6, 2, 1). This makes a box 6 meters wide and 2 meters tall that sits on the floor.
- Set its Position to (0, 0, 5), 5 meters in front of the player.

Make the trigger visible
The trigger is invisible in the game, so add a see-through box that shows where it is.
- In
SpawnTutorial/Materials, create a material namedTriggerZone. In the Inspector, set Surface Type to Transparent, then set the Base Map color to orange using the hex valueFF8C00, and set its A (alpha) value to 80 so the box is see-through. - Right-click
SpawnTrigger1in the Hierarchy and choose 3D Object > Cube. This creates a new cube as a child ofSpawnTrigger1. Rename the cubeTriggerVisual. - Set its Position to (0, 1, 0) and its Scale to (6, 2, 1) to match the Box Collider.
- Remove the cube's Box Collider component: click the ⋮ menu on the component and choose Remove Component. Otherwise, the cube is solid, and the player bumps into it.
- Drag the
TriggerZonematerial ontoTriggerVisual, either in the Scene view or in the Hierarchy.

- Go to GameObject > Create Empty and rename it
-
Add spawn points
Spawn points are empty GameObjects that mark where enemies appear.
- Create three empty GameObjects named
SpawnPoint1,SpawnPoint2, andSpawnPoint3, and drag them ontoSpawnTrigger1in the Hierarchy to make them its children. This keeps the Hierarchy tidy. - Set their positions to (-2, 1, 4), (0, 1, 4), and (2, 1, 4). Because they're children of the trigger, these positions are relative to it, so this puts them in a row 4 meters past the trigger.
The Y position of each is 1 because the capsule is 2 meters tall and spawns centered on the point, so a height of 1 puts it on the floor.
This tutorial uses three spawn points because Max Alive is set to 3 in the next step. Each point holds one enemy at a time, so you need at least as many spawn points as Max Alive. With fewer points, fewer enemies can be alive at once.
- Create three empty GameObjects named
-
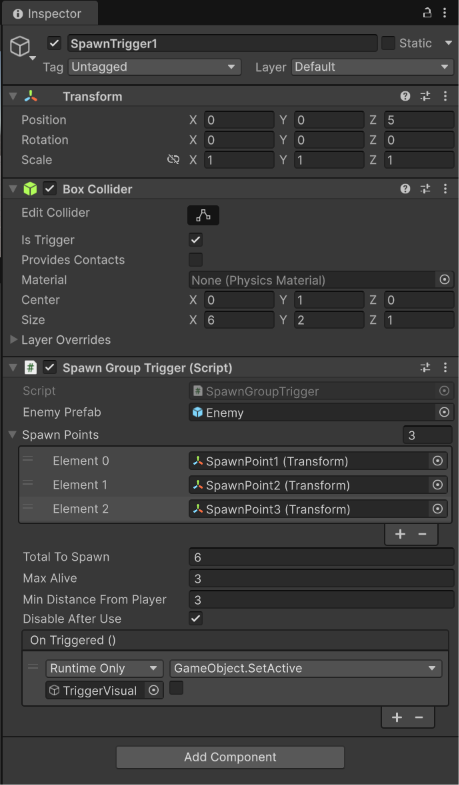
Connect the settings
Select
SpawnTrigger1and fill in theSpawnGroupTriggerfields in the Inspector:
- **Enemy Prefab:** drag in the `Enemy` prefab from `SpawnTutorial/Prefabs`.
- **Spawn Points:** click the arrow next to **Spawn Points** to expand it, set the size to **3**, and drag `SpawnPoint1`, `SpawnPoint2`, and `SpawnPoint3` into **Element 0**, **Element 1**, and **Element 2**.
- **Total To Spawn:** 6
- **Max Alive:** 3
- **Min Distance From Player:** 3
- **Disable After Use:** checked
- **On Triggered:** click **+**, drag `TriggerVisual` into the object field, and choose **GameObject > SetActive (bool)**. Leave the checkbox unchecked. This hides the box once the trigger fires.
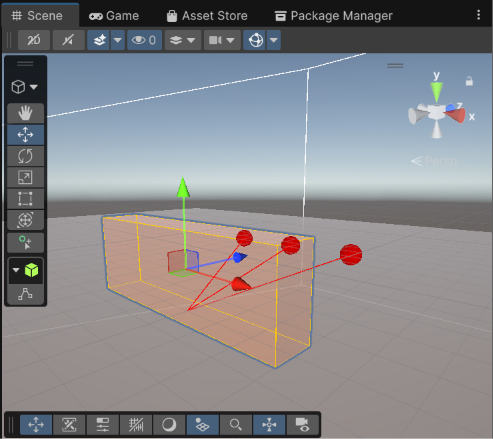
In the Scene view, you now see the orange trigger box, with lines to the three red spawn points.
-
Test it
Press Play and walk through the orange box. The box disappears, and up to three enemies appear. Touch an enemy to remove it. Another enemy spawns when a free spawn point is at least 3 meters away from you. This continues until six enemies have spawned in total. If spawning pauses, move away from the spawn points.

If nothing spawns, check the Console for a warning about a missing prefab or spawn points.
Save and troubleshoot
When you finish testing, stop Play mode and press Ctrl + S to save the scene.
If the trigger or enemies don't behave as expected, check the following:
- Check the Console. Resolve any script errors. A warning appears if the enemy prefab is missing or the spawn-point list is empty.
-
Check the player tag. Select
PlayerArmatureand confirm its Tag is set to Player. -
Check the colliders. Confirm that Is Trigger is checked on the
Enemyprefab's Capsule Collider and onSpawnTrigger1's Box Collider. -
Check the spawn points. On
SpawnTrigger1, expand Spawn Points and confirm that all three entries have a spawn point assigned. - Move away from the spawn points. An enemy won't spawn at a point that is occupied or too close to the player. Spawning resumes when a suitable point becomes available.
-
Check the trigger visual. If the orange box doesn't disappear, confirm that On Triggered targets
TriggerVisual, calls GameObject > SetActive (bool), and has the checkbox unchecked.
Next steps
You now have a working spawn trigger that controls how many enemies spawn, how many are alive at once, and where they appear. Here are some ways to build on it:
-
Make enemies chase the player. Bake a NavMesh for the floor and add a NavMesh Agent to the
Enemyprefab, then set its destination to the player's position each frame. -
Chain triggers together. Place a second
SpawnGroupTriggerfurther along the path. Its spawn points and settings are independent, so each area of a level can have its own wave. -
Open a door when a wave is cleared. Add an
onWaveClearedUnityEvent that fires when every enemy has spawned and been defeated. Then connect it to a door in the Inspector, the same way you connectedTriggerVisualtoonTriggered. - Track kills across triggers. Let each trigger add to, or reset, a required kill count, so the level only progresses once the player has defeated enough enemies.
- Scale for multiplayer. Increase Total To Spawn and Max Alive based on the number of players, so a group faces a bigger wave than a single player.
- Reuse enemies instead of destroying them. For larger waves, an object pool avoids the cost of creating and destroying objects during play.
You can download the complete project on GitHub.


Top comments (0)