Originally posted on my blog.

Or: Taking a Picture Every 30 Seconds and Sending It To A Server.
I was planning to make pulled pork the next day. That evening I set up the Weber kettle, got out the bag of charcoal and some chunks of apple wood, and laid everything out. Mise en place, as they say. I’d be waking up at 7am the next morning to light it up, and I didn’t trust my sleepy self to remember everything.
One of the things I set out was the probe thermometer and 2 probes: one to measure the air temperature, and one to measure the internal temperature of the meat. Smoking is a low and slow method of cooking: you want to get the air temperature up to 225˚F and hold it there for hours as the meat slowly cooks and infuses with smoke. Smoking a pork shoulder (a.k.a. pulled-pork-to-be) can take 8 - 12 hours. Hence why I’m waking up at 7am.
So where does React Native play into all this?
Well, holding a temperature with a Weber kettle is a bit of a trick. And a manual one at that. There are 2 air vents you can tweak – one on top, one on the bottom. Open them up to increase the temperature, close them down to lower it. The fire takes a while to respond, though. It’s a fire, not a digital dial. So you, as the pit master, get to be a human PID controller for the day.
What I mean is: you have to keep watching the temperature, adjusting the vents, and re-checking. If you’re good at it, you don’t have to tweak it much, but I’m a newb, so I’m out there a lot.
I wanted to be able to know, without running out to the smoker every 15 minutes, whether the temperature was at 225˚F or close enough.
This is where React Native comes in.
At 9pm, after I’d laid out all the materials, I had the idea: I’ll make an app to take a picture of the thermometer every 30 seconds, and upload it to a server – and then I can just refresh a page instead of running down to the smoker!
And before you tell me – yes, I know there are remote thermometers for sale that do exactly this. And yes, I also know I could’ve just sat outside with a beer all day watching the thing, and that would’ve been fun too. But really I just wanted an excuse to play with React Native :)
Grand Plans: The System Layout
Like any good project, I started off thinking about how I wanted it to work.
I would need:
- A phone with a camera (old iPhone 4S).
- An app running on the phone to take pictures all day.
- A server to receive the pictures, running on my laptop.
- The same server to serve up the latest picture.
I decided I wanted to keep this as minimal as possible (mostly because it was 9pm and I still needed to wake up at 7). There would be little to no security. There would be no websockets notifying a React app to download the latest image. This server would simply accept images, and send back the latest upon request.
React Native
You’ve probably heard of React Native - a framework for building native mobile apps using React and JS. If you can write React apps, you can figure out React Native pretty quickly. The core concepts are the same, just props and state.
Since there’s no DOM behind React Native, though, there are some differences. Mainly, the HTML elements you know and love (div, span, img, etc.) are replaced by React Native components (div == View, span == Text, img == Image).
Also, “real” CSS isn’t supported, but RN does support styling through inline styles. Flexbox layout and most normal styles like color and backgroundColor and the like will work. I noticed that some shorthand properties don’t work either: something like border: 1px solid red would instead be described explicitly, like { borderWidth: 1, borderColor: 'red' }.
Expo
Expo is a tool, and a platform, for building apps with React Native.
One nice thing about using Expo is that it lets you deploy apps to your phone without signing up for an Apple Developer subscription (for us iPhone people anyway). I’ve read that you actually can get an app onto your phone without the Apple Developer subscription, but it requires messing with Xcode and that wasn’t something I wanted to tackle this evening.
The other big bonus with Expo is that it comes with the Expo SDK which gives you a bunch of native APIs out of the box – like the accelerometer, compass, location, maps, and the most important one for this project: the camera.
Install Expo on Computer and Phone
I used the Expo command line but they also provide an IDE. If you want to follow along, install the Expo commandline tool with NPM or Yarn:
npm install -g exp
(Yes, it’s exp, not expo).
Then you need to install the Expo app on your phone, and you can find that in the App Store / Play Store.
Create the Project
With the command line tool installed, run this command to create a new project:
exp init grillview
It’ll prompt for a template: choose the “blank” one.
Then follow the provided instructions to start it up:
$ cd grillview
$ exp start
At some point it will ask you to create an account with Expo. This is needed in order to deploy the app from your computer to Expo’s servers. Then the Expo app on your phone can load your app.
Follow the instructions to send the URL to your device, or just type it in. Expo also lets you run this in a simulator, but I thought it’d be more fun with the real phone so that’s what I did.
Once you’ve got it open on your phone, the developer experience is pretty nice. Change code, save, and the app will live reload (auto-refresh) automatically – just like developing locally with Create React App. There’s a small delay as it downloads the JS bundle each time. You can also enable hot reloading (no refresh) from Expo’s developer menu, which you can bring up if you shake your phone. Gently. Don’t throw it through a window or whatever.
File Structure
Expo sets us up with an App.js file in the root of the project, which exports the App component. Here’s the entirety of the generated app:
import React from 'react';
import { StyleSheet, Text, View } from 'react-native';

export default class App extends React.Component {
  render() {
    return (
      <View style={styles.container}>
        <Text>Open up App.js to start working on your app!</Text>
      </View>
    );
  }
}

const styles = StyleSheet.create({
  container: {
    flex: 1,
    backgroundColor: '#fff',
    alignItems: 'center',
    justifyContent: 'center',
  },
});
You’ll notice there’s a Text component inside the View. Try leaving the “Open up App.js…” text alone, but removing the wrapping Text component and see what happens.
If you peek inside package.json you’ll see this line:
"main": "node_modules/expo/AppEntry.js"
This is what kicks off our app, and it expects to find an App.js file that exports the root component.
If you wanted to reorganize the project structure, the first step would be to copy AppEntry.js into your project and modify it accordingly, but we’re gonna stick with defaults on this one.
Using the Camera
Permission Granted
To take pictures, Expo provides a Camera component. But before we can use it, we need to ask for permission.
Open up App.js, add a new import for the camera and permissions objects, and change the component to look like this:
import React from 'react';
import { StyleSheet, Text, View } from 'react-native';

// add this:
import { Camera, Permissions } from 'expo';

export default class App extends React.Component {
  // initialize state
  state = {
    cameraPermission: null
  };

  render() {
    const { cameraPermission } = this.state;

    // Render one of 3 things depending on permissions
    return (
      <View style={styles.container}>
        {cameraPermission === null ? (
          <Text>Waiting for permission...</Text>
        ) : cameraPermission === false ? (
          <Text>Permission denied</Text>
        ) : (
          <Text>yay camera</Text>
        )}
      </View>
    );
  }
}
Now the app should render “Waiting for permission…” and just be stuck there, since we’re not doing anything yet.
We’ll ask for permission in the componentDidMount lifecycle hook. Add that in:
export default class App extends React.Component {
  ...

  componentDidMount() {
    Permissions.askAsync(Permissions.CAMERA)
      .then(({ status }) =>
        this.setState({
          cameraPermission: status === 'granted'
        })
      );
  }

  render() {
    ...
  }
}
When you save, and the app refreshes, you’ll see a dialog asking for camera permission. And once you allow it, the text should change.
If this is your first time using Expo, it will probably ask for permissions for Expo itself before asking about your app.

Live Camera View
Now let’s replace the “yay camera” text with a component that will render the camera. Add a new component to App.js named Autoshoot. For now, it will just render the Camera, and we can make sure everything is working.
class Autoshoot extends React.Component {
  render() {
    return (
      <View style={{ flex: 1, width: '100%' }}>
        <Camera
          style={{ flex: 1 }}
          type={Camera.Constants.Type.back}
          ref={cam => this.camera = cam}>
        </Camera>
      </View>
    );
  }
}
We’re putting the Camera inside a View, giving both flex: 1 so they take up the entire height, and the width: '100%' so the View takes the entire screen (without the width set, you’ll see a blank screen: try it!).
We’re using the “better” camera (on iPhone anyway – the back one, as opposed to the front selfie one).
And we’re saving a ref to this camera component, because that’s how we’ll trigger the shutter in the next section.
Now that this component exists, go back to the render method of App and replace the “yay camera” element with this Autoshoot component:
render() {
  const { cameraPermission } = this.state;

  // Render one of 3 things depending on permissions
  return (
    <View style={styles.container}>
      {cameraPermission === null ? (
        <Text>Waiting for permission...</Text>
      ) : cameraPermission === false ? (
        <Text>Permission denied</Text>
      ) : (
        <Autoshoot/>
      )}
    </View>
  );
}
Finally: Taking a Picture
To trigger the shutter, we’ll put a “button” of sorts inside the Camera component. Unfortunately Camera doesn’t support the onPress prop (the one that gets triggered when you tap it), so we’ll import TouchableOpacity and render one of those inside.
At the top, import it:
import { StyleSheet, Text, View, TouchableOpacity } from 'react-native';
And in Autoshoot’s render, insert the component as a child of Camera:
render() {
  const { photo } = this.state;

  return (
    <Camera
      style={{ flex: 1 }}
      type={Camera.Constants.Type.back}
      ref={cam => this.camera = cam}>
      <TouchableOpacity
        style={{ flex: 1 }}
        onPress={this.takePicture}/>
    </Camera>
  );
}
Then we need a takePicture method, which we can insert above render:
takePicture = () => {
  this.camera.takePictureAsync({
    quality: 0.1,
    base64: true,
    exif: false
  }).then(photo => {
    this.setState({ photo });
  })
}
At this point, the app will behave the same: when you tap the screen, the app will still display the camera (and hopefully no errors).
Next, we need to initialize the state of photo at the top:
class Autoshoot extends React.Component {
  state = {
    photo: null
  }

  ...
}
Then inside render, we’ll either render the photo (if there is one) or the camera:
render() {
  const { photo } = this.state;

  return (
    <View style={{ flex: 1, width: '100%' }}>
     {photo ? (
       <ImageBackground
         style={{ flex: 1 }}
         source={{ uri: photo.uri }} />
     ) : (
       <Camera
         style={{ flex: 1 }}
         onPress={this.takePicture}
         type={Camera.Constants.Type.back}
         ref={cam => this.camera = cam}>
         <TouchableOpacity
           style={{ flex: 1 }}
           onPress={this.takePicture}/>
       </Camera>
     )}
    </View>
  );
}
We’re using the ImageBackground component for the first time here too, so make sure to import that at the top from ‘react-native’:
import { StyleSheet, Text, View, TouchableOpacity, ImageBackground } from 'react-native';
There we go! Now you can tap the screen to take a picture, and it will stay up on the screen.
Here’s a quick exercise for you:
Make it so that when you tap the captured photo, the app goes back to displaying the Camera. Hint: ImageBackground doesn’t support onPress, so you’ll need to use the same trick we used with the TouchableOpacity.
Taking Photos On a Timer
We’ve got the code in place to take a picture manually – now let’s automate it.
We can do this by essentially calling takePicture on an interval. But there’s a small problem: the camera needs a bit of time to focus before it takes the shot. So what we really need is something like this:
- Activate camera (screen shows live camera)
- Let it focus for 3 seconds
- Take a picture (screen shows still image)
- Wait 27 seconds
- GOTO 1
And once we get that working, we’ll insert a step “3a”: send the picture to the server. (which doesn’t exist yet, but we’ll get to that in a bit)
When Autoshoot initially renders, we’ll start a 30-second timer. Let’s create a constant for the timer, and the amount of time to focus, because we’ll need it in a few places.
const PHOTO_INTERVAL = 30000;
const FOCUS_TIME = 3000;

class Autoshoot extends React.Component {
  componentDidMount() {
    this.countdown = setTimeout(
      this.takePicture,
      PHOTO_INTERVAL
    );
  }

  componentWillUnmount() {
    clearInterval(this.countdown);
  }

  ...
}
And for testing purposes, just change the timeout to 2 seconds so we’re not waiting around all day.
When the app reloads (which you can trigger manually by shaking your device, and choosing “Reload JS Bundle”), a photo will be taken automatically. Awesome.
Start Another Timer
Now that we’re taking a photo automatically, we just need a couple more timers to have it take photos all day long.
There are a few ways to write this: we could do it with two stacked timers (one for 27 seconds, which then triggers one for 3 seconds), or we could do it with 2 simultaneous timers, or we could do it with setState callbacks.
The latter option is probably the most precise (and avoids potential race conditions), but we’ll go with the easy option: 2 simultaneous timers. With the triggers this far apart, a race condition/overlapping timers is pretty unlikely.
To make it work, replace takePicture with this implementation:
takePicture = () => {
  this.camera.takePictureAsync({
    quality: 0.1,
    base64: true,
    exif: false
  }).then(photo => {
    this.setState({ photo });

    // In 27 seconds, turn the camera back on
    setTimeout(() => {
      this.setState({ photo: null });
    }, PHOTO_INTERVAL - FOCUS_TIME);

    // In 30 seconds, take the next picture
    setTimeout(this.takePicture, PHOTO_INTERVAL);
  });
}
Now when the app refreshes, it will take pictures for infinity. (or until your battery runs out)
The Express Server
We have the React Native app taking pictures now. Let’s work on building a server to send them to.
We’re going to use Express to write a barebones server to handle two routes:
-
POST /: Upload a new photo -
GET /: View the latest photo
For this most simple of servers, we’re just gonna create a server.js file in the root of our grillview project. React Native and Express, side-by-side. (Is this a recommended way to create Real Projects™? Nah, but this whole thing is a bit of a hack, so.).
We’ll need a couple packages to make this work, so install those now:
yarn add express body-parser
Then we can start with a barebones Express server. Create the server.js file and paste this in:
const express = require('express');
const bodyParser = require('body-parser');

const app = express();

// If your phone has a modern camera (unlike my iPhone 4S)
// you might wanna make this bigger.
app.use(bodyParser.json({ limit: '10mb' }));

// TODO: handle requests

const port = process.env.PORT || 5005;
app.listen(port);

console.log(`Grill server listening on ${port}`);
This won’t handle requests yet, but it will run. We have bodyparser.json in place to handle the POST’ed images. Now let’s add the POST request handler in place of the TODO:
// Store the single image in memory.
let latestPhoto = null;

// Upload the latest photo for this session
app.post('/', (req, res) => {
  // Very light error handling
  if(!req.body) return res.sendStatus(400);

  console.log('got photo')

  // Update the image and respond happily
  latestPhoto = req.body.photo;
  res.sendStatus(200);
});
This just accepts the image from the client and saves it in a local variable, to be returned later.
Quick warning: this is doing nothing about security. We’re blindly saving something from the client and will parrot it back, which is a recipe for disaster in a deployed app. But since I’m only running it on my local network, I’m not too worried. For a real app, do some validation of the image before saving it.
Underneath that we’ll add the GET handler that will send back the latest image:
// View latest image
app.get('/', (req, res) => {
  // Does this session have an image yet?
  if(!latestPhoto) {
    return res.status(404).send("Nothing here yet");
  }

  console.log('sending photo');

  try {
    // Send the image
    var img = Buffer.from(latestPhoto, 'base64');
    res.writeHead(200, {
      'Content-Type': 'image/png',
      'Content-Length': img.length
    });
    res.end(img);
  } catch(e) {
    // Log the error and stay alive
    console.log(e);
    return res.sendStatus(500);
  }
});
We’re creating a buffer to convert the base64 image to binary, and then sending it to the client.
And just to reiterate: this is not a secure setup. We’re assuming that the client sent us a good base64 image, but Rule 1 is “Don’t trust the client” – we should be validating the image before storing it.
That’s all we need for the server! Start it up:
node server.js
Then visit http://localhost:5005 – you should see the message “Nothing here yet”. Leave the server running in a separate command line terminal, and we’ll go work on sending images to the server.
Uploading the Pictures
Back in App.js and the Autoshoot component, we need to add a method for uploading the picture. In a larger app we might pull the API methods into a separate file and export them as individual functions – but since we only have the single call to make, we’ll put it in Autoshoot. Add this method:
uploadPicture = () => {
  return fetch(SERVER_URL, {
    body: JSON.stringify({
      image: this.state.photo.base64
    }),
    headers: {
      'content-type': 'application/json'
    },
    method: 'POST'
  })
  .then(response => response.json())
}
Here we’re using fetch (which is built into React Native) to POST the data to the server. Notice the SERVER_URL variable, which we haven’t created yet. Since this will only be working on our local network, we can hard-code that above Autoshoot:
const SERVER_URL = 'http://<your-ip>:5005/'
Replace <your-ip> with your own dev machine’s IP address. If you don’t know where to find that, Google is your friend :)
Now we’ll change takePicture to call uploadPicture, and as part of that change, we’ll pull out the timer code into a separate method because we want to call it from 2 places:
// Here's the timer code, lifted from takePicture:
queuePhoto = () => {
  // In 27 seconds, turn the camera back on
  setTimeout(() => {
    this.setState({ photo: null });
  }, PHOTO_INTERVAL - FOCUS_TIME);

  // In 30 seconds, take the next picture
  setTimeout(this.takePicture, PHOTO_INTERVAL);
}

// Take the picture, upload it, and
// then queue up the next one
takePicture = () => {
  this.camera.takePictureAsync({
    quality: 0.1,
    base64: true,
    exif: false
  }).then(photo => {
    this.setState({ photo }, () => {
      this.uploadPicture()
        .then(this.queuePhoto)
        .catch(this.queuePhoto);
    });
  });
}
Notice that I’m calling queuePhoto in both the .then and .catch handlers.
I wanted the app to keep on chugging away even if I restarted the server (which will cause failed requests), so I just made it ignore errors entirely.
During development it was helpful to add a console log in there to see why things were failing (syntax errors, etc), but I took it out once everything was working.
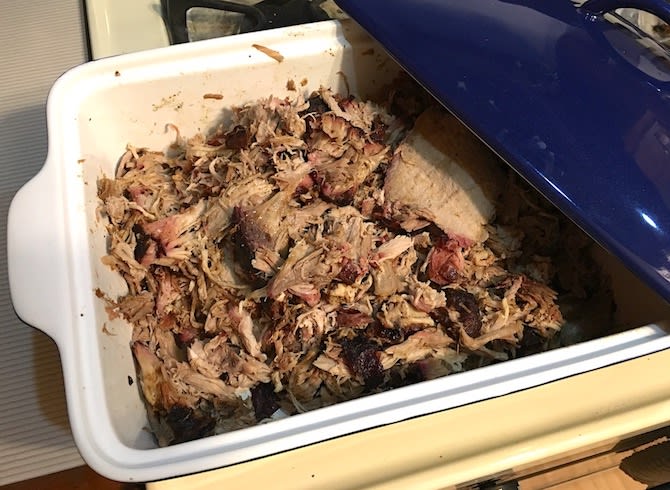
Time to cook some pulled pork!
With those last changes in place, the app is working!
I was excited to try it out. The next morning, I set up the thermometer and the phone. Started up the app, aaand… hmm, there’s no good place to put the phone.
I could’ve just put the phone and the thermometer on the ground. That’s what I should’ve done. What a reasonable person would do.
7am Dave did not do that. He grabbed an old board, cut 2 pieces of scrap wood, and fashioned it together into a little shelf leaned against the house.
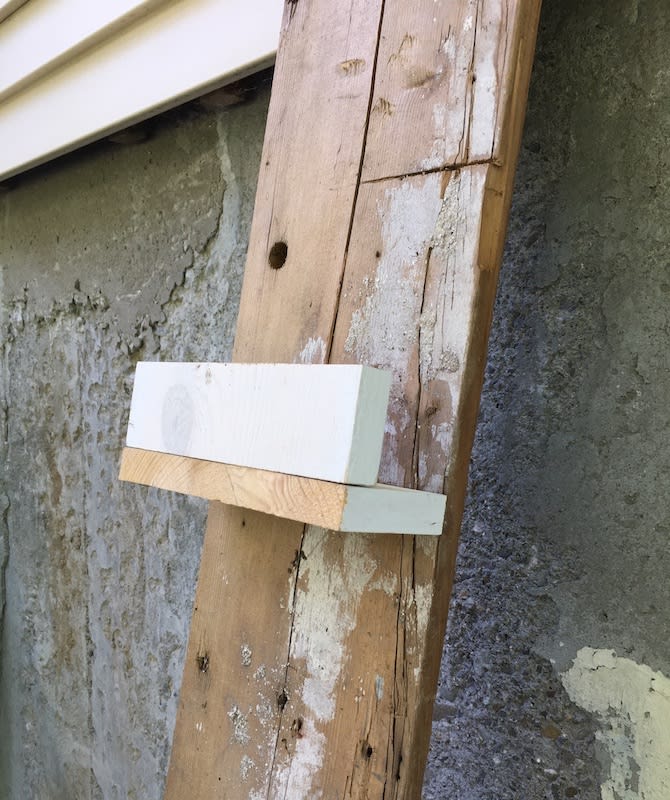
“Carpentry.” It has pocket screws. Why? I have no idea.
As for the app?
It performed admirably. Mostly. It only crashed a few times.
It turned out to be pretty useful, and saved me a bunch of running up and down the stairs to check the temperature. A+++ would build again.

And the pulled pork was delicious.
Takeaways
I think it’s important to work some fun into programming projects. Give yourself permission to build something that already exists, if only to learn how to build it yourself. It doesn’t have to be a big serious project, or a perfect portfolio piece.
And on that note, don’t be afraid to hack things together. It’s a fun project! Write some terrible code that you know is terrible. Don’t stress so much about perfect abstractions and Best Practices and feeling like you have to incorporate every new library and tool. It’ll be fine. You can always refactor it when you write the blog post ;)
Recipes, Tools, Code…
You can get the full code for this project on Github.
I followed Amazing Ribs’s Perfect Pulled Pork recipe.
I used a Weber 22” Grill with a Slow n’ Sear (evidently discontinued, but I see there’s a v2 which looks similar).
The thermometer is a ThermoWorks DOT.
(no affiliate links, just good products)
Thanks for reading!
I have more articles on React and Redux at my blog.

Top comments (0)